Index
STAR-CCM+
Simcenter STAR-CCM+ is a commercial software tool for CFD and more generally computational continuum mechanics (by CD-adapco or nowadays Siemens PLM). As a general purpose CFD code Simcenter StarCCM+ provides a wide variety of physical models for turbulent flows, acoustics, Eulerian and Lagrangian multiphase flow modeling, radiation, combustion and chemical reactions, heat and mass transfer including CHT (conjugate heat transfer in solid domains).
Please note that the clusters do not come with any license. If you want to use Simcenter STAR-CCM+ on the HPC clusters, you have to have access to suitable licenses. Several groups hold a joint license pool for non-commercial academic use which is coordinated through the software group of RRZE.
Availability / Target HPC systems
Different versions of all Simcenter STAR-CCM+ are available via the modules system, which can be listed by module avail star-ccm+. A special version can be loaded, e.g. by module load star-ccm+/2020.1.
We mostly install the current versions automatically, but if something is missing, please contact hpc-support@fau.de.
Production jobs should be run on the parallel HPC systems in batch mode.
Simcenter STAR-CCM+ can also be used in interactive GUI mode for serial pre- and/or post-processing on the login nodes (Linux: SSH Option „-X“; Windows: using PuTTY and XMing for X11-forwarding). This should only be used to make quick simulation setup changes. Please be aware that Simcenter STAR-CCM+ is loading the full mesh into the login node’s memory when you open a simulation file. You should do this only with comparable small cases. It is NOT permitted to run computationally intensive Simcenter STAR-CCM+ simulation runs or serial/parallel post-processing sessions with large memory consumption on login nodes.
Notes
- Once you load the
star-ccm+module, the environment variable$PODKEYwill hold your specific POD-key. Please only use the environment variable as the value will be updated centrally as needed. The POD-key from the HPC system will not work at your chair and vice versa. - Do not use SMT/Hyperthreads, since this will impact performance and slow down your simulation! Refer to the sample job scripts below on how to set it up correctly.
- We recommend writing automatic backup files (every 6 to 12 hours) for longer runs to be able to restart the simulation in case of a job or machine failure.
- Besides the default mixed precision solver, Siemens PLM is also providing installation packages for higher accuracy double precision simulations. The latter comes for the price of approx. 20% higher execution times and approx. twice as large simulation results files. These modules are only available on demand and are named
star-ccm+/XXX-r8. - Siemens PLM recently changed (with release 2020.x?) the default MPI used by STAR-CCM+ from HP/Platform MPI to Open MPI. Old job scripts may required changes to avoid errors due to incompatible MPI options. The sample scripts below have been updated accordingly.
Sample job scripts
All job scripts have to contain the following information:
- Resource definition for the queuing system (more details here)
- Load Simcenter STAR-CCM+ environment module
- Generate a file with names of hosts of the current simulation run to tell STAR-CCM+ on which nodes it should run (see example below)
- Start command for parallel execution of
starccm+with all appropriate command line parameters, including a controlling StarCCM+ java macro. Available parameters can be listed viastarccm+ -help.
#!/bin/bash -l #SBATCH --job-name=my-ccm #SBATCH --nodes=2 #SBATCH --time=01:00:00 #SBATCH --export=NONE# star-ccm+ arguments CCMARGS="-load simxyz.sim"
# specify the time you want to have to save results, etc. # (remove or comment the line if you don not want this feature) TIME4SAVE=1200
# number of cores to use per node (must be an even number!) PPN=20
# STAR-CCM+ version to use module add star-ccm+/2022.1
##################################################### ### normally, no changes should be required below ### #####################################################
unset SLURM_EXPORT_ENV
echo echo "Job starts at $(date) - $(date +%s)" echo
# count the number of nodes NUMNODES=$SLURM_NNODES # calculate the number of cores actually used NUMCORES=$(( $NUMNODES * ${PPN} ))
# change to working directory (should not be necessary for SLURM) cd $SLURM_SUBMIT_DIR
if [ ! -z $TIME4SAVE ]; then # automatically detect how much time this batch job requested and adjust the # sleep accordingly TIMELEFT=$(squeue -j $SLURM_JOBID -o %L -h) HHMMSS=${TIMELEFT#*-} [ $HHMMSS != $TIMELEFT ] && DAYS=${TIMELEFT%-*} IFS=: read -r HH MM SS <<< $TIMELEFT [ -z $SS ] && { SS=$MM; MM=$HH; HH=0 ; } [ -z $SS ] && { SS=$MM; MM=0; } SLEEP=$(( ( ( ${DAYS:-0} * 24 + 10#${HH} ) * 60 + 10#${MM} ) * 60 + 10#$SS - $TIME4SAVE )) echo "Available runtime: ${DAYS:-0}-${HH:-0}:${MM:-0}:${SS}, sleeping for up to $SLEEP, thus reserving $TIME4SAVE for clean stopping/saving results" ( sleep $SLEEP && touch ABORT ) >& /dev/null & SLEEP_ID=$! fi
echo echo "============================================================" echo "Running STAR-CCM+ with $NUMCORES MPI processes in total" echo " with $PPN cores per node" echo " on $SLURM_NNODES different hosts" echo "============================================================"
echo
# start STAR-CCM+
starccm+ -batch -cpubind v -np ${NUMCORES} --batchsystem slurm -power -podkey $PODKEY ${CCMARGS} # final clean up if [ ! -z $TIME4SAVE ]; then pkill -P ${SLEEP_ID} fi
echo "Job finished at $(date) - $(date +%s)"
Mentors
- please volunteer!
- for issue with the license server or POD key contact hpc-support@fau.de (T. Zeiser)
- for contract questions regarding the joint license pool contact ZISC (H. Lanig)
LAMMPS
LAMMPS is a classical molecular dynamics code with a focus on materials modeling. LAMMPS has potentials for solid-state materials (metals, semiconductors) and soft matter (biomolecules, polymers) and coarse-grained or mesoscopic systems. It can be used to model atoms or, more generically, as a parallel particle simulator at the atomic, meso, or continuum scale.
Availability / Target HPC systems
- Woody, Meggie, Fritz
- TinyGPU, Alex
Most of these installations were made using through SPACK – check https://github.com/spack/spack/blob/develop/var/spack/repos/builtin/packages/lammps/package.py for possible versions and build options if you’d like to request a different compilation
Allocate an interactive job and run mpirun -np 1 lmp -help to see which Lammps packages have been included in a specific build.
On fritz, in addition to the installations from SPACK (normally based on GNU compilers), there is a LAMMPS installation built with the Intel compilers. For this installation the following plugins were included: AMOEBA ASPHERE ATC AWPMD BOCS BODY BPM BROWNIAN CG-DNA CG-SPICA CLASS2 COLLOID COLVARS COMPRESS CORESHELL DIELECTRIC DIFFRACTION DIPOLE DPD-BASIC DPD-MESO DPD-REACT DPD-SMOOTH DRUDE EFF ELECTRODE EXTRA-COMPUTE EXTRA-DUMP EXTRA-FIX EXTRA-MOLECULE EXTRA-PAIR FEP GRANULAR INTEL INTERLAYER KIM KSPACE LATBOLTZ MACHDYN MANIFOLD MANYBODY MC MDI MEAM MESONT MGPT MISC ML-HDNNP ML-IAP ML-PACE ML-POD ML-RANN ML-SNAP MOFFF MOLECULE MOLFILE MPIIO OPENMP OPT ORIENT PERI PHONON PLUGIN POEMS PTM QEQ QMMM QTB REACTION REAXFF REPLICA RIGID SHOCK SMTBQ SPH SPIN SRD TALLY UEF VORONOI YAFF
Notes
We regularly observe that LAMMPS jobs have severe load balancing issues; this can be cause by inhomogenous distribution of particles in a system or can happen in systems that have lots of empty space. It is possible to handle these problems with Lammps commands like processors, balance or fix balance. Please follow the links to the Lammps documentation.
Sample job scripts
#!/bin/bash -l
#SBATCH --time=10:00:00
#SBATCH --partition=a40
#SBATCH --gres=gpu:a40:1
#SBATCH --job-name=my-lammps
#SBATCH --export=NONE

unset SLURM_EXPORT_ENV

module load lammps/20201029-gcc10.3.0-openmpi-mkl-cuda

cd $SLURM_SUBMIT_DIR

srun --ntasks=16 --cpu-bind=core --mpi=pmi2 lmp -in input.in
#!/bin/bash -l

#SBATCH --partition=singlenode
#SBATCH --nodes=1
#SBATCH --ntasks-per-node=72
#SBATCH --time=00:05:00
#SBATCH --export=NONE

unset SLURM_EXPORT_ENV

# load required modules
module load lammps/20221222-intel-impi-mkl

# run lammps
srun lmp -in input.lmp
#!/bin/bash -l

#SBATCH --partition=multinode
#SBATCH --nodes=2
#SBATCH --ntasks-per-node=72
#SBATCH --time=00:05:00
#SBATCH --export=NONE

unset SLURM_EXPORT_ENV

# load required modules
module load lammps/20221222-intel-impi-mkl

# run lammps
srun lmp -in input.lmp
#!/bin/bash -l

#SBATCH --partition=singlenode
#SBATCH --nodes=1
#SBATCH --ntasks-per-node=4
#SBATCH --cpus-per-task=18
#SBATCH --time=00:05:00
#SBATCH --export=NONE

unset SLURM_EXPORT_ENV

# load required modules
module load lammps/20221222-intel-impi-mkl

# specify the number of OpenMP threads
export OMP_NUM_THREADS=$SLURM_CPUS_PER_TASK
export SRUN_CPUS_PER_TASK=$SLURM_CPUS_PER_TASK

# run lammps
srun lmp -sf omp -in input.lmp
#!/bin/bash -l

#SBATCH --partition=multinode
#SBATCH --nodes=2
#SBATCH --ntasks-per-node=4
#SBATCH --cpus-per-task=18
#SBATCH --time=00:05:00
#SBATCH --export=NONE

unset SLURM_EXPORT_ENV

# load required modules
module load lammps/20221222-intel-impi-mkl

# specify the number of OpenMP threads
export OMP_NUM_THREADS=$SLURM_CPUS_PER_TASK
export SRUN_CPUS_PER_TASK=$SLURM_CPUS_PER_TASK


# run lammps
srun lmp -sf omp -in input.lmp
Further information
Mentors
- Dr. A. Ghasemi, NHR@FAU, hpc-support@fau.de
- AG Zahn (Computer Chemistry Center)
TURBOMOLE
TURBOMOLE is a commercial program package for ab initio electronic structure calculations. Unlike many other programs, the main focus in the development of TURBOMOLE has not been to implement all new methods and functionals, but to provide a fast and stable code which is able to treat molecules of industrial relevance at reasonable time and memory requirements.
NHR@FAU holds a binary site-license license for non-commercial academic use for Turbomole 7.6 (and three update releases).
Availability / Target HPC systems
- throughput cluster Woody: module
turbomoleandturbomole-parallel
- parallel computer Meggie & Fritz:
turbomole/7.6(serial version) andturbomole/7.6-mpi(parallel version)
New versions of TURBOMOLE are installed by NHR@FAU upon request.
Notes
TURBOMOLE with its fine grain IO can easily kill $FASTTMP. NHR@FAU will kill / throttle any jobs which abuse the (parallel) file system.
Sample job scripts
not available yet; please volunteer!
Further information
- https://www.turbomole.org/
- https://www.turbomole.org/turbomole/turbomole-documentation/
- http://www.cosmologic.de/turbomole/support-download/documentation-how-to.html
Mentors
- please volunteer!
GROMACS
GROMACS (GROningen MAchine for Chemical Simulations) is a molecular dynamics package primarily designed for simulations of proteins, lipids and nucleic acids.
Availability / Target HPC systems
- TinyGPU: best value if only one GPU is used per run – use the latest versions of GROMACS as they allow more and more offloading to the GPU
- parallel computers: experiment to find proper setting for
-npme
New versions of GROMACS are installed by RRZE upon request.
Notes
GROMACS can produce large amounts of data in small increments:
- Try to reduce the frequency and amount of data as much as possible, e.g. remove the
-vflag for verbose output from the program call. - It also may be useful to stage the generated output in the node’s RAMdisk (i.e. in the directory
/dev/shm/) first and only copy it back to e.g.$WORKonce just before quitting the job. - The high output frequency of small amounts of data is NOT suitable for
$FASTTMP. - For serial and single-node simulations you have to use
gmx mdrun;
for multi-node simulations, the binary to use withsrunisgmx_mpi mdrun. See the sample scripts below!
Sample job scripts
#!/bin/bash -l
#
# allocate 4 nodes with 20 cores per node = 4*20 = 80 MPI tasks
#SBATCH --nodes=4
#SBATCH --tasks-per-node=20
#
# allocate nodes for 6 hours
#SBATCH --time=06:00:00
# job name
#SBATCH --job-name=my-gmx
# do not export environment variables
#SBATCH --export=NONE
#
# first non-empty non-comment line ends SBATCH options

# do not export environment variables
unset SLURM_EXPORT_ENV
# jobs always start in submit directory

module load gromacs/2021.5-gcc11.2.0-mkl

### 1) The argument of -maxh should match the requested walltime!
### 2) Performance often can be optimized if -npme # with a proper number of pme tasks is specified;
###    experiment of use tune_mpe to find the optimal value.
###    Using the SMT threads can sometimes be beneficial, however, requires testing.
### 3) Number of openMP threads also has to be tested beforehand and is limited by the number of pme tasks.
srun gmx_mpi mdrun [-npme #] [-ntomp #] -maxh 6 -dlb yes -s my.tpr
#!/bin/bash -l
#SBATCH --job-name=my-gmx
#SBATCH --nodes=3
#SBATCH --ntasks-per-node=72
#SBATCH --partition=multinode
#SBATCH --cpus-per-task=1
#SBATCH --time=10:00:00
#SBATCH --export=NONE

unset SLURM_EXPORT_ENV

module load gromacs/2021.5-gcc11.2.0-impi-mkl

srun gmx_mpi mdrun [-npme #] -maxh 9.5 [-ntomp #] -dlb yes -s my.tpr
#!/bin/bash -l
# allocate nodes for 6 hours
#SBATCH --time=06:00:00
# job name
#SBATCH --job-name=Testjob
#SBATCH --gres=gpu:1
# do not export environment variables
#SBATCH --export=NONE

# do not export environment variables
unset SLURM_EXPORT_ENV

module load gromacs/2021.1-gcc-mkl-cuda11.2

### 1) the argument of -maxh should match the requested walltime!
### 2) optional arguments are: -pme gpu
###                            -bonded gpu
###                            -update gpu
gmx mdrun -maxh 6 -s my.tpr -nb gpu -pin on -pinstride 1 -ntmpi 1 -ntomp 8

### try automatic restart (adapt the conditions to fit your needs)
if [ -f confout.gro ]; then
   echo "*** confout.gro found; no re-submit required"
   exit
if [ $SECONDS -lt 1800 ]; then
   echo "*** no automatic restart as runtime of the present job was too short"
   exit
fi

sbatch job_script
#!/bin/bash -l
#SBATCH --job-name=my-gmx
#SBATCH --time=24:00:00
#SBATCH --gres=gpu:a40:1

# for a clean environment in job scripts
#SBATCH --export=NONE
unset SLURM_EXPORT_ENV

cd $SLURM_SUBMIT_DIR

# adjust module according to your needs
module load gromacs/2021.5-gcc11.2.0-mkl-cuda

TPR=name-of-run-input-file

#First, copy the data from your submit directory to the local SSD of the node (${TMPDIR}) and check how long that takes
RSYNCSTART=`date +%s`

#call rsync twice just to make sure that everything is copied
rsync -avzh --progress ${SLURM_SUBMIT_DIR}/* ${TMPDIR}/
rsync -avzh --progress ${SLURM_SUBMIT_DIR}/* ${TMPDIR}/

RSYNCEND=`date +%s`
RSYNCTIME=$(($RSYNCEND - $RSYNCSTART))
echo "It took ${RSYNCTIME} seconds to copy stuff from submit directory to ${TMPDIR}."

cd $TMPDIR

gmx mdrun -s -ntmpi 1 -ntomp 16 -pme gpu -bonded gpu -update gpu -pin on -pinstride 1 -deffnm $TPR -cpi $SLURM_SUBMIT_DIR/$TPR

#Copy the simulated data from the local SSD back to the submit directory
RSYNCSTART=`date +%s`

#call rsync twice just to make sure that everything is copied
rsync -avzh --progress ${TMPDIR}/* ${SLURM_SUBMIT_DIR}/
rsync -avzh --progress ${TMPDIR}/* ${SLURM_SUBMIT_DIR}/

RSYNCEND=`date +%s`
RSYNCTIME=$(($RSYNCEND - $RSYNCSTART))
echo "It took ${RSYNCTIME} seconds to copy stuff from ${TMPDIR} to the submit directory."

cd $SLURM_SUBMIT_DIR
The performance benefit of using multiple GPUs is often very low! You get much better throughout if you run multiple independent jobs on a single GPUs as shown above.
Even if using multiple GPUs do not use the MPI-parallel version (mdrun_mpi) but the thread-mpi version (gmx mdrun) of Gromacs. -ntmpi # usually should match the number of GPUs available.
#!/bin/bash -l
# allocated one GPU
#SBATCH --gres=gpu:gtx3080:2
# allocate nodes for 6 hours
#SBATCH --time=06:00:00
# job name #SBATCH --job-name=Testjob
# do not export environment variables
#SBATCH --export=NONE

# do not export environment variables
unset SLURM_EXPORT_ENV

module load gromacs/2021.1-gcc-mkl-cuda11.2

### 1) The argument of -maxh should match the requested walltime!
### 2) Typical optional arguments are: -pme gpu
###                                    -bonded gpu

# these variables are needed for halo exchange and
# optimized communication between the GPUs
export GMX_GPU_DD_COMMS=true
export GMX_GPU_PME_PP_COMMS=true
export GMX_GPU_FORCE_UPDATE_DEFAULT_GPU=true
gmx mdrun -ntmpi 4 -ntomp 2 -maxh 6 -s my.tpr -npme 1 -pin on -pinstride 1

### try automatic restart (adapt the conditions to fit your needs)
if [ -f confout.gro ]; then
   echo "*** confout.gro found; no re-submit required"
   exit
if [ $SECONDS -lt 1800 ]; then
   echo "*** no automatic restart as runtime of the present job was too short"
   exit
fi

sbatch job_script
This is an example script for running a meta-dynamic simulation with 32 walkers with Gromacs patched with Plumed on eight of our RTX3080 GPUs. Transfer to other GPU hardware is possible, but may require adjustment of settings (e.g. MPS-server [y/n], flags for mpirun and Gromacs program flags).
Please note: The run-input-file (*.tpr) for each walker needs to be in its own directory and it must be given the same name inside that directory.
#!/bin/bash -l
# allocated one GPU
#SBATCH --gres=gpu:gtx3080:8
# allocate nodes for 6 hours
#SBATCH --time=06:00:00
# job name
#SBATCH --job-name=Testjob
# do not export environment variables
#SBATCH --export=NONE

# do not export environment variables
unset SLURM_EXPORT_ENV

module load gromacs/2021.1-gcc-mkl-cuda11.2

TPR=name

# not necessary, but makes sure the directories are in correct order
directories=`echo dir{0..9} dir{1..2}{0..9} dir3{0..1}`

# these variables are needed to start the MPS-server
# Select a location that’s accessible to the given $UID
export CUDA_MPS_PIPE_DIRECTORY=/tmp/nvidia-mps.$SLURM_JOB_ID
export CUDA_MPS_LOG_DIRECTORY=/tmp/nvidia-log.$SLURM_JOB_ID
# Start the daemon.
nvidia-cuda-mps-control -d

# these variables need to be placed directly before the Gromacs invocation
# these variables are needed for halo exchange and
# optimized communication between the GPUs
export GMX_GPU_DD_COMMS=true
export GMX_GPU_PME_PP_COMMS=true
export GMX_GPU_FORCE_UPDATE_DEFAULT_GPU=true

# --oversubscribe is necessary, otherwise mpirun aborts
# -s is needed, otherwise gromacs complains
# -pme -nb -update -bonded make sure everything is offloaded to the GPU
# -pin -pinstride order the threads on the CPU, otherwise there's
#  wild chaos on the CPU
# -plumed ../plumed_in.dat needs to point to where the file is relative
#  to the directory the .tpr is in

mpirun -np 32 --oversubscribe gmx_mpi mdrun -s $TPR -pme gpu -nb gpu -update gpu -bonded gpu -pin on -pinstride 1 -plumed ../plumed_in.dat -multidir ${directories} -cpi $TPR -maxh 6

# this will stop the MPS-server
echo quit | nvidia-cuda-mps-control
Further information
- https://manual.gromacs.org/documentation/current/
- https://doi.org/10.1002/jcc.26011 – More bang for your buck: Improved use of GPU nodes for GROMACS 2018
- our own evaluation – Multi-GPU Gromacs Jobs on TinyGPU – Gromacs Shootout: Intel Xeon Ice Lake vs. NVIDIA A100, A40, and others – Gromacs performance on different GPU types
Mentors
- Dr. A. Kahler, RRZE, hpc-support@fau.de
- AG Böckmann (Professur für Computational Biology, NatFak)
Amber/AmberTools
Amber and AmberTools are suite of biomolecular simulation programs. Here, the term “Amber” does not refer to the set of molecular mechanical force fields for the simulation of biomolecules but to the package of molecular simulation programs consisting of the AmberTools (sander and many more) and Amber (pmemd).
AmberTools are open-source while Amber (pmemd) requires a license. NHR@FAU holds a “compute center license” of Amber, thus, Amber is generally available to everyone for non-profit use, i.e. for academic research.
Availability / Target HPC systems
- TinyGPU and Alex: typically use pmemd.cuda which uses a single GPU.
Thermodynamic integration (TI) may require special tuning; contact us! - Woody (throughput cluster) and parallel computers: use pmemd.MPI whenever possible and only choose sander.MPI if the former does not support your input.
New versions of Amber/AmberTools are installed by RRZE upon request.
Notes
Modules for CPU and GPU are called amber; the numbers in the module name specify the Amber version, Amber patch level, the AmberTools version, and the AmberTools patch level. The numbers are complemented by the used compilers/tools, e.g. amber/22p00-at22p03-gnu-cuda11.5 or amber/20p12-at21p11-impi-intel. GPU module names contain the string cuda, parallel CPU module names mpi.
cpptraj is also available in parallel CPU versions (cpptraj.OMP and cpptraj.MPI) and for GPU (cpptraj.cuda). For resource-intensive analyses you may try these on the cluster as separate jobs.
pmemd and sander do not have internal measures to limit the run time. Thus, you have to estimate the number of time steps which can finish within the requested wall time before hand and use that in your mdin file. Keep in mind the maximum wall time of 24h (cf sample input for chain job below).
Dumping intermediate results to the hard disk systems slows down your job, maybe needlessly: Estimate how many snapshots you want to analyze from your simulation in order to obtain meaningful results and adjust your trajectory output frequency accordingly; adapt the frequency of writing to the output file to this value, unless you need the information; set the frequency for restart file output to a value so that you really would use this file for a restart in case of a crash and not simply restart the complete calculation – in this case writing the restart file at the end of your simulation would be sufficient. Of course, all this also depends on your specific project needs.
GPU versions of Amber are deterministic with respect to the CPU card type: Using the same binary restart file with coordinates and velocities for restarting a calculation will yield the exact same trajectory on the same GPU card type (e.g. A40).
Amber benchmark calculations on Alex have shown that A40 cards are more economical (price performance ratio) than the A100 cards and are thus recommended for molecular dynamics simulations with Amber.
Originally, it has been suggested by the Amber authors to run the heating and (pressure) equalization steps on the CPU, but using the GPU version might also work. In case of problems, consider to split your simulations into more chunks, since a program restart also resets some global parameters and thus may better adapt to a rapidly changing system (e.g. box size).
Recent versions of AmberTools install their only version of Python, which is independent of the Python of the Linux distribution or the usual Python modules of RRZE.
Sample job scripts
#!/bin/bash -l
#SBATCH --time=06:00:00
#SBATCH --job-name=Testjob
#SBATCH --gres=gpu:1
#SBATCH --export=NONE
unset SLURM_EXPORT_ENV

module add amber-gpu/20p08-at20p12-gnu-cuda11.2

### there is no need to fiddle around with CUDA_VISIBLE_DEVICES!

pmemd.cuda -O -i mdin ...
#!/bin/bash -l
#
#SBATCH --job-name=my-pmemd
#SBATCH --ntasks=16
#SBATCH --time=06:00:00
# use gpu:a100:1 and partition=a100 for A100
#SBATCH --gres=gpu:a40:1
#SBATCH --partition=a40
#SBATCH --export=NONE

unset SLURM_EXPORT_ENV

module load amber/20p12-at21p11-gnu-cuda11.5

pmemd.cuda -O -i mdin -c inpcrd -p prmtop -o output
#!/bin/bash -l
#
# allocate 4 nodes with 20 cores per node = 4*20 = 80 MPI tasks
#SBATCH --nodes=4
#SBATCH --tasks-per-node=20
#
# allocate nodes for 6 hours
#SBATCH --time=06:00:00
# job name
#SBATCH --job-name=my-pmemd
# do not export environment variables
#SBATCH --export=NONE
#
# first non-empty non-comment line ends SBATCH options

# do not export environment variables
unset SLURM_EXPORT_ENV
# jobs always start in submit directory

module load amber/20p03-at20p07-intel17.0-intelmpi2017

# run
srun pmemd.MPI -O -i mdin ...
#!/bin/bash -l
# Sample chain job script for automatic resubmission (Alex, A40)
#
# Required files in the current directory:
#   * this slurm file
#   * top file: topology    -> <variable1>
#   * inp file: MD input    -> <variable2>
#   * crd file: coordinates -> <variable3>_md.crd
#   * COUNT: Initial counter for MD-1, i.e. initially 0; echo 0 > COUNT
#   * MAXCOUNT: Final counter for MD, e.g. 10;  echo 10 > MAXCOUNT
#
# For each simulation cycle n, a subdirectory "MDn" is created into which
# the result files are moved after completion. The restart file is renamed,
# and the topology file is kept in the current directory.
#
# Note: For extending a set of MAXCOUNT simulations, simply increase
#       the number in MAXCOUNT to the new maximum and resubmit this
#       slurm job file.
#
# SLURM settings
#SBATCH --partition=a40
#SBATCH --gres=gpu:a40:1
#SBATCH --export=NONE
# USER: Please adjust time and job-name
#SBATCH --time=12:00:00
#SBATCH --job-name=XYZ
unset SLURM_EXPORT_ENV

# Change into the submit directory
cd $SLURM_SUBMIT_DIR

# Add your favorite AMBER module here
module load amber/20p12-at21p11-gnu-cuda11.5
export SANDER=pmemd.cuda

# USER: Please adjust file names for input, topology, and basis name
#       (YYY and ZZZ may be the same)
inp=XXX.inp
top=YYY.top
bas=ZZZ_md

echo "Starting AMBER calculation for $bas"
$SANDER -O -i $inp -p $top -c ${bas}.crd \
        -o ${bas}.out -r ${bas}.rst -e ${bas}.ene \
        -x ${bas}.ndf -inf ${bas}.inf
echo "Finished Amber calculation"

# Get current simulation cycle number and increase it
COUNT=`cat COUNT`; let COUNT++; echo $COUNT > COUNT

# Save work in subdirectories MDn, keep restart file
DD=MD${COUNT}

echo Saving work in $DD
mkdir $DD
mv ${bas}.crd $DD
mv ${bas}.out $DD
mv ${bas}.ene $DD
mv ${bas}.ndf $DD
mv ${bas}.inf $DD
cp ${bas}.rst $DD ; mv ${bas}.rst ${bas}.crd

# Resubmit
MAXCOUNT=`cat MAXCOUNT`
if [[ $COUNT -ge MAXCOUNT ]]; then
echo "Maximum number of invocations reached: $MAXCOUNT"
else
let COUNT++ ; newname=$bas-$COUNT
echo "Resubmitting $0 with jobname $newname"
sbatch --job-name $newname $0
fi
sync
# End of sample chain job script
#!/bin/bash -l

#SBATCH --gres=gpu:a40:4
#SBATCH --export=NONE
#SBATCH --time=12:00:00
#SBATCH --job-name=my-hremd

unset SLURM_EXPORT_ENV

module load amber/20p12-at21p11-openmpi-gnu-cuda11.5

# number of replicas, e.g. 32
NG=32

# these variables are needed to start the MPS-server
# Select a location that’s accessible to the given $UID
export CUDA_MPS_PIPE_DIRECTORY=/tmp/nvidia-mps.$SLURM_JOB_ID
export CUDA_MPS_LOG_DIRECTORY=/tmp/nvidia-log.$SLURM_JOB_ID
# Start the daemon.
nvidia-cuda-mps-control -d

mpirun --oversubscribe -np $NG pmemd.cuda.MPI -O -ng $NG -groupfile groupfile -rem 3

# this will stop the MPS-server
echo quit | nvidia-cuda-mps-control
Further information
- Amber benchmark suite results on Alex
- http://ambermd.org
- http://ambermd.org/doc12/Amber23.pdf
- http://ambermd.org/tutorials/
- http://ambermd.org/GPULogistics.php
- https://amberhub.chpc.utah.edu/
- https://www.exxactcorp.com/blog/Molecular-Dynamics/rtx3090-benchmarks-for-hpc-amber-a100-vs-rtx3080-vs-2080ti-vs-rtx6000
Mentors
- Dr. A. Kahler, RRZE, hpc-support@fau.de
- AG Sticht (Professur für Bioinformatik, MedFak)
Special applications, and tips & tricks
Many different applications are used by scientists from the various fields on the HPC systems at NHR@FAU. The HPC team at NHR@FAU does not have any experience with most of the applications. Nevertheless, we try to collect some useful information and tips&tricks for key applications on the following pages. The pages will not teach you how to use the applications but collect information which is specific to the usage on the HPC systems of NHR@FAU.
Central installation of software
As the parallel computers of NHR@FAU are operated stateless, all system software has to reside in a RAM disk, i.e. in main memory. Therefore, only limited packages from the Linux distribution can be installed on the compute nodes, and the compute nodes only contain a subset of the packages installed on the login nodes. Most (application) software but also libraries therefore will be installed in /apps and made available as modules. Multiple versions of a single software can be provided in that way, too.
As a general rule: software will be installed centrally
-
- if there are multiple groups which benefit from the software, or
- if the software is very easy to install.
In both cases NHR@FAU will more and more request that a least one group acts as mentor for the software, i.e. provides NHR@FAU with simple input for validation of the installation, but moreover, that group has to provide limited support for other groups to get started with the software.
NHR@FAU is installing moving to installing more software using Spack. Users may “chain” our central Spack installations to complement it with their own additions. Loading the module user-spack; will set up the necessary configs for you and add the command spack. However, NHR@FAU cannot provide help for your installations.
Notes on specific software
Molecular dynamics for chemistry, life science, and material science
- Amber & AmberTools – suite of biomolecular simulation programs. Here, the term “Amber” does not refer to the set of molecular mechanical force fields for the simulation of biomolecules but to the package of molecular simulation programs consisting of the AmberTools (sander and many more) and Amber (pmemd).
- DL_POLY / DL_POLY_CLASSIC – general-purpose classical molecular dynamics simulation software.
DL_POLY with its fine grain IO can easily kill$FASTTMP. RRZE will kill / throttle any jobs which abuse the parallel file system. - GROMACS – versatile package to perform molecular dynamics, i.e. simulate the Newtonian equations of motion for systems with hundreds to millions of particles. It is primarily designed for biochemical molecules like proteins, lipids and nucleic acids that have a lot of complicated bonded interactions, but since GROMACS is extremely fast at calculating the non-bonded interactions (that usually dominate simulations) many groups are also using it for research on non-biological systems, e.g. polymers.
- IMD – software package for classical molecular dynamics simulations. Several types of interactions are supported and a rich choice of simulation options is available. There is no restriction on the number of particle types.
- LAMMPS – classical molecular dynamics code with a focus on materials modeling. LAMMPS has potentials for solid-state materials (metals, semiconductors) and soft matter (biomolecules, polymers) and coarse-grained or mesoscopic systems. It can be used to model atoms or, more generically, as a parallel particle simulator at the atomic, meso, or continuum scale.
- NAMD – a molecular dynamics program designed for parallel computation. Full and efficient treatment of electrostatic and van der Waals interactions are provided via the Particle Mesh Ewald algorithm.
Quantum chemistry
- CP2K – quantum chemistry and solid state physics program package to perform atomistic simulations of solid state, liquid, molecular, periodic, material, crystal, and biological systems.
- CPMD – parallelized plane wave / pseudopotential implementation of Density Functional Theory, particularly designed for ab-initio molecular dynamics.
- Molpro – a comprehensive system of ab initio programs for advanced molecular electronic structure calculations.
- OpenMolcas – a quantum chemistry software package using the multiconfigurational approach to the electronic structure.
- ORCA – an ab initio quantum chemistry program package that contains modern electronic structure methods including density functional theory, many-body perturbation, coupled cluster, multireference methods, and semi-empirical quantum chemistry methods. Its main field of application is larger molecules, transition metal complexes, and their spectroscopic properties.
- Quantum Espresso – integrated suite of open-source computer codes for electronic-structure calculations and materials modeling at the nanoscale. It is based on density-functional theory, plane waves, and pseudopotentials.
- TURBOMOLE – program package for ab initio electronic structure calculations.
- VASP – Vienna Ab initio Simulation Package (VASP) is a computer program for atomic scale materials modeling, e.g. electronic structure calculations and quantum-mechanical molecular dynamics, from first principles.
Not yet installed centrally – but contact us if you have an own license but would like to use a RRZE provided binary.
Computational fluid dynamics (CFD), multiphysics and FE, climatology and glaciology
- ANSYS CFX – commercial CFD software tool with a special focus on turbomachinery, such as pumps, fans, compressors and gas and hydraulic turbines.
- ANSYS Fluent – commercial CFD to model flow, turbulence, heat transfer and reactions in all sorts of applications.
- ANSYS Mechanical – commercial finite element analysis (FEA) tool, to solve complex mechanical problems.
- Simcenter STAR-CCM+ – commercial software tool for CFD and more generally computational continuum mechanics (by CD-adapco or nowadays Siemens PLM).
- OpenFOAM.org/OpenFOAM.com – leading free, open-source software for computational fluid dynamics but also an extensive C++ toolbox for the development of customized numerical solvers, and pre-/post-processing utilities for the solution of continuum mechanics problems.
- Abaqus – software suite for finite element analysis and computer-aided engineering.
Currently no (known) active users on the HPC systems. - COMSOL Multiphysics – general-purpose simulation software for modeling designs, devices, and processes in all fields of engineering, manufacturing, and scientific research.
- Elmer/Ice – open-source Finite Element software for ice sheet, glaciers, and ice flow modeling.
Avoid MATC expressions in the SIF input. - WRF – Weather Research and Forecasting (WRF) is a next-generation mesoscale numerical weather prediction system designed for both atmospheric research and operational forecasting applications.
Mathematical and statistical software
- Matlab – numerical computing environment and proprietary programming language developed by MathWorks
- Python and Jupyter – Python is a versatile scripting language (often used by data scientists); Jupyter is a sort of interactive web-based user environment
- R and R Studio – “Microsoft R Open” is installed on Woody. It is an enhanced distribution of R. R Studio is a HTML5-based IDE for R.
Additional packages available from MRAN; can be installed centrally upon request. You are also able to install packages on your own in user space.
Machine learning and big data
- cuDNN in version 7 is installed on TinyGPU and the GPU nodes of Emmy since autumn 2019 as Nvidia relaxed the license conditions.
There is no need to load a module as the include files and libraries are in/usr/includeand/usr/lib[64]. - TensorFlow & co
RRZE currently does not provide any central installation for twothreereasons: (a) the software changes very rapidly;(b) NVIDIA imposes very strict conditions on cuDNN – you can only get a personal license; (c) no group volunteered as mentor so far. - OpenPose – multi-person gesture detection (i.e. human body, hand, facial, and foot keypoints)
A detailed description on how to get OpenPose installed on RRZE’s HPC systems can be found in http://peter-uhrig.de/openpose-with-nvcaffe-in-a-singularity-container-with-support-for-multiple-architectures/
Physics
- software for the astrophysics community is maintained by ECAP
- several packages for quantum computing are collected in the
quantumtoolsmodule.
Virtualization and containers
HPC tools and software development
- DDT – parallel debugger.
- TotalView – parallel debugger. See in HPC-Wiki.
- LIKWID – tool suite for performance-oriented programmers and administrators. The term LIKWID stands for ‘Like I know what I do’. See in HPC-Wiki and on Github .
- Intel Trace Collector / Analyzer – tool for profiling and checking the correctness of MPI communication. A short how-to is available here or in the HPC-Wiki.
- Intel Vtune & friends (advisor, inspector, performance_snapshots, vtune_amplifier) – tools for detailed performance profiling. See HPC-Wiki for Vtune and Intel Advisor.
Only available on special machines – contact hpc-support@fau.de for details. - Continuous Integration / Gitlab CI – Continuous Integration allows you to run a pipeline of scripts to build, test, and validate the code changes before merging them into the main branch.
- Working with NVIDIA GPUs
- VAMPIR
Getting started with HPC
This guide will give you a short overview of the most important aspects of running applications on the HPC systems. For more in-depth information, please refer to the linked documentation.
If you have any questions that you like to ask in person, you can come to our HPC Café. On every second Tuesday of the month, we offer a short talk about a specific topic and you can also get a hands-on introduction to our systems. And of course, there is coffee and cake!
Getting an HPC account
Depending on the status, there are different protocols to get an HPC account:
- NHR users from outside FAU; See the page on NHR application rules for up-to-date information on allocating resources of NHR@FAU.
Also check the pages on the NHR@FAU HPC-Portal Usage /New digital workflow for HPC accounts. - FAU staff and students (except for lectures): use the HPC application form. Details on how to fill out the form are given below. Basic usage of the HPC systems typically is free of charge for FAU researchers for publicly funded research. For compute needs beyond the free basic usage see the page on NHR application rules for preliminary information on allocating resources of NHR@FAU.
- Lectures of FAU with need for HPC access: there is a simplified protocol to get HPC accounts for all students of your course. Lecturers have to approach HPC support with a list of the IdM accounts of all students of the course and the course name. Late registrations of additional students are not possible. Thus, be sure to collect all IdM accounts before sending the list to RRZE.
- Block courses with external participants: Lecturers have to approach HPC support at least one week in advance with title and date of the course, and the expected number of participants. Such accounts cannot be valid for more than one week.
The HPC application form for FAU within HPC4FAU
You can get the application form here: HPC application form. Applications always have to be approved by your local chair / institute – we do not serve private persons. If you have any questions regarding the application, please contact your local IT contact person at the chair / institute.
You need to fill out the application form, print it, sign it and let it be stamped with the Chair or Institute seal.
Once it is ready, you can bring it by the RRZE Service Desk or send it via Email, or internal mail.
Fill out the following metadata fields if applying for the first time:
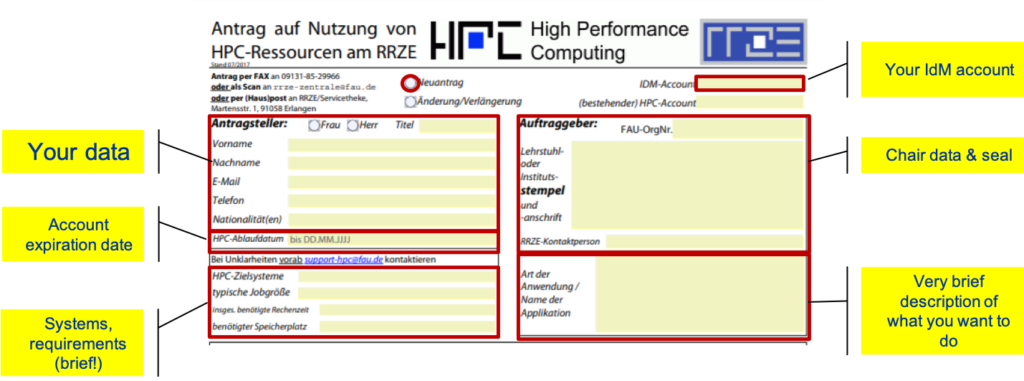
For the System requirement section, a rough estimate of the resources you expect to need is sufficient. Just tell us how many nodes/CPUs your simulations will need (typical job size), the expected runtime per simulation, and the approximate number of simulation runs you are planning (overall requested computation time). If you are unsure or need help do not hesitate to contact us. Also note that you have to provide an expiration date, usually the duration of your specific project. The duration can also be coupled to your affiliation (employee, PhD student, etc.).
For the lower part of the form, the following information is required:

Please note that the more detailed project information is only necessary in case a new RRZE customer ID is requested.
Changing/setting a password for your HPC Account
Once your application is processed, you will be notified by email.
Before a login to our HPC systems is possible a password needs to be set in IDM.
It will always take several hours for a password change in IDM to effect all systems and not at the same time for the different clusters.
 Select “Data overview” in the left-hand menu bar.
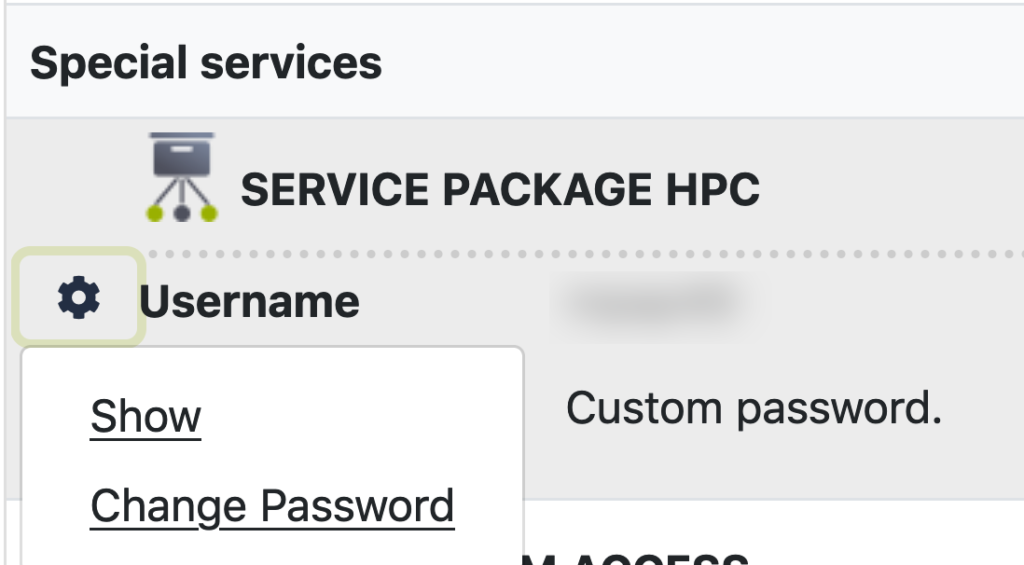 Scroll down to your HPC account and left-click the gear icon next to “username”.
HPC Clusters
By default, all clusters use Linux operating systems with text-mode only. Basic knowledge of file handling, scripting, editing, etc. under Linux is therefore required.
NHR@FAU operates diverse HPC systems that are tailored to different use cases. Thus, the choice of the appropriate cluster always is essential even if your account will work on most of the systems:
- single-core or single node (throughput) jobs: Woody
- multi-node MPI-parallel jobs: Meggie, Fritz
- GPU jobs: TinyGPU, Alex
most of the nodes in TinyGPU have been financed by individual groups; therefore, access restrictions/throttling policies may apply. - large main memory requirement: TinyFat
the modern Broadwell-based nodes have been financed by an individual group; therefore, access restrictions/throttling policies may apply.
Also, see the table on the main HPC page. If you’re unsure about which systems to use, feel free to contact the HPC group.
Connecting to HPC systems
To log into the HPC front ends, you have to connect via an SSH (SecureShell) client. Windows users can either use the SSH functionality included in recent Windows 10 versions (via command or Powershell) or a third-party client like for example PuTTY or MobaXterm. Under Linux and Mac, native OpenSSH functionality is available. From within the university network, you can connect using the following command:
ssh USERNAME@CLUSTERNAME.nhr.fau.de
In this case, USERNAME is your HPC user name and CLUSTERNAME is the name of the cluster you want to log into, e.g. woody. If you want to access TinyFat, or TinyGPU, you have to connect to tinyx.
If you want to access the clusters from outside the university network, you have to connect to the dialogserver first :
ssh USERNAME@cshpc.rrze.fau.de
You can then ssh to the cluster front ends from there. As an alternative, you can also use VPN to access the clusters directly.
For more in-depth information about how to use SSH, refer to SSH – Secure Shell access to HPC systems.
Working with data
Different file systems are accessible from the clusters. Due to their different properties, some might be more suited for the required task than others. The first three classes of directories are available on all HPC systems:
$HOME: standard home directory at login, available under/home/hpc- small quota (50 GB) and 500k inodes – cannot be increased
- backup: regular, additional fine-grained snapshots
- storage of important files only
$WORK: general-purpose work directory
The recommended work directory is$WORK. Its destination may point to different file servers and file systems:- available under
/home/woody- standard quota 500GB
- no backup
- can be used for input/output files and for small files
- available under
/home/saturnor/home/titan, both are for shareholders only!- group quota according to payment (typically 25+ TB)
- no backup
- can be used for input/output files and for small files
- available under
/home/atuin, for NHR projects only!- user/group quota according to NHR grant (typically 10+ TB)
- no backup
- can be used for input/output files and for small file
- available under
$HPCVAULT: available under/home/vault- standard quota 500GB for files and quota on the number of files/directories
- backup: regular, additional snapshots
- high-quality, mid- to long-term storage of larger files
- Parallel file systems
$FASTTMP:- local to Meggie/Fritz, cannot be accessed from outside these systems
- no backup, no quota for data volume, but high watermark deletion and limits on the number of files/directories
- short-term storage, only for high-performance parallel I/O, no ASCII files
For all filesystems, your personal folder is located in your group directory, for example for $HOME at /home/hpc/GROUPNAME/USERNAME. You can also use the environment variables to access the folders directly.
File system quota
Nearly all file systems impose quotas on the data volume and/or the number of files or directories. These quotas may be set per user or per group. There is a distinction between hard quota, which is the absolute upper limit that cannot be exceeded, and soft quota, which can be exceeded temporarily for a certain grace period (7 days). After that time, it turns into a hard quota. You will be notified automatically if you exceed your personal quota on any file system. You can look up your used quota by typing quota -s or shownicerquota.pl on any cluster front end.
Shareholders can look up information on their group quota in text files available as /home/{saturn,titan,janus,atuin}/quota/GROUPNAME.txt.
Data transfer
Under Linux and Mac, scp and rsync are the preferred ways to copy data from and to a remote machine. Under Windows, either the Linux subsystem, scp via Command/PowerShell, or additional tools like WinSCP can be used. For large files, we recommend using scp or rsyncbecause they are usually much faster than other transfer protocols. rsync also provides more extensive functionality, e.g. skipping files that already exist or resuming file transfers.
Available Software
The standard Linux packages are installed on the cluster front ends. On the compute nodes, usually, much less software is available.
The majority of software is provided by RRZE via the modules system. It contains a variety of compilers, libraries, open and commercial software. A module has to be loaded explicitly to become usable. All module commands affect the current shell only. The available modules may differ between the clusters.
The available modules can be listed via module avail. Modules are loaded via module load <modulename> and unloaded via module unload <modulename>. The currently loaded modules are displayed by module list. The module commands can usually be used unmodified in any type of Slurm job script.
Some modules cannot be loaded together. In some cases, such a conflict is detected automatically during the load command, in which case an error message is printed and no modifications are made. Modules can depend on other modules so that these are loaded automatically when you load the module. As an example, when you load the OpenMPI module, the corresponding compiler modules will be loaded automatically:
$ module load openmpi/4.1.3-gcc11.2.0 $ module list Currently Loaded Modulefiles: 1) gcc/11.2.0 <aL> 2) openmpi/4.1.3-gcc11.2.0 |
Compiling parallel applications
For compiling your MPI parallel application, you have to explicitly load the necessary modules. For example when using the Intel compiler and Intel MPI, use module load intel/<version> and module load intelmpi/<version>. When the GNU compiler should be used instead, use module load gcc/<version> and module load intelmpi/<version>. The selection of the compiler occurs by the wrapper name, e.g. mpicc = gcc, mpiicc = Intel; mpif90 = gfortran; mpiifort = Intel.
In case of OpenMPI, the module is dependent on the compiler mentioned in the module name, e.g. openmpi/4.1.3-gcc11.2.0 depends on the gcc compiler. The corresponding compiler module will be loaded automatically as a dependency with the OpenMPI module.
Prior to running your code, you have to load the same modules as for compiling the program, e.g. inside your Slurm job script.
More details on running parallel applications can be found here.
Running Jobs
The cluster front ends can be used for interactive work like editing input files or compiling your application. The amount of time each of your applications is running is restricted by system limits, e.g., after 1 hour of CPU time, your run will be killed. Front ends are shared among all users, so be considerate of which applications you run. Please do not run applications with large computational or memory requirements on the front ends, since this may interfere with the work of other users. MPI parallel jobs are generally not allowed on the front ends at RRZE.
Batch system
Compute nodes cannot be accessed directly. Compute resources have to be requested by resource manager software, the so-called batch system. All user jobs except short serial test runs must be submitted to the cluster through this batch system. This is done by creating a job script, that contains all the commands you want to run and also the requested resources like the number of compute nodes and runtime. The submitted jobs are routed into a number of queues (depending on the needed resources, e.g. runtime) and sorted according to some priority scheme. A job will run when the required resources become available. The output of the job is written into a file in your submit directory.
The clusters use a software called Slurm as the batch system. Please refer to the linked general documentation for details on the required commands and example scripts. There might be cluster-specific differences in the batch system, which are detailed in the respective cluster documentation.
It is also possible to submit interactive batch jobs that, when started, open a shell on one of the assigned compute nodes and let you run interactive programs there. This is especially useful for testing or applications which cannot be run on the front ends due to higher computational requirements.
Job status
Use the command sinfo on the respective cluster frontend node to get the current status of the cluster nodes (idle, mixed, allocated). This information can be useful to assess the current workload of the cluster, which also influences the queuing time of your job. Keep in mind, however, that there might be some resource or priority limitations that prevent your job from running even if nodes are available.
You can use squeue to check the status of your jobs. If your job is not starting straight away, you can see the reason for the delay in the column NODELIST(REASON). An explanation of these reasons is available here.
When you log into the cluster frontend node, it will also show the Message of the Day (MOTD), where changes in the configuration, maintenance times, and other disruptions in service will be announced.
Good practices
Try to use the appropriate amount of parallelism. Since most workloads are not highly scalable, it is not always better to use more cores for your application. It can be beneficial to run scaling experiments to figure out the “sweet spot” of your application.
Check the results of your job regularly to prevent a waste of computational resources. You can also check if your job actually uses the allocated nodes in an efficient way and if it runs with the expected performance. On all clusters, it is also possible to access performance data of your running and finished jobs, including e.g. memory used, floating point rate, and usage of the (parallel) file system. To review this data, log into https://monitoring.nhr.fau.de/ using your HPC account. For NHR users, log into the HPC Portal and follow the links.
Use the appropriate file system for your calculations. Doing tiny-size, high-frequency I/O on a parallel file may overload the metadata servers. When data becomes obsolete, delete it, especially on the parallel file systems ($FASTTMP). No quota limitations apply there, but if a certain level is reached, a high-watermark deletion will be executed, which will affect the old files of all users. Data that should be stored mid- to long-term should be moved to $HPCVAULT.
If you have a problem with your application that you cannot solve yourself, report it to the HPC-support using your FAU mail address. This will immediately open a helpdesk ticket and someone will get back to you. Please provide as much detail as possible so we know where to look, including user name, cluster name, jobID, file system, time of the event, etc..
Additional materials for beginners
- Introduction for Beginners (online), monthly, more information under HPC Cafe.
- 2019-04-26 – HPC in a Nutshell (Part 1) + Video recording (access to video recording only with FAU IdM login)
- 2019-05-09 – HPC in a Nutshell (Part 2) + Video recording (access to video recording only with FAU IdM login)
- 2021-11-08 – Hands-on session in the MuCoSim seminar (part 1) + Video recording (access to video recording only with FAU IdM login)
Woody(-old) throughput cluster (Tier3)
All nodes of this cluster have either been shut down or moved to the new Woody cluster in September 2022
The RRZE’s “Woody” is the preferred cluster for serial/single-node throughput jobs.
The cluster has changed significantly over time. You can find more about the history in the section about history. The current hardware configuration looks like this:
40 compute nodes (w10xx nodes) with Xeon E3-1280 CPUs (“SandyBridge”, 4 cores, HT disabled, 3,5 GHz base frequency; only AVX but no AVX2), 8 GB RAM, 500 GB HDD – from 12/2011these nodes have been shutdown in October 2020
70 compute nodes (w11xx nodes) with Xeon E3-1240 v3 CPUs (“Haswell”, 4 cores, HT disabled, 3,4 GHz base frequency), 8 GB RAM, 1 TB HDD– from 09/2013 these nodes have been shutdown in September 202264 compute nodes (w12xx/w13xx nodes) with Xeon E3-1240 v5 CPUs (“Skylake”, 4 cores, HT disabled, 3,5 GHz base frequency), 32 GB RAM, 1 TB HDD – from 04/2016 and 01/2017=> now part of Woody-NG
112 compute nodes (w14xx/w15xx nodes) with Xeon E3-1240 v6 CPUs (“Kaby Lake”, 4 cores, HT disabled, 3,7 GHz base frequency), 32 GB RAM, 960 GB SDD – from Q3/2019=> now part of Woody-NG

This website shows information regarding the following topics:
Access, User Environment, and File Systems
Access to the machine
Access to the system is granted through the frontend nodes via ssh. Please connect to
woody.rrze.fau.de
and you will be randomly routed to one of the frontends. All systems in the cluster, including the frontends, have private IP addresses in the 10.188.82.0/23 range. Thus they can only be accessed directly from within the FAU networks. If you need access from outside of FAU you have to connect for example to the dialog server cshpc.rrze.fau.de first and then ssh to Woody from there. While it is possible to ssh directly to a compute node, a user is only allowed to do this when they have a batch job running there. When all batch jobs of a user on a node have ended, all of their shells will be killed automatically.
The login and compute nodes run a 64-bit Ubuntu LTS-version. As on most other RRZE HPC systems, a modules environment is provided to facilitate access to software packages. Type “module avail” to get a list of available packages.
On September 5th, 2022, the login node woody3 has been updates to Ubuntu 20.04 while the remaining w11xx nodes of Woody-PBS are still Ubuntu 18.04. However, woody3 now matches the OS of TinyGPU/Slurm and TinyFAT.
File Systems
The following table summarizes the available file systems and their features. Also check the description of the HPC file systems.
| Mount point | Access via | Purpose | Technology, size | Backup | Data lifetime | Quota |
|---|---|---|---|---|---|---|
/home/hpc |
$HOME |
Storage of source, input and important results | central servers, 5 TB | YES + Snapshots | Account lifetime | YES (very restrictive) |
/home/vault |
$HPCVAULT |
Mid- to long-term, high-quality storage | central servers | YES + Snapshots | Account lifetime | YES |
/home/{woody, saturn, titan, atiun} |
$WORK |
storage for small files | NFS, in total ~2 PB | NO | Account lifetime | YES (user and/or group) |
/tmp |
$TMPDIR |
Temporary job data directory | Node-local, between 400 and 900 GB | NO | Job runtime | NO (but only limited capacity depending on the node) |
Node-local storage $TMPDIR
Each node has at least 400 GB of local hard drive capacity for temporary files available under /tmp (also accessible via /scratch/). All files in these directories will be deleted at the end of a job without any notification.
If possible, compute jobs should use the local disk for scratch space as this reduces the load on the central servers. In batch scripts the shell variable $TMPDIR points to a node-local, job-exclusive directory whose lifetime is limited to the duration of the batch job. This directory exists on each node of a parallel job separately (it is not shared between the nodes). It will be deleted automatically when the job ends. Important data to be kept can be copied to a cluster-wide volume at the end of the job, even if the job is cancelled by a time limit. Please see the section on batch processing for examples on how to use $TMPDIR.
Batch Processing
All user jobs except short serial test runs must be submitted to the cluster by means of the Torque Resource Manager. The submitted jobs are routed into a number of queues (depending on the needed resources, e.g. runtime) and sorted according to some priority scheme. It is normally not necessary to explicitly specify the queue when submitting a job to the cluster, the sorting into the proper queue happens automatically.
Please see the batch system description for further details.
The following queues are available on this cluster. There is no need to specify a queue manually!
| Queue | min – max walltime | Comments |
|---|---|---|
route |
N/A | Default router queue; sorts jobs into execution queues |
devel |
0 – 01:00:00 | Some nodes reserved for queue during working hours |
work |
01:00:01 – 24:00:00 | “Workhorse” |
onenode |
01:00:01 – 48:00:00 | only very few jobs from this queue are allowed to run at the same time. |
Regular jobs are always required to request all CPUs in a node (ppn=4). Using less than 4 CPUs per node is only supported in the SandyBridge segment.
If you submit jobs, then by default you can get any type of node: SandyBridge, Haswell, Skylake, or Kabylake based w1xxx-nodes. They all have the same number of cores (4) and minimum memory (at least 8 GB) per node, but the speed of the CPUs can be different, which means that job runtimes will vary. You will have to calculate the walltime you request from the batch system so that your jobs can finish even on the slowest nodes.
It is also possible to request certain kinds of nodes from the batch system. This has two mayor use cases besides the obvious “benchmarking”: If you want to run jobs that use less than a full node, those are currently only allowed on the SandyBridge nodes, so you need to request those explicitly. Some applications can benefit from using AVX2 which is not available on the SandyBridge based nodes. Moreover, the Skylake and Kabylake based nodes have more memory (32 GB). You request a node property by adding it to your -lnodes=... request string, e.g.: qsub -l nodes=1:ppn=4:hw. In general, the following node properties are available:
| Property | Matching nodes (#) | Comments |
|---|---|---|
| (none specified) | w1xxx (286) | Can run on any node, that is all the |
|
||
:hw |
w11xx (70) | Can run on the Haswell nodes only. |
:sl32g |
||
:kl32g |
||
:any32g |
||
:hdd900 |
w1[1-5]xx (246) | Can run on any node with (at least) 900 GB scratch on HDD/SDD. |
Note: Many of the original properties are no longer supported.
OpenMP
The installed Intel compilers support at least the relevant parts of recent OpenMP standards. The compiler recognizes OpenMP directives if you supply the command line option -openmp or -qopenmp. This is also required for the link step.
MPI
Although the cluster is basically able to support many different MPI versions, we maintain and recommend to use Intel MPI. Intel MPI supports different compilers (GCC, Intel). If you use Intel compilers, the appropriate intelmpi module is loaded automatically upon loading the intel64 compiler module. The standard MPI scripts mpif77, mpif90, mpicc and mpicxx are then available. By loading a intelmpi/201X.XXX-gnu module instead of the default intelmpi, those scripts will use the GCC.
Further Information
History
The cluster was originally delivered end of 2006 by companies Bechtle and HP, with 180 compute-nodes, each with two Xeon 5160 “Woodcrest” chips (4 cores) running at 3.0 GHz with 4 MB Shared Level 2 Cache per dual core, 8 GB of RAM and 160 GB of local scratch disk and a half-DDR/half-SDR high speed infiniband-network. The cluster was expanded to 212 nodes within a year. However, those nodes were replaced over time and turned off one by one. None of these nodes remain today. At that time it was the main cluster at RRZE, intended for distributed-memory (MPI) or hybrid parallel programs with medium to high communication requirements. It also was the first cluster at RRZE that employed a parallel filesystem (HP SFS) with a capacity of 15 TB and an aggregated parallel I/O bandwidth of > 900 MB/s. That filesystem was retired in 2012.
The system entered the November 2006 Top500 list on rank 124 and in (November 2007) was ranked number 329.
In 2012, 40 single socket compute nodes with Intel Xeon E3-1280 processors (4-core “SandyBridge”, 3.5 GHz, 8 GB RAM and 400 GB of local scratch disk) have been added (w10xx nodes). These nodes are only connected by GBit Ethernet. Therefore, only single-node (or single-core) jobs are allowed in this segment. These nodes have been shutdown in October 2020.
In 2013, 72 single socket compute nodes with Intel Xeon E3-1240 v3 processors (4-core “Haswell”, 3.4 GHz, 8 GB RAM and 900 GB of local scratch disk) have been added (w11xx nodes). These nodes are only connected by GBit Ethernet. Therefore, only single-node jobs are allowed in this segment. These nodes replaced three racks full of old w0xxx-nodes, providing significantly more compute power at a fraction of the power usage.
In 2016/2017, 64 single socket compute nodes with Intel Xeon E3-1240 v5 processors (4-core “Skylake”, 3.5 GHz, 32 GB RAM and 900 GB of local scratch disk) have been added (w12xx/w13xx nodes). Only single-node jobs are allowed in this segment.
In autumn 2019, 112 single socket compute nodes with Intel Xeon E3-1240 v6 processors (4-core “Kabylake”, 3.7 GHz, 32 GB RAM and 900 GB of local scratch SSD) have been added (w14xx/w15xx nodes). Only single-node jobs are allowed in this segment, too.
Although Woody was originally a system that was designed for running parallel programs using significantly more than one node, the communications network is pretty weak compared to our other clusters and today’s standards. It is therefore now intended for running single node jobs. In other words, you cannot reserve single cores, the minimum allocation is one node. In the w10xx segment, also single cores can be requested as an exception.
File systems
This website shows information regarding the following topics:
File systems
Overview
A number of file systems is available at RRZE. They differ in available storage size, backup and also in their intended use. Please consider these properties when looking for a place to store your files. More details on the respective systems are listed below.
There is one simple logic rule to keep in mind: Everything that starts with /home/ is available throughout the RRZE, which naturally includes all HPC systems. Therefore, e.g. /home/woody is accessible from all clusters, even if it was originally bought together with the Woody-Cluster and mainly for use by the Woody cluster.
| Mount point | Access via | Purpose | Size | Backup | Data lifetime | Quota | Remarks |
|---|---|---|---|---|---|---|---|
/home/hpc |
$HOME |
Storage of source, input and important results only | 40 TB | Yes | Account lifetime | Yes (restrictive; capacity & inodes) | |
/home/vault |
$HPCVAULT |
Mid- to long- term high-quality storage; especially for large file | 5 PB | Yes | Account lifetime | Yes | |
| diverse
|
$WORK |
general purpose work directory and storage for small files | n/a | NO | Account lifetime | Yes | |
/home/woody |
$WORK if you are not eligible for any of the other work filesystems |
general purpose work directory and storage for small files (used to be cluster local storage for woody cluster) | 130 TB | No | Account lifetime | Yes | There may be limited backup, meaning that backup on this filesystem does not run daily and data is only kept in backup for a rather short time. |
/home/saturn
|
$WORK if you are eligible |
general purpose work directory and storage for small to large files | 2x 460 +400 TB | NO | Account lifetime | Yes (group quota) | There is no backup and it is a shareholder-only filesystem, i.e. only groups who paid for the file server have access. |
/home/atuin |
$WORK if you are eligible |
general purpose work directory and storage for small to large files | 1,1 PB | NO | Account lifetime | Yes (typically group quota) | There is no backup and it is reserved for NHR projects. |
/lustre |
$FASTTMP (Fritz/Alex-Cluster) |
High performance parallel I/O; short-term storage; no large ASCII files! | 2,8 PB | NO | High watermark deletion | No; but number of files/directories limited | only available on the Fritz + Alex cluster |
| diverse
often somewhere in |
$TMPDIR |
job-specific storage (either located in main memory [RAM disk] or if available local HDD / SDD) | from some GB to several hundreds of GB | NO | job lifetime |
No; but space is o f course very limited | it’s always node-local only
see cluster specific documentation for details especially concerning size |
Home directory $HOME
The Home directories of the HPC users are housed in the HPC storage system. These directories are available under the path /home/hpc/GROUPNAME/USERNAME on all RRZE HPC systems. The home directory is the directory, in which you are placed right after login, and where most programs try to save settings and similar things. When this directory is unavailable, most programs will stop working or show really strange behavior – which is why we tried to make the system highly redundant.
The home directory is protected by fine-grained snapshots, and additionally by regular backups. It should therefore be used for „important“ data, e.g. your job scripts, source code of the program you’re working on, or unrecoverable input files. There are comparatively small quotas there, so it will most probably be too small for the inputs/outputs of your jobs.
Each user gets a standard quota of 50 Gigabytes for the home. Quota extensions are not possible.
Vault $HPCVAULT
Additional high-quality storage is provided on in a second part of the HPC storage system called “vault”. Each HPC user has a directory there that is available under the path /home/vault/GROUPNAME/USERNAME on all RRZE HPC systems.
This filesystem is also protected by regular snapshots and backups, although not as fine-grained as on $HOME. It is suitable for mid and long-term storage of files.
The default quota for each user is 500 Gigabytes.
General work directory $WORK
The recommended work directory is $WORK. Its destination may point to different file servers and file systems:
However, bear in mind that there are neither backups nor snapshots on $WORK. Hence, important data should be archived in other locations.
/home/woody
Despite the name, it is available from all HPC systems under the path /home/woody/GROUPNAME/USERNAME. It is intended as a general purpose work directory and should be used for input/output files and as a storage location for small files.
The standard quota for each user is 500 Gigabytes.
/home/saturn, /home/titan, /home/janus
Access to these shareholder-only filesystems is only available for eligible users. It is intended as a general purpose work directory for both small and large files.
The quota for this file system is defined for the whole group, not for the individual user. It is dependent on the respective share the group has paid for. If your group is interested in contributing, please contact HPC Services.
Share holders can lookup information on their group quota in text files available as /home/{saturn,titan,janus}/quota/GROUPNAME.txt.
/home/atuin
Atuin is the general work directory for NHR projects.
The quota for this file system is typically defined for the whole group, not for the individual user. It is dependent on the granted NHR proposal
Share holders can look up information on their group quota in text files available as /home/atuin/quota/GROUPNAME.txt.
Parallel file systems $FASTTMP
The Fritz cluster has a local parallel filesystem for high performance short-term storage. Please note that it is entirely different systems, i.e. you cannot see the files on Fritz’s $FASTTMP on Woody or TinyGPU.
The parallel file systems use a high watermark deletion algorithm: When the filling of the file system exceeds a certain limit (e.g. 70%), files will be deleted starting with the oldest and largest files until a filling of less than 60% is reached. Be aware that the normal tar -x command preserves the modification time of the original file instead of the time when the archive is unpacked. So unpacked files may become one of the first candidates for deletion. Use tar -mx or touch in combination with find to work around this. Be aware that the exact time of deletion is unpredictable.
Note that parallel filesystems generally are not made for handling large amounts of small files or ASCII files. This is by design: Parallel filesystems achieve their amazing speed by writing binary streams to multiple different servers at the same time. However, they do that in blocks, in our case 1 MB. That means that for a file that is smaller than 1 MB, only one server will ever be used, so the parallel filesystem can never be faster than a traditional NFS server – on the contrary: due to larger overhead, it will generally be slower. They can only show their strengths with files that are at least a few megabytes in size, and excel if very large files are written by many nodes simultaneously (e.g. checkpointing).
Snapshots ($HOME and $HPCVAULT)
Snapshots work mostly as the name suggests. In certain intervals, the filesystem takes a “snapshot”, which is an exact read-only copy of the contents of the whole filesystem at one moment in time. In a way, a snapshot is similar to a backup, but with one great restriction: As the “backup” is stored on the exact same filesystem, this is no protection against disasters – if for some reason the filesystem fails, all snapshots will be gone as well. Snapshots do however provide great protection against user errors, which has always been the number one cause of data loss on the RRZE HPC systems. Users can restore Important files that have been deleted or overwritten from an earlier snapshot.
Snapshots are stored in a hidden directory .snapshots. Please note that this directory is more hidden than usual: It will not even show up on ls -a, it will only appear when it is explicitly requested.
This is best explained by an example: let’s assume you have a file important.txt in your home directory /home/hpc/exam/example1 that you have been working on for months. You accidentally delete that file. Thanks to snapshots, you should be able to recover most of the file, and “only” lose the last few hours of work. If you do a ls -l /home/hpc/exam/example1/.snapshots/, you should see something like this:
drwx------ 49 example1 exam 32768 8. Feb 10:54 @GMT-2019.02.10-03.00.00 drwx------ 49 example1 exam 32768 16. Feb 18:06 @GMT-2019.02.17-03.00.00 drwx------ 49 example1 exam 32768 24. Feb 00:15 @GMT-2019.02.24-03.00.00 drwx------ 49 example1 exam 32768 28. Feb 23:06 @GMT-2019.03.01-03.00.00 drwx------ 49 example1 exam 32768 1. Mär 21:34 @GMT-2019.03.03-03.00.00 drwx------ 49 example1 exam 32768 1. Mär 21:34 @GMT-2019.03.02-03.00.00 drwx------ 49 example1 exam 32768 3. Mär 23:54 @GMT-2019.03.04-03.00.00 drwx------ 49 example1 exam 32768 4. Mär 17:01 @GMT-2019.03.05-03.00.00 |
Each of these directories contains an exact read-only copy of your home directory at the time that is given in the name. To restore the file in the state as it was at 3:00 UTC on the 5th of March, you can just copy it from there to your current work directory again: cp '/home/hpc/exam/example1/.snapshots/@GMT-2019.03.05-03.00.00/important.txt' '/home/hpc/exam/example1/important.txt'
Snapshots are enabled on both the home directories and vault section, but they are made much more often on the home directories than on vault. Please note that the exact snapshot intervals and the number of snapshots retained may change at any time – you should not rely on the existence of a specific snapshot. Also note that any times given are in GMT / UTC. That means that, depending on whether daylights saving time is active or not, the 03:00 UTC works out to either 05:00 or 04:00 german time. At the time of this writing, snapshots were configured as follows:
| Interval | x Copies retained | = covered timespan |
|---|---|---|
| 30 minutes (every half and full hour) | 6 | 3 hours |
| 2 hours (every odd-numbered hour – 01:00, 03:00, 05:00, …) | 12 | 1 day |
| 1 day (at 03:00) | 7 | 1 week |
| 1 week (Sundays at 03:00) | 4 | 4 weeks |
| Interval | x Copies retained | = covered time span |
|---|---|---|
| 1 day (at 03:00) | 7 | 1 week |
| 1 week (Sundays at 03:00) | 4 | 4 weeks |
Advanced Topics
Limitations on the number of files
Please note that having a large number of small files is pretty bad for the filesystem performance. This is actually true for almost any filesystem and certainly for all RRZE fileservers, but it is a bit tougher for the HPC storage system ($HOME,$HPCVAULT) due to the underlying parallel filesystem and the snapshots. We have therefore set a limit on the number of files a user is allowed. That limit is set rather high for the home section, so that you are unlikely to hit it unless you try to, because small files are part of the intended usage there. It is however set rather tight on the vault section, especially compared to the large amount of space available there. If you are running into the file limit, you can always put small files that you don’t use regularly into an archive (tar, zip, etc.).
The same limitations apply for the parallel file systems ($FASTTMP).
Access Control Lists (ACLs)
Besides the normal Unix permissions that you set with chmod (where you can set permissions for the owning user, the owning group, and everyone else), the system also supports more advanced ACLs.
However, they are not done in the traditional (and non-standardized) way with setfacl / getfacl that users of Linux or Solaris might be familiar with, but in the new standardized way that NFS version 4 uses. You can set these ACLs from an NFS client (e.g. a cluster frontend) under Linux using the nfs4_setfacl and nfs4_getfacl commands. The ACLs are also practically compatible with what Windows does, meaning that you can edit them from a Windows client through the usual explorer interface.
Further Information on HPC storage
The system serves two functions: It houses the normal home directories of all HPC users, and it provides tape-backed mid- to long-term storage for users data. It is based on Lenovo hardware and IBM software (Spectrum Scale/GPFS) and took up operation in September 2020.
Technical data
- 5 file servers, Lenovo ThinkSystem SR650, 128 GB RAM, 100 GB Ethernet
- 1 archive frontend, Lenovo ThinkSystem SR650, 128 GB RAM, 100 GB Ethernet
- 1 TSM server, Lenovo ThinkSystem SR650, 512 GB RAM, 100 GB Ethernet
- IBM TS4500 tape library with currently
- 8 LTO8 tape drives and two expansion frames
- 3.370 LTO8 tape slots
- >700 LTO7M tapes
- 4 Lenovo DE6000H storage arrays
- plus 8 Lenovo DE600S expansion units (2 per DE6000H)
- redundant controllers
- Usable data capacity: 5 PB for vault, 1 PB for FauDataCloud, and 40 TB for homes
Software environment
We aim to provide an environment across the RRZE production cluster systems that is as homogeneous as possible. This page describes this environment.
This page covers the following topics:
- Available Software
- modules system
- Available shells
- Software development
- Parallel computing
- Libraries
Available software on the HPC systems
As the parallel computers of RRZE are operated diskless, all system software has to reside in a RAM disk, i.e. in main memory. Therefore, only limited packages from the Linux distribution can be installed on the compute nodes, and the compute nodes only contain a subset of the packages installed on the login nodes. Most (application) software but also libraries, therefore, will be installed in /apps and made available via the modules system. Multiple versions of a single software can be provided in that way, too. We provide mainly libraries and compilers, but also some other frequently requested software packages.
As a general rule, software will be installed centrally, if
- there are multiple groups that benefit from the software, or
- the software is very easy to install.
The only commercial software we provide on all clusters are the Intel compilers and related tools.
Some other commercial software may be installed, but HPC@RRZE will NOT provide any licenses. If you want to use other commercial software, you will need to bring the license with you. This is also true for software sub-licensed from the RRZE software group. All calculations you do on the clusters will draw licenses out of your license pool. Please try to clarify any licensing questions before contacting us, as we really do not plan to become experts in software licensing.
Feel free to compile software in the versions and with the options you need yourself. This is perfectly fine, yet support for self-installed software cannot be granted. We only can provide software centrally which is of importance for multiple groups. If you want to use Spack for compiling additional software, on most of our clusters, you can load our user-spack module to make use of the packages we already build with Spack if the concretization match instead of starting from scratch. Once user-spack is loaded, the command spack will be available (as alias), you will inherit the pre-sets we defined for certain packages (e.g. Open MPI to work with Slurm), but you’ll install everything into your own directories ($WORK/USER-SPACK).
You can also bring your own environment in a container using Singularity/Apptainer.
modules system
On all RRZE HPC systems, established tools for software development (compilers, editors, …), libraries, and selected applications are available. For many of these applications, it is necessary to set special environment variables, so that e.g. search paths are correct or license servers can be found.
To ease selection of and switching between different versions of software packages, all HPC systems at RRZE use the modules system (cf. modules.sourceforge.net). It allows to conveniently load the necessary configurations for different programs or different versions of the same program an, if necessary, unload them again later.
Important module commands
| Command | What it does |
|---|---|
module avail |
lists available modules |
module whatis |
shows an over-verbose listing of all available modules |
module list |
shows which modules are currently loaded |
module load <pkg> |
loads the module pkg, that means it makes all the settings that are necessary for using the package pkg (e.g. search paths). |
module load <pkg>/version |
loads a specific version of the module pkg instead of the default version. |
module unload <pkg> |
removes the module pkg, which means it undoes what the load command did. |
module help <pkg> |
shows a detailed description for module pkg. |
module show <pkg> |
shows what environment variables module pkg actually sets/modifies. |
General hints for using modules
- modules always only affect the current shell.
- If individual modules are to be loaded all the time, you can put the command into your login scripts, e.g. into
$HOME/.bash_profile– but keep in mind that your home is shared among all HPC clusters and that the available modules are likely to be different on different systems. - The syntax of the
module-Commands are independent of the shell used. They can thus usually be used unmodified in any type of job script. - Some modules cannot be loaded together. In some cases, such a conflict is detected automatically during the load command, in which case an error message is printed and no modifications are made.
- Modules can depend on other modules so that these are loaded automatically when you load the module.
- A current list of all available modules can be retrieved with the command
module avail.
Important modules
intel |
This module provides the legacy Intel compilers icc, icpc, and ifort as well as the new LLVM-based ones (icx, icpx, dpcpp, ifx). |
intelmpi |
This module provides Intel MPI. To use the legacy Intel compilers with Intel MPI you just have to use the appropriate wrappers with the Intel compiler names, i.e. mpiicc, mpiicpc, mpiifort. To use the new LLVM-based Intel compilers with Intel MPI you have to specify them explicitly, i.e use mpiicc -cc=icx, mpiicpc -cxx=icpx, or mpiifort -fc=ifx. The execution of mpicc, mpicxx, and mpif90 results in using the GNU compilers. |
openmpi |
Loads some version of OpenMPI and the matching compiler. |
gcc |
Some version of the GNU compiler collection. Please note that all systems naturally have a default gcc version that is delivered together with the operating system and that is always available without loading any module. However, that version is often a bit dated, so we provide a gcc-module with a somewhat newer version on some clusters. |
Some hints which can simplify the usage of modules in Makefiles:
- When using MPI modules, the environment variables
MPICHROOTDIRandMPIHOMEare set to the root directory of the respective MPICH version. Access to include files and libraries can therefore be achieved by$MPIHOME/includeand$MPIHOME/lib. - Analogously, the environment variables
INTEL_C_HOMEandINTEL_F_HOMEare set to the respective root directory when using the Intel compiler modules. This can be helpful when Fortran and C++ objects should be linked and the respective libraries have to be included manually.
On all newly installed clusters, the intel64 module has been renamed to intel and no longer automatically loads intel-mpi and mkl.
Defining own module tree
Some users or groups require software or specific software versions not provided by the NHR@FAU module system. For them we offer the user-spack modules which integrates itself into the available module tree. If you need other software but still want the easy management through modules, you can create an own module tree.
Create a folder in your home directory ($HOME/.modulefiles) for the module tree. Inside this folder, create a folder for each module you want ($HOME/.modulefiles/mymod). Inside this folder, create a file for the version (can also be a name or similar). The module will be present as mymod/version in the end. In most cases the file is very simple and has a common structure.
#%Module

# Descriptive text
module-whatis "This is my module"

# conflicting modules to load only one version at a time
conflict mymod

# Define base path to the installed software
set rootdir_name /base/path/of/own/software

# Add bin directory to $PATH
prepend-path PATH "$rootdir_name/bin"

# Add sbin directory to $PATH if needed
#prepend-path PATH "$rootdir_name/sbin"

# Add library directory to $LD_LIBRARY_PATH
prepend-path LD_LIBRARY_PATH "$rootdir_name/lib"

# Man pages of the software (if available)
#prepend-path MANPATH "$rootdir_name/man"

# Set own environment variables
setenv MYVAR "foobar"

# Remove variables from environment
# unsetenv NOTMYVAR
In order to append your module tree to the NHR@FAU modules, run module use -a $HOME/.modulefiles.
If you have multiple versions of a module, it is helpful to define a default version. You can do that by creating a file in the module ($HOME/.modulefiles/mymod/.version):
#%Module1.0
set ModulesVersion "default"
The modules system provide a lot of features not shown here. If you are interested, check out the official documentation.
shells
In general, two types of shells are available on the HPC systems at RRZE:
csh, the C-shell, usually in the form of the feature enhancedtcshinstead of the classiccsh.bash
csh used to be the default login shell for all users, not because it is a good shell (it certainly isn’t!), but simply for “historical reasons”. Since ca. 2014 the default shell for new users has been bash instead, which most people having used any Linux systems will be familiar with. The newer clusters (starting with Emmy) will always enforce bash as the shell, even for old accounts. If you have one of those old accounts still using csh and want to change to bash for the older clusters too, you can contact the ServiceTheke or the HPC team to get your login shell changed.
Software Development
You will find a wide variety of software packages in different versions installed on the cluster frontends. The module concept is used to simplify the selection and switching between different software packages and versions. Please see the page on batch processing for a description of how to use modules in batch scripts.
Compilers
Intel
Intel compilers are the recommended choice for software development on all clusters. A current version of the Fortran90, C and C++ compilers (called icc, icpc, and ifort for the legacy Intel compilers and icx, icpx, dpcpp, ifx for the new LLVM-based compilers.) can be selected by loading the intel module. For use in scripts and makefiles, the module sets the shell variables $INTEL_F_HOME and $INTEL_C_HOME to the base directories of the compiler packages.
As a starting point, try to use the option combination -O3 -xHost when building objects. All Intel compilers have a -help switch that gives an overview of all available compiler options. For in-depth information please consult the local docs in $INTEL_[F,C]_HOME/doc/ and Intel’s online documentation for their compiler suite (currently named “Intel Parallel Studio XE”).
Endianness
All x86-based processors use the little-endian storage format which means that the LSB for multi-byte data has the lowest memory location. The same format is used in unformatted Fortran data files. To simplify the handling of big-endian files (e.g. data you have produced on IBM Power, Sun Ultra, or NEC SX systems) the Intel Fortran compiler has the ability to convert the endianness on the fly in read or write operations. This can be configured separately for different Fortran units. Just set the environment variable F_UFMTENDIAN at run-time.
Examples:
| F_UFMTENDIAN= | Effect |
|---|---|
| big | everything treated as BE |
| little | everything treated as LE (default) |
| big:10,20 | everything treated as LE, except for units 10 and 20 |
| “big;little:8” | everything treated as BE, except for unit 8 |
GCC
The GNU compiler collection (GCC) is available directly without having to load any module. However, do not expect to find the latest GCC version here. Typically, several versions are separately installed on all systems and made available via environment modules, e.g. module load gcc/<version>.
Be aware that the Open MPI module depends on the used compiler, i.e. openmpi/XX-intel for use with the Intel compiler and openmpi/XX-gcc for the GCC compiler. The IntelMPI module intelmpi/XX is independent of the used compiler.
MPI Profiling with Intel Trace Collector/Analyzer
Intel Trace Collector/Analyzer are powerful tools that acquire/display information on the communication behavior of an MPI program. Performance problems related to MPI can be identified by looking at timelines and statistical data. Appropriate filters can reduce the amount of information displayed to a manageable level.
In order to use Trace Collector/Analyzer you have to load the itac module. This section describes only the most basic usage patterns. Complete documentation can be found on Intel’s ITAC website, or in the Trace Analyzer Help menu. Please note that tracing is currently only possible when using Intel MPI, therefore the corresponding intel64 and intelmpi module have to be loaded.
Trace Collector (ITC)
ITC is a tool for producing tracefiles from a running MPI application. These traces contain information about all MPI calls and messages and, optionally, on functions in the user code.
It is possible to trace your application without rebuilding it by dynamically loading the ITC profiling library during execution. The library intercepts all MPI calls and generates a trace file. To start the trace, simply add the -trace option to your mpirun command, e.g.:
$ mpirun -trace -n 4 ./myApp.
In some cases, your application has to be rebuild to trace it, for example, if it is statically linked with the MPI library or if you want to add user function information to the trace. To include the required libraries, you can use the -trace option during compilation and linking. Your application can then be run as usual, for example:
$ mpicc -trace myApp.c -o myApp
$ mpirun -n 4 ./myApp
You can also specify other profiling libraries, for a complete list please refer to the ITC User Guide.
After an MPI application that has been compiled or linked with ITC has terminated, a collection of trace files is written to the current directory. They follow the naming scheme <binary-name>.stf* and serve as input for the Trace Analyzer tool. Keep in mind that depending on the amount of communication and the number of MPI processes used, these trace files can become quite large. To generate one single file instead of several smaller files, specify the option -genv VT_LOGFILE_FORMAT=SINGLESTF in your mpiruncall.
Trace Analyzer (ITA)
The <binary-name>.stf file produced after running the instrumented MPI application should be used as an argument to the traceanalyzer command:
traceanalyzer <binary-name>.stf
The trace analyzer processes the trace files written by the application and lets you browse through the data. Click on “Charts-Event Timeline” to see the messages transferred between all MPI processes and the time each process spends in MPI and application code, respectively. Click and drag lets you zoom into the timeline data (zoom out with the “o” key). “Charts-Message profile” shows statistics about the communication requirements of each pair of MPI processes. The statistics displays change their content according to the currently displayed data in the timeline window. Please consider the Help menu or the ITAC User Guide to get more information. Additionally, the HPC group of RRZE will be happy to work with you on getting insight into the performance characteristics of your MPI applications.
Python
You have to distinguish between the Python installation from the Linux distribution in the default path and the one available through the python/[3.x]-anaconda modules. The system Python only provides a limited functionality (especially on the compute nodes). Some software packages (e.g. AMBER) come with their own Python installation. For more information, refer to the documentation about Python and Jupyter.
Parallel Computing
The intended parallelization paradigm on all clusters is either message passing using the Message Passing Interface (MPI) or shared-memory programming with OpenMP.
IntelMPI
Intel MPI supports different compilers (GCC, Intel). It is available by loading the intelmpi module. To use the legacy Intel compilers with Intel MPI you just have to use the appropriate wrappers with the Intel compiler names, i.e. mpiicc, mpiicpc, mpiifort. To use the new LLVM-based Intel compilers with Intel MPI you have to specify them explicitly, i.e use mpiicc -cc=icx, mpiicpc -cxx=icpx, or mpiifort -fc=ifx. The execution of mpicc, mpicxx, and mpif90 results in using the GNU compilers.
There are no special prerequisites for running MPI programs. On all clusters, we recommend starting MPI programs with srun instead of mpirun. Both IntelMPI and OpenMPI have integrated support for the Slurm batch system and are able to detect the allocated resources automatically.
If you require using Intel mpirun for your application, this usually works without problems for pure MPI applications. Slurm instructs mpirun about number of processes (as defined via sbatch/salloc) and node hostnames for IntelMPI automatically. Do NOT add options like -n <number_of_processes> or any other option defining the number of processes or nodes to mpirun, as this might mess with the automatic affinity settings of the processes.
By default, one process will be started on each allocated CPU in a blockwise fashion, i.e. the first node is filled completely, followed by the second node, etc.. If you want to start fewer processes per node (e.g. because of large memory requirements) you can specify the --ntasks-per-node=XX option to sbatch to define the number of processes per node.
We do not support running MPI programs interactively on the frontends. To do interactive testing, please start an interactive batch job on some compute nodes. During working hours, a number of nodes is reserved for short (< 1 hour) tests.
OpenMPI
Loading the openmpi/XX-intel or openmpi/XX-gcc module will automatically also load the respective compiler module. The standard MPI compiler wrapper mpicc, mpicxx and mpifort are then available.
The usage of OpenMPI is very similar to IntelMPI. On all clusters, we recommend starting MPI programs with srun instead of mpirun. Both IntelMPI and OpenMPI have integrated support for the Slurm batch system and are able to detect the allocated resources automatically.
If you require using Intel mpirun for your application, this usually works without problems for pure MPI applications. Slurm instructs mpirun about number of processes (as defined via sbatch/salloc) and node hostnames for IntelMPI automatically. Do NOT add options like -n <number_of_processes> or any other option defining the number of processes or nodes to mpirun, as this might mess with the automatic affinity settings of the processes.
By default, one process will be started on each allocated CPU in a blockwise fashion, i.e. the first node is filled completely, followed by the second node, etc.. If you want to start fewer processes per node (e.g. because of large memory requirements) you can specify the --ntasks-per-node=XX option to sbatch to define the number of processes per node.
MPI process binding
It is possible to use process binding to specify the placement of the processes on the architecture. This may increase the speed of your application, but also requires advanced knowledge about the system’s architecture. When no options are given, default values are used. This is the recommended setting for most users.
Both srun and mpirun will bind the MPI processes automatically in most cases. Two cases have to be distinguished regarding the binding of processes:
- Full nodes: all available cores are used by a jobstep. In this case, process binding is usually done correctly and automatically by
srunandmpirun - Partially used nodes: some (automatically) allocated cores are not used by a jobstep. In this case, process binding is in some cases not done automatically by srun. In this case, use the option
--cpu-bind=coreswithsrun.
Automatic binding behavior can differ between the type of MPI (IntelMPI vs. OpenMPI), the version of the MPI library, and the Slurm version. The resulting distribution of processes may also differ between srun and mpirun. We strongly recommend checking the process binding of your application regularly, especially after changing versions of any of the used libraries. Incorrect process binding can negatively impact the performance of your application. Use --cpu-bind=verbose for srun, export I_MPI_DEBUG=5 for IntelMPI-mpirun, or --report-bindings for OpenMPI-mpirun.
More information about process binding can be found in the HPC Wiki.
OpenMP
The installed compilers support at least the relevant parts of recent OpenMP standards. The compiler recognizes OpenMP directives if you supply the command line option. Use -fopenmp for GCC and -qopenmp for the Intel compiler. This is also required for the link step.
To run an OpenMP application, the number of threads has to be specified explicitly by setting the environment variable OMP_NUM_THREADS. This is not done automatically via the batch system, since Slurm is not OpenMP-aware. If this is not set, the default variable will be used. In most cases, the default is 1, which means that your code is executed serially. If you want to use for example 12 threads in the parallel regions of your program, you can change the environment variable by export OMP_NUM_THREADS=12.
For correct resource allocation in Slurm, use --cpus-per-task to define the number of OMP threads. If your application does not use OpenMP but other shared-memory parallelization, please consult the application manual on how to specify number of threads.
OpenMP Pinning
To reach optimum performance with OpenMP codes, the correct pinning of the OpenMP threads is essential. As nowadays practically all machines are ccNUMA, where incorrect or no pinning can have devastating effects, this is something that should not be ignored. Slurm will not pin OpenMP threads automatically.
A comfortable way to pin your OpenMP threads to processors is by using likwid-pin, which is available within the likwid module on all clusters. You can start your program run using the following syntax:
likwid-pin -c <cpulist> <executable>
There are various possibilities to specify the CPU list, depending on the hardware setup and the requirements of your application. A short summary is available by calling likwid-pin -h. A more detailed documentation can be found on the Likwid Github page.
An alternative way of pinning is using OpenMP specific methods, e.g. by setting $OMP_PLACES=cores and $OMP_PROC_BIND=spread. More information about this is available in the HPC Wiki.
Libraries
Intel Math Kernel Library (MKL)
The Math Kernel Library provides threaded BLAS, LAPACK, and FFTW routines and some supplementary functions (e.g., random number generators). For distributed-memory parallelization, there is also ScaLAPACK and CDFT (cluster DFT), together with some sparse solver subroutines. It is highly recommended to use MKL for any kind of linear algebra if possible. To facilitate the choice of functions for a specific use case, you can refer for example to the Intel MKL LAPACK function finding advisor.
After loading the mkl module, several shell variables are available that help with compiling and linking programs that use MKL. The installation directory can be found under $MKLROOT, other useful environment variables are available by module show mkl/XX. For most applications, it should be sufficient to compile and link your program with -mkl. For more complex applications, you can find out what libraries are recommended by using the Intel MKL link line advisor.
Many MKL routines are threaded and can run in parallel by setting the OMP_NUM_THREADS shell variable to the desired number of threads. If you do not set OMP_NUM_THREADS, the default number of threads is one. Using OpenMP together with threaded MKL is possible, but the OMP_NUM_THREADS setting will apply to both your code and the MKL routines. If you don’t want this it is possible to force MKL into serial mode by setting the MKL_SERIAL environment variable to YES.
For more in-depth information, please refer to Intel’s online documentation on MKL.