To use the HPC systems at NHR@FAU, you have to log into a cluster frontend via an SSH (SecureShell) client. For all HPC accounts created via the new HPC portal, thus, in particular all NHR project accounts, the use of SSH public key authentication is mandatory and the only way to access the HPC systems as the HPC portal does not store password hashes. Only legacy FAU-HPC accounts can still use password authentication for some transition period.
SSH is a common command-line tool for remotely logging into and executing commands on a different computer over the network. The following topics will be discussed in detail on this page:
- Basic usage
- Graphical applications
- SSH public-key authentication
- SSH agent
- Configure host settings in ~/.ssh/config
- Security recommendations
- Advanced usage
Basic usage
Access to the HPC systems is possible via an SSH (SecureShell) client. Under Linux, Mac and recent Windows 10 versions, a command-line SSH client is pre-installed and available via Terminal/Console/PowerShell. If you want to have a graphical user interface, you can use third-party clients like MobaXterm (Windows). We do not recommend using PuTTY due to limitations in the available SSH configuration.
Connect to a remote host
Direct access to the cluster frontends is restricted to networks within the university. So if you are connected via such a network, or if you are using VPN, you can connect using the following command:
ssh USERNAME@CLUSTERNAME.nhr.fau.de
In this case, USERNAME is your HPC user name and CLUSTERNAME is the name of the cluster you want to log into, e.g. woody, meggie, fritz or alex. If you want to access TinyFat or TinyGPU, you have to connect to tinyx. You will be prompted for your HPC password or your SSH key passphrase if you are using SSH keys. After successful authentication, you have a login shell on the target system.
Accounts created via the new HPC portal (in particular NHR project accounts) do not have passwords, they can only use SSH keys.
If you are outside of the university network and are not using VPN, you have to connect to the dialogserver first :
ssh USERNAME@cshpc.rrze.fau.de
You can then use the above SSH command to connect to the cluster front ends from there.
It is also possible to use the proxy jump functionality of OpenSSH within your SSH config to “jump” over the dialogserver when connecting to the cluster frontends.
Copy data to a remote host
A secure mechanism for copying data to a remote host is also available in all OpenSSH distributions on Linux, Mac, and current Windows 10 versions. When running Windows, you can also use WinSCP or MobaXterm, which has a graphical user interface.
For all command-line based options, the secure copy mechanism is invoked by the following command:
scp <filename> USERNAME@CLUSTERNAME.nhr.fau.de:<remote_directory>
This will copy the local file <filename> to the directory $HOME/<remote_directory> on the remote system. This directory must exist prior to the copy attempt. Keep in mind that nearly all available file systems are mounted on all frontends (see File Systems documentation). It is therefore sufficient to copy data to only one frontend, e.g. cshpc.
For WinSCP, it is possible to choose from different file transfer protocols, mainly scp and sftp. A comparison can be found on the WinSCP website. Especially for large files, scp is usually much faster, however, the transfer cannot be resumed.
For more complex file transfers or a larger amount of files, we recommend using rsync. It provides more extensive functionality than scp, e.g. resuming file transfers, excluding specific files, or checking if files already exist in the destination. It is, however, only available for Linux and Mac.
Graphical applications
We generally do not recommend running graphical applications on the cluster frontends, since they normally consume much more resources and can, therefore, interfere with the work of other users on these shared systems. However, there are some cases where the use of graphical applications is necessary.
For applications that do not need many resources, it should be sufficient to enable X11 forwarding/X11 tunneling by your SSH client via the -X option:
ssh -X USERNAME@CLUSTERNAME.rrze.fau.de
However, this requires an X11-Server running on your local machine, which is generally not available by default on Mac and Windows. In this case, you need to activate X11 tunneling in your client configuration, as well as have an X Window server (e.g. Xming or MobaXTerm for Windows, XQuartz for Mac) running locally.
As an alternative, we recommend using remote desktop software to run graphical applications, e.g. NoMachine NX. A description of how to set up and use NoMachine NX on cshpc is available in the dialogserver description.
SSH public-key authentication
The use of SSH public key authentication is mandatory for all accounts created via the HPC portal (in particular all NHR project accounts).
As an alternative to logging in with your HPC password when you connect to a server via SSH, you can also use public key authentication. It requires a so-called SSH key pair comprised of two matching parts – a public and a private key. The key pair is generated on your local machine. The public key is uploaded to the remote system, whereas the private key remains on your local machine. We recommend generating a separate SSH key pair for every system (workstation, laptop, …) you use for logging into the HPC clusters.
Generating key pairs is possible over the Terminal/Console/PowerShell when your client has OpenSSH capabilities (Linux, Mac, Windows 10). We do not recommend using PuTTY or puttykeygen.exe, since it uses a special key format.
When generating a key pair, you have to choose between different algorithms and key sizes. The recommendations of which one to use are changing over time since also the capabilities to break encryptions increase. Currently, it is advised to use either rsa with a length of 4096 bits, ecdsa with 521 bits or ed25519. Use one of the following commands to generate a key pair:
ssh-keygen -t rsa -b 4096
ssh-keygen -t ecdsa -b 521
ssh-keygen -t ed25519
During the generation process, you will be prompted for a passphrase to encrypt your private key. We don’t recommend leaving this empty since in this case, your private key sitting on your computer as a plain text file. If this unencrypted private key is copied/stolen by someone, they can access the corresponding server directly. In case it is encrypted by a passphrase, the attacker must first find out the passphrase in order to gain access to the server with the key.
By default, the key pair is generated into the folder .ssh in your home directory, with the files id_<algorithm> being your private and id_<algorithm>.pub being your public key. If you want to change the location and name of your key pair, use the following option:
ssh-keygen -f <path_to_keys>/<keyname> -t <algorithm>
The public key must then be copied to the server and added to the authorized_keys file to be used for authentication. How this has to be done depends on the type of account you have:
ssh-copy-id tool:
ssh-copy-id -i ~/.ssh/id_<algorithm>.pub USERNAME@cshpc.rrze.fau.de
If this doesn’t work, you can also manually copy the public key and add it to ~/.ssh/authorized_keys:
cat id_rsa.pub | ssh USERNAME@cshpc.rrze.fau.de 'cat >> ~/.ssh/authorized_keys'
Once the public key has been configured on the server (for HPC portal-based accounts this process can take 2 hours for all HPC systems to get the uploaded SSH public key), the server will allow any connecting user that owns the private key to log in. Since your home directory is shared on all HPC systems at RRZE, it is sufficient to copy the key to only one system, e.g. cshpc. It will be automatically available on all others.
If you have changed the default name of your key pair, you have to explicitly specify that this key should be used for connecting to a specific host. This is possible by using the -i parameter:
ssh -i ~/<path_to_keys>/<keyname> USERNAME@CLUSTERNAME.rrze.fau.de
For frequent usage, this is quite cumbersome. Therefore, it is possible to specify these parameters (and many more) in the ~/.ssh/config file. A detailed description of how to do this is given below.
If you have problems using your key, e.g. when you are asked for your password despite the key, or in case authentication is not working for some other reason, try using the option ssh -v. This will cause SSH to print debugging messages about its progress, which can help locate the issue much easier.
Also check our FAQ entries on SSH.
SSH agent
If you have set a passphrase for your private SSH key, you will be prompted to enter the passphrase every time you use the key to connect to a remote host. To avoid this, you can use an SSH agent. After you have entered your passphrase for the first time, this small tool will store your private key for the duration of your session. This will allow you to connect to a remote host without re-entering your passphrase every time.
If you are using a current Linux distribution with a graphical desktop session (Unity, GNOME,…), an SSH agent will be started automatically in the background. Your private keys will be stored automatically and used when connecting to a remote host.
In case you are not using a graphical desktop session or your SSH agent does not start automatically, you will have to start it manually by typing the following into your local terminal session:
eval "$(ssh-agent -s)"
This will start the agent in the background. To add your private key to the agent, type the following:
ssh-add ~/.ssh/<keyname>
After you have successfully entered your passphrase, you will get a confirmation message that your identity file was successfully added to the agent. This will allow you to use your key to sign in without having to enter the passphrase again in the current terminal session.
You can also list the keys which are currently managed by the SSH agent via:
ssh-add -l
For more information about the SSH agent, type man ssh-add on your terminal.
Configure host settings in ~/.ssh/config
If you are regularly connecting to multiple remote systems over SSH, you’ll find that typing all the remote hostnames, different usernames, identity files, and various other options is quite cumbersome. However, there is a much simpler solution to define shortcuts for different hosts and store SSH settings for each remote machine you connect to.
The client-side configuration file is named config and is located in the .ssh folder in your home directory. If it does not exist, you can create it manually.
The configuration file is organized into different sections for each host. You can use wildcards to match more than one host, and you can also use multiple patterns on the same line. The SSH client reads the configuration file line by line, so later matches can override earlier ones. Because of this, you should put your most general matches at the top of the file.
One simple example to create a shortcut for connection to cshpc is given below. The following is added to ~/.ssh/config:
Host cshpc cshpc.rrze.fau.de
  HostName cshpc.rrze.fau.de
  User USERNAME
  IdentityFile ~/.ssh/private_ssh_key_name
With this configuration, you can now connect via
ssh cshpc
instead of typing
ssh -i ~/.ssh/private_ssh_key_nameUSERNAME@cshpc.rrze.fau.de
A large number of different SSH options are available. Some options which are used more frequently or are especially useful are listed below. You can find a full list by typing man ssh_config in your terminal.
Template for HPC portal and NHR users
HPC portal users, in particular NHR users, can add the following template to their local .ssh/config. It specifies the usage of an SSH (private) key for ssh connections to the Alex and Fritz clusters as well as the dialog server cshpc. Connections to Alex and Fritz are performed by proxy jump through the dialog server cshpc first. This is necessary for external users, who cannot access the cluster frontends directly.
Whenever a connection with ssh or any other application utilizing ssh is made to cshpc.rrze.fau.de, alex.nhr.fau.de, fritz.nhr.fau.de the settings will be applied.
Before usage, the template has to be adjusted for
- your HPC account (
<HPC account>) , as listed in the HPC portal under Your accounts -> Active accounts, not your SSO identity!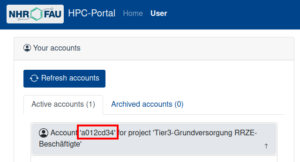
Example of where to find the HPC account in the HPC portal. - path to the private key of the corresponding public key that was added to the HPC portal (
<path to HPC portal SSH private key>)
It can be adjusted further for increased comfort. For example, if you would like to not have to type out fritz.nhr.fau.de every time you connect, you can introduce an shorter alias for that, for example just “fritz”. To do that, replace the line that reads Host fritz.nhr.fau.de with Host fritz.nhr.fau.de fritz.
Template:
Host cshpc.rrze.fau.de
  HostName cshpc.rrze.fau.de
  User <HPC account>
  IdentityFile <path to HPC portal SSH private key>
  IdentitiesOnly yes
  PasswordAuthentication no
  PreferredAuthentications publickey

Host csnhr.nhr.fau.de
  HostName csnhr.nhr.fau.de
  User <HPC account>
  IdentityFile <path to HPC portal SSH private key>
  IdentitiesOnly yes
  PasswordAuthentication no
  PreferredAuthentications publickey

Host fritz.nhr.fau.de
  HostName fritz.nhr.fau.de
  User <HPC account>
  ProxyJump cshpc.rrze.fau.de
  IdentityFile <path to HPC portal SSH private key>
  IdentitiesOnly yes
  PasswordAuthentication no
  PreferredAuthentications publickey

Host alex.nhr.fau.de
  HostName alex.nhr.fau.de
  User <HPC account>
  ProxyJump cshpc.rrze.fau.de
  IdentityFile <path to HPC portal SSH private key>
  IdentitiesOnly yes
  PasswordAuthentication no
  PreferredAuthentications publickey

# Following is not needed for NHR projects, only for "Tier3-Grundversorgung" accounts
Host tinyx.nhr.fau.de
  HostName tinyx.nhr.fau.de
  User <HPC account>
  ProxyJump cshpc.rrze.fau.de
  IdentityFile <path to HPC portal SSH private key>
  IdentitiesOnly yes
  PasswordAuthentication no
  PreferredAuthentications publickey

# Following is not needed for NHR projects, only for "Tier3-Grundversorgung" accounts
Host woody.nhr.fau.de
  HostName woody.nhr.fau.de
  User <HPC account>
  ProxyJump cshpc.rrze.fau.de
  IdentityFile <path to HPC portal SSH private key>
  IdentitiesOnly yes
  PasswordAuthentication no
  PreferredAuthentications publickey

# Following is not needed for NHR projects, only for "Tier3-Grundversorgung" accounts
Host meggie.rrze.fau.de
  HostName meggie.rrze.fau.de
  User <HPC account>
  ProxyJump cshpc.rrze.fau.de
  IdentityFile <path to HPC portal SSH private key>
  IdentitiesOnly yes
  PasswordAuthentication no
  PreferredAuthentications publickey
Description:
Host cshpc.rrze.fau.de |
The hostname to match for. See here. |
HostName cshpc.rrze.fau.de |
The hostname to use for this connection. See here. |
User <HPC account> |
The HPC account to use. Specify the account name as provided by the HPC portal. |
PreferredAuthentication publickey |
For authentication prefer public key. |
PasswordAuthentication no |
Do not use password authentication. |
IdentityFile <path to HPC portal SSH private key> |
Use the specified SSH private key. |
IdentitiesOnly yes |
Use only the specified SSH key, even if, e.g. ssh-agent, could provide more SSH keys. |
ProxyJump cshpc.rrze.fau.de |
For alex.nhr.fau.de, fritz.nhr.fau.de, tinyx.nhr.fau.de, and woody.nhr.fau.de: use proxy jump to connect to cshpc.rrze.fau.de first and from there connect to cluster frontend. |
Security recommendations
In general, it is recommended not to trust systems that are accessible to multiple users or that someone else has root access to, which is true for all HPC systems. Even with best efforts by the administrators to keep the systems safe, it is always possible that attackers are able to gain root rights on the system, which makes them very powerful. An attacker may for example install keyloggers or hijack your running SSH-agent, just to name a few possibilities.
Thus it is often recommended
- not to log in via interactive passwords on untrusted hosts,
- not to use SSH agents on untrusted hosts,
- and not to use SSH agent forwarding to untrusted hosts.
It is generally more secure to use SSH public-private key pairs for authentication when accessing remote systems, as long as these rules are followed:
- Store no private keys on untrusted hosts. Private keys should only be placed on single-user systems (e.g. your laptop).
- Always use SSH private keys with strong passphrases.
- Use only one SSH key pair per system with shared homes.
- Use a separate key pair for every client (laptop, desktop,..).
To make it easier to jump between different systems at RRZE, we recommend generating a separate key for internal use only. This key may also be used for access to external systems (e.g. LRZ).
SSH agent forwarding
SSH agent forwarding is mostly used as a Single-Sign-On solution to connect from one remote host to another (e.g. from cshpc to other cluster frontend or between different cluster frontends). When you enable SSH agent forwarding, the query of the remote server for the private key is redirected to your local client where the SSH-agent is running. This eliminates the need for using password logins and for having private keys on remote machines. However, it is not recommended to use SSH agent forwarding to an untrusted host. Attackers with the ability to bypass file permissions on the remote machine can gain access to the agent on your local machine through the forwarded connection. An attacker cannot obtain key material from the agent, however, they can use the loaded keys to gain access to remote machines with your identity. An alternative to using SSH-agent forwarding is the ProxyJump functionality provided by SSH, which is described below.
X11 forwarding
Similar to SSH agent forwarding, X11 forwarding can be a security risk. If your SSH client is configured to generally allow applications on a remote server to render GUI windows on your screen, this can be exploited by an attacker. It is therefore recommended to specify ForwardX11 no for all hosts in ~/.ssh/config and only use -X on the command line when necessary.
Host keys
SSH host keys are used to verify a server’s identity before you sent any sensitive information like passwords to it. Each server has a unique host key, which is the server’s public key. It can be used by the client to decrypt an authentication message sent from the server when connecting. This makes sure that the remote host you connect to is really the one you intended to connect to, and that your connection is not secretly redirected to another server.
SSH clients automatically store host keys for all hosts they have connected to. These keys are normally stored in ~/.ssh/known_hosts. If the host key of a server you are trying to connect to has changed, you will get a warning message.
When you connect to a server for the first time, you cannot know if the key offered by the server is correct. Therefore, we provide the public system keys for the cluster frontends below, which can be directly added into the ~/.ssh/known_hosts file (you may need to generate the .ssh directory and/or the file if it does not exist yet) on your local machine.
cshpc.rrze.fau.de ssh-rsa AAAAB3NzaC1yc2EAAAABIwAAAIEAs0wFVn1PN3DGcUtd/JHsa6s1DFOAu+Djc1ARQklFSYmxdx5GNQMvS2+SZFFa5Rcw+foAP9Ks46hWLo9mOjTV9AwJdOcSu/YWAhh+TUOLMNowpAEKj1i7L1Iz9M1yrUQsXcqDscwepB9TSSO0pSJAyrbuGMY7cK8m6//2mf7WSxc=
cshpc.rrze.fau.de ssh-ed25519 AAAAC3NzaC1lZDI1NTE5AAAAIPSIFF3lv2wTa2IQqmLZs+5Onz1DEug8krSrWM3aCDRU
cshpc.rrze.fau.de ecdsa-sha2-nistp256 AAAAE2VjZHNhLXNoYTItbmlzdHAyNTYAAAAIbmlzdHAyNTYAAABBBNVzp97t3CxlHtUiJ5ULqc/KLLH+Zw85RhmyZqCGXwxBroT+iK1Quo1jmG6kCgjeIMit9xQAHWjS/rxrlI10GIw=
csnhr.nhr.fau.de ssh-rsa AAAAB3NzaC1yc2EAAAADAQABAAABgQDT11h5EoZ6ai2un4RRxIPDURa6J5KGX79FMNA5RJf82KmHj9rDA70FVIToAVBGcMLS3mHr9226eMFnkiUvD1yk2DsV5iGI0xKMKTclAfBR1DJWrvvVEg9DyZDOhYmc9QgeL+0iALeXEqe2n8zZPsFz+L5vvyVI8O371oXsTQbWY9KEvzc1NsmLECVe1TuER+wcRlVDsL512qmrPzM2UF0gMfTbYkYaKdl6X7saAXjdyPerI9X+YDoPO52haG13h+MbHM8a24+2ewvSSadKK2xxL/+voVEHUHNc+INEYbxgSB83EUyGSd6Zt/T+zJNfbr2NRSkP9kZAy7dt+MPX8xgYKfbFAvAuuXuF/AemCtFIDWoFLIUEiOjvdXp68c6FSODoNYgmBePtWVvu3XaXpPef0PuXlkbG9nw8zCNgDZCB2xIMBfxRN3Euqw1xgJYxxzPOKI1BeWAUuj+iwm784tIxYn0JR3m5BLOTynwShAOS+8mWvIlEO2wim6Tz/D2hoys=
csnhr.nhr.fau.de ssh-ed25519 AAAAC3NzaC1lZDI1NTE5AAAAIC94rFtCF7Ka6Q1glwWRSi8OOMx4mtCEOweNR4D7t5fi
csnhr.nhr.fau.de ecdsa-sha2-nistp256 AAAAE2VjZHNhLXNoYTItbmlzdHAyNTYAAAAIbmlzdHAyNTYAAABBBHJ036qY9DD5kAW62T3pFOGqmRMZF1W5d/YO/sxoxIHpCzHI94y+cSSi+XoZyhnwG74H0IOPtrgxFQwmBxs2y2I=
tinyx.nhr.fau.de ssh-rsa AAAAB3NzaC1yc2EAAAADAQABAAAEAQDeiwzMm9JQ3fnc7AqLkXrlmUOHh5CXh11XF0gQe0wqZx2sER+oumfi+T0M2lWMTBoeMOL74fMal/Bgpq66ETqnodDyVasyD6LwaJwEVIxlss9gcrN1SPa1XaXxgAhpEaR7mTwrNLjM6W5d3+6CMiLvp32lsL4RrQHShjhkXAYrhr3RbApMLwFdb6QZzHa7teN47aMy9s6oubRr4haoeTbfFGRaQjIyguG18nrOcnTlhyPafiHyivL5AE0wLiLCZyqux5Q0GZhIr1uK8smyT1QIIf55A8bRHVvE/QGkcT8lz2w9OnKJKNHUS/UA4MerJIM5V2/IOOdSeDgLnMuJ0usEwawgqNXoqx76X1wuhXA8IqaP4J0vo2OkK7QdyZP7qKP2YMZoDwFmyl73C8xaCw28ovIYGzPmCVLpwtIAQf0uX5xe2yWo9hLPhfP3rTKEKksOVnLKcLNpMLMqxxJHsHbLnmbFn7RdDWQ92JH0nZDAjmUZ2NaHzoPbcz5y1/CCvdURUrNLSosaMqcclq5yZif8uWtUQ8wvIacrMQUFetPTz86dg9ryIrZhxOaYgWzNQVV2ZeED4k5P+QQLkjbvw26htYWxHP7BpTOxIYryQJO/gRMTOnDPP/js49nECn1bW07HDYznhhztGVcjZAgNND8hELHxAmG3WYAsR0/sOMM1ddddM3GbYaCzX++3EE26dvEWpy3J6rHRq9mvGhRG7p8Y2LozlyDXo8wodNNci2/kXTArgeZnU5W15awjl9G5haPcoeNxg467T7bIKGq9JdLkHhqBrqGesrM0ADcDLufgrcT0SIukrc9rSOgVWtYfnXeRWfj7FrjaT15FpWeFSxBXqkQeOrScrPpmbkE7fR5xJYPFDugXQs2FvIjfvW8TsSWaxyt7eLbiFdfa1czGO1S5SOIASIn4/6CuECasvMalSX0JKKLV3Yhs7zXMk3t3wiAHXJ8m+PZB7sY0jhU1UDJIymbvwSzEtrRpbXLkQDhf9XHuG0yNS8dd9u25X6jqoWogPGKoEpQX/2xicebMfJRA3TLWuOM4RtqwAYNVrjsmAfXVmAewvlAtPNFrD0JeKJANVGfa6JFvLfhGHI2UVmdt5vzQzneI/31/+2jNbglcheAfsUO5gPbq3BdToM1bDxJ8hWw3sS2gZ2DZybVz/95rdh9zcj+ciCDMjYypVzgmDROskoAcoVRdKyOE1ZJ3jCOPvJphEPwDSNUBGiYu6LCZdTcwMsepGOvNYbk/c9LIIyczNFh/H46cgekYgVx0i8LwmhJkxCnaK7N15NkMHsK7yInjLqfzKvZQ0z7mfmeXKVgDQVEDxjsdUYq3UUCcbA8muWyuSUtTu3+wSG/v2xhl
tinyx.nhr.fau.de ssh-ed25519 AAAAC3NzaC1lZDI1NTE5AAAAIPC9x4/BNwKQro3+95Gwh4DZpHBT2tVHPjKouwIBOk6g
tinyx.nhr.fau.de ecdsa-sha2-nistp256 AAAAE2VjZHNhLXNoYTItbmlzdHAyNTYAAAAIbmlzdHAyNTYAAABBBL7lrwFFhlZZ7mGBJ3f5gSxDEKcxvebrXLXd/bz0fH6A9Qk2GrJN2tL+sleVPRJHTboOFbdeaJy0igSwivqI2vc
meggie.rrze.fau.de ssh-rsa AAAAB3NzaC1yc2EAAAADAQABAAABgQDWRrk/BTdc6FruAf4cNXEMSaDicyqL5ZU0a8jTPotdZVHOnijItKfo55HYJAAVdF05jiUnaqGx9lxfHnjoVPthxL5R5k0b1UGmrbM9OE2Hzk1ChGLFt0LSKW/piVe3WNNbxK29MqAgAYfxCZNoP5yQnAjed8LyH+i1NB4SebQYMNgjiXkdM/e6MuuckYq5RsjPRVEbw0Ma4G2pY6fp0R3AXZvfGH14ur4K7ZxacXFp9xuH1h24d853A61QMdHT1Ja2znNdSS6HmO3WntG6y7kC8d4p1yyT5cgoljTZY+lA5bSwCCcCegkx7oSUhGR/L5DF6mIb/gPv2/uOvfnGXiv+7ugevd1OZ/fgy+Bh2NM/vmE9jumEVmhLeVymX6dYHwrttClwTPc4QozO0uGsT4Rkvkz81k2KFZo1TsYBtpDaWtpRr6C6u8rP8qMEVH54zCtu7hcPc9uXLjyxq8bJGEUCosk/qwVNKEI3RZ+Dk8OXiuZWhy8tqV40EzzeUn8PcH0=
meggie.rrze.fau.de ecdsa-sha2-nistp256 AAAAE2VjZHNhLXNoYTItbmlzdHAyNTYAAAAIbmlzdHAyNTYAAABBBArwyF9D0l6NX9hU+HmIrzff1gv5+qg4J5UEU+xlrAfBFR4ti/olCRSiK4Tbj/M3f4u7gX/KmNxlJclZxGT95b4=
meggie.rrze.fau.de ssh-ed25519 AAAAC3NzaC1lZDI1NTE5AAAAIMtlqrVtV+m35FSmIbu2ALrPexprRkPR0+sADB6BfwCY
SHA256 Fingerprint as displayed when connecting with SSH for the first time:
| ECDSA | OidKJlJ3KNbXlJpRUiZNoKp8vephfTbhQepA7Zmn8p4 |
| ED25519 | XJS5y5JvFSkKRHWyMz8p6KPaGTuggNIgD/xTr8QZTlI |
| RSA | nyqTfKAAACVUe5hs6RAkpUl963/Hnco4VLmS8kjp1dI |
Note: This key changed on 2022-09-06 due to the OS update/reinstallation of meggie.
Please keep in mind that these keys should not usually change, but they can change every few years, e.g. when we switch to a new major version of the operating system. So if you get a warning while connecting, first check the above keys if they have changed!
Advanced Usage
Proxy Jump
If you want to connect from one host to another without the risks involved by using SSH agent forwarding and without having to type your password each time, the ProxyJump functionality of SSH can be a good alternative. When using ProxyJump, the connection is forwarded through one or more jump hosts to the target destination host via SSH. This is the most secure method because encryption is end-to-end. You can use ProxyJump for example to connect to the meggie cluster frontend by using cshpc as the jump host. This can be achieved via the following additions to ~/.ssh/config:
Host meggie meggie.rrze.fau.de
  HostName meggie.rrze.fau.de
  ProxyJump cshpc.rrze.fau.de
SSH config
There are some options to use in ~/.ssh/config that can simplify your workflow. To see all available options, type man ssh_config in your terminal.
- Instead of defining the same identity file explicitly for every host, you can also define to always use the same key for a specific user:
Match User JohnDoe
  IdentityFile ~/.ssh/private_ssh_key_name
- Specify that only the SSH keys listed in ~/.ssh/config should be tried for authentication. This can avoid a “Too many authentication failures” error, if the SSH agent offers many different keys.
IdentitiesOnly yes - It is possible to use wildcards (*,?,..) in hostnames to reduce the number of explicit entries. For example, it is possible to deny SSH agent and X11 forwarding for all hosts via:
Host *
  ForwardAgent no
  ForwardX11 no
SSHFS
In order to access your data on a remote system, you can mount the remote directory to your local machine and use all your local tools to work on the data. If not installed, you have to install sshfs locally. It uses the FUSE subsystem to mount file systems with user privileges.
A basic mount looks like this:
$ sshfs <user>@<remote_host>:<remote_directory> <local_directory>
In order to unmount it, you call:
$ fusermount -u <local_directory>
It is recommended to use some mount options that help with shaky connections and adaption to the local system:
$ sshfs -o reconnect,ServerAliveInterval=15,ServerAliveCountMax=3,idmap=user,cache=yes <user>@<remote_host>:<remote_directory> <local_directory>
$ sshfs -o noappledouble,noapplexattr,reconnect,ServerAliveInterval=15,ServerAliveCountMax=3,kernel_cache,cache=yes,idmap=user <user>@<remote_host>:<remote_directory> <local_directory>
You can add an alias to your ~/.bashrc for convenience:
alias sshfs="sshfs -o <opts>"