Index
Job monitoring with ClusterCockpit
Introduction
System monitoring of cluster systems is a crucial task for system administrators but there is also the users of these systems are interested in a part of the collected metrics. For users there are also additional metrics of interest like floating-point performance or memory bandwidth. The NHR@FAU provides job-specific monitoring for clusters already for quite some time but with the installation of the Fritz and Alex cluster, the whole system has been re-created. The development is led by NHR@FAU but also other NHR centers are contributing by enhancing or just using (and therefore testing) the framework. The whole stack is called ClusterCockpit and contains multiple components:
- Node agent on each compute node: cc-metric-collector
- In-memory short-term and file-based long-term storage: cc-metric-store
- Webfrontend with authentication for all users: cc-backend
Setup at NHR@FAU
The main point of access for the users is monitoring.nhr.fau.de. For authentication the HPC account is required, not the IDM account.
Integrated clusters:
Scope of user accounts
Users can only see their own jobs in the monitoring.
Different Views
ClusterCockpit provides different views of the systems depending on the scope of your account.
Job list
The job list contains all currently running jobs with job information like requested resources and a limited set of plots that give a first impression of the quality of a job.
If you click on the job id on the left, the job-specific page with more information and plots is shown.
It takes a few minutes after job start that it is shown in the list of running jobs.
User section
In the user section, each user can check the history of the jobs including some statistics.
Tag section
Users can enrich the information of a job with tags, a key/value pair, describing the job. In the tag section, you can select tags and get a list of all jobs with the requested tags.
Reporting problems with ClusterCockpit
If you have problems with the setup at NHR@FAU, please contact the common support hpc-support@fau.de.
For general questions about ClusterCockpit and it’s development, there are two separate matrix chats:
Dr. Jan Eitzinger
Erlangen National High Performance Computing Center
Software & Tools
- Phone number: +49 9131 85-28911
- Email: jan.eitzinger@fau.de
Thomas Gruber
Erlangen National High Performance Computing Center
Software & Tools Division
- Phone number: +49 9131 85-28911
- Email: thomas.gruber@fau.de
Spack package manager
Spack package manager
Some users require special software for their HPC runs which is not provided by the computing center. In order to provide this special software, the HPC systems at NHR@FAU provide the Spack package manager in the module environment under the name user-spack.
The benefits when using Spack:
- Easy to maintain separate versions of the same package
- Separate installations when using different versioned or built dependencies
The benefits also have their downside. You partly have to very specific what to install with which dependencies.
The main Spack documentation (for the latest version) can be found here.
Basics
Load the user-spack module:
$ module avail user-spack
------------------- /apps/modules/data/via-spack -------------------
user-spack/0.18.1
$ module load user-spack
All software will be installed below $WORK/USER-SPACK.
List available compilers
The NHR@FAU team provides some predefined compilers which are mostly available as distinct modules or are part of the base system installation. They are only loosely related to the packages used inside Spack, so the list of compilers does not change when you load a module before.
$ spack compilers
==> Available compilers
-- dpcpp almalinux8-x86_64 --------------------------------------
dpcpp@2022.1.0 dpcpp@2021.4.0

-- gcc almalinux8-x86_64 ----------------------------------------
gcc@12.1.0 gcc@11.2.0 gcc@8.5.0

-- oneapi almalinux8-x86_64 -------------------------------------
oneapi@2022.1.0 oneapi@2021.4.0
List available packages
$ spack list netcdf
==> 7 packages.
netcdf-c netcdf-cxx netcdf-cxx4 netcdf-fortran parallel-netcdf py-h5netcdf py-netcdf4
List installed packages
$ spack find openmpi
==> 4 installed packages
-- linux-almalinux8-zen / gcc@8.4.1 -----------------------------
openmpi@3.1.6

-- linux-almalinux8-zen / intel@2021.4.0 ------------------------
openmpi@3.1.6

-- linux-almalinux8-zen / oneapi@2021.4.0 -----------------------
openmpi@3.1.6

-- linux-centos7-haswell / gcc@4.8.5 ----------------------------
openmpi@4.1.2
Get information about a package
$ spack info numactl
AutotoolsPackage: numactl

Description:
NUMA support for Linux

Homepage: https://github.com/numactl/numactl

Preferred version:
2.0.14 https://github.com/numactl/numactl/archive/v2.0.14.tar.gz

Safe versions:
2.0.14 https://github.com/numactl/numactl/archive/v2.0.14.tar.gz
2.0.12 https://github.com/numactl/numactl/archive/v2.0.12.tar.gz
2.0.11 https://github.com/numactl/numactl/archive/v2.0.11.tar.gz

Deprecated versions:
None

Variants:
None

Build Dependencies:
autoconf automake gnuconfig libtool m4

Link Dependencies:
None

Run Dependencies:
None
Get available versions for a package
$ spack versions kokkos
==> Safe versions (already checksummed):
develop master 3.6.00 3.5.00 3.4.01 3.4.00 3.3.01 3.3.00 3.2.01 3.2.00 3.1.01 3.1.00 3.0.00
==> Remote versions (not yet checksummed):
3.6.01
Install a package
The most complicated part is the specification of the package for installation. Spack uses a special syntax.
See Simple package installation, Custom versions & configurations and Customize dependencies in the Spack docs for more information.
Check what will be installed
$ spack spec libvdwxc
Input spec
--------------------------------
libvdwxc

Concretized
--------------------------------
libvdwxc@0.4.0%gcc@8.5.0+mpi~pfft arch=linux-almalinux8-x86_64
 ^fftw@3.3.10%gcc@8.5.0+mpi~openmp~pfft_patches precision=double,float arch=linux-almalinux8-x86_64
  ^openmpi@3.1.6%gcc@8.5.0~atomics~cuda~cxx~cxx_exceptions~gpfs~internal-hwloc~java+legacylaunchers~lustre~memchecker+pmi+romio+rsh~singularity+static+vt+wrapper-rpath fabrics=psm2 schedulers=slurm arch=linux-almalinux8-x86_64
   ^hwloc@1.11.13%gcc@8.5.0~cairo~cuda~gl~libudev+libxml2~netloc~nvml~opencl+pci~rocm+shared patches=d1d94a4 arch=linux-almalinux8-x86_64
    ^libpciaccess@0.16%gcc@8.5.0 arch=linux-almalinux8-x86_64
     ^libtool@2.4.7%gcc@8.5.0 arch=linux-almalinux8-x86_64
      ^m4@1.4.19%gcc@8.5.0+sigsegv patches=9dc5fbd,bfdffa7 arch=linux-almalinux8-x86_64
       ^libsigsegv@2.13%gcc@8.5.0 arch=linux-almalinux8-x86_64
     ^pkgconf@1.8.0%gcc@8.5.0 arch=linux-almalinux8-x86_64
     ^util-macros@1.19.3%gcc@8.5.0 arch=linux-almalinux8-x86_64
    ^libxml2@2.9.13%gcc@8.5.0~python arch=linux-almalinux8-x86_64
     ^libiconv@1.16%gcc@8.5.0 libs=shared,static arch=linux-almalinux8-x86_64
     ^xz@5.2.5%gcc@8.5.0~pic libs=shared,static arch=linux-almalinux8-x86_64
     ^zlib@1.2.12%gcc@8.5.0+optimize+pic+shared patches=0d38234 arch=linux-almalinux8-x86_64
    ^ncurses@6.2%gcc@8.5.0~symlinks+termlib abi=none arch=linux-almalinux8-x86_64
   ^numactl@2.0.14%gcc@8.5.0 patches=4e1d78c,62fc8a8,ff37630 arch=linux-almalinux8-x86_64
    ^autoconf@2.69%gcc@8.5.0 patches=35c4492,7793209,a49dd5b arch=linux-almalinux8-x86_64
     ^perl@5.34.1%gcc@8.5.0+cpanm+shared+threads arch=linux-almalinux8-x86_64
      ^berkeley-db@18.1.40%gcc@8.5.0+cxx~docs+stl patches=b231fcc arch=linux-almalinux8-x86_64
      ^bzip2@1.0.8%gcc@8.5.0~debug~pic+shared arch=linux-almalinux8-x86_64
       ^diffutils@3.8%gcc@8.5.0 arch=linux-almalinux8-x86_64
      ^gdbm@1.19%gcc@8.5.0 arch=linux-almalinux8-x86_64
       ^readline@8.1%gcc@8.5.0 arch=linux-almalinux8-x86_64
    ^automake@1.16.5%gcc@8.5.0 arch=linux-almalinux8-x86_64
   ^opa-psm2@11.2.206%gcc@8.5.0+avx2 arch=linux-almalinux8-x86_64
   ^openssh@8.0p1%gcc@8.5.0 arch=linux-almalinux8-x86_64
   ^slurm@21.08.3-1%gcc@8.5.0~gtk~hdf5~hwloc~mariadb~pmix+readline~restd sysconfdir=PREFIX/etc arch=linux-almalinux8-x86_64
There you see the whole package tree including the used compilers, the feature flags and the architecture used.
Example from the Spack docs
# Install hdf5 and link it with specific versions of openmpi and hwloc
$ spack install hdf5@1.10.1 %gcc@4.7.3 +debug ^openmpi+cuda fabrics=auto ^hwloc+gl
This installs the hdf5 package in version 1.10.1 with the gcc compiler in version 4.7.3 and enables the debug flag.
As dependencies, it uses openmpi with cuda feature enabled and the fabrics variable set to auto and hwloc with the gl feature enabled.
Downloading sources & packages
On some compute systems, it might be required to use a proxy server for accessing the internet.
$ export http_proxy=http://proxy:80
$ export https_proxy=http://proxy:80
It takes some time
Spack itself is not the fastest piece of software and all operations at the computing centers are on remote file systems. Those file systems commonly don’t like the traffic which happens when building software.
Moreover, Spack installs all dependencies down to the lowest level for each compiler&deps combination. So you might see builds of base packages like zlib, perl, ncurses, etc. The NHR@FAU team tries to provide a basic set of common packages to avoid to many builds of the same dependency over and over again.
Some builds fail
Due to the high flexibility of packages and versions coupled together by Spack and the various compilers, it might be that a build fails. It often helps to add a dependency with ^ compiled with gcc. For the netcdf-fortran package in the next paragraph, the ^numactl@2.0.14%gcc dependency was required otherwise some dependency of OpenMPI failed with missing <numa.h>.
Using an installed package
All installed packages (and installed dependencies) should be visible as modules after installation (see module avail). If not, try unloading the user-spack module and load it again. If it is still not visible, try logging in again in a new session.
$ module load user-spack
$ spack install netcdf-fortran%oneapi@2022.1.0 \
                ^netcdf-c%oneapi@2022.1.0 \
                ^openmpi@4.1.3%oneapi@2022.1.0 \
                ^cmake@3.23.1 \
                ^numactl@2.0.14%gcc
$ module avail netcdf-fortran
------------------- /home/saturn/unrz/unrzXXX/USER-SPACK/share/spack/modules/linux-almalinux8-x86_64 -------------------
netcdf-fortran/4.5.4-oneapi2022.1.0-openmpi-3bmi7ym
You can use the software versions installed through Spack like normal modules. The module files are managed by Spack but it has its own mechanism to setup the proper environment, it does not load the modules corresponding to the environment.
$ module load netcdf-fortran/4.5.4-oneapi2022.1.0-openmpi-3bmi7ym
$ nf-config
The module avail command shows all installed packages, also the base packages like zlib, perl, ncurses, etc. You can load them separately, but you do not need to load them explicitly to use netcdf-fortran (in this case).
$ module avail
------------------- /home/saturn/unrz/unrzXXX/USER-SPACK/share/spack/modules/linux-almalinux8-x86_64 -------------------
autoconf/2.69-gcc8.4.1-g4skt4y libbsd/0.11.3-gcc8.4.1-flcvhjw numactl/2.0.14-gcc12.1.0-elphffx
autoconf/2.69-gcc12.1.0-zp6lni4 libbsd/0.11.5-oneapi2022.1.0-csnexv2 numactl/2.0.14-oneapi2022.1.0-2rlabzl
autoconf/2.69-oneapi2022.1.0-ogngd4o libevent/2.1.12-oneapi2022.1.0-urjh4xz opa-psm2/11.2.206-gcc12.1.0-7aw5fpm
automake/1.16.3-gcc8.4.1-2mgywnr libiconv/1.16-gcc8.4.1-wk2vhbw opari2/2.0.6-gcc8.4.1-4vdn6tg
automake/1.16.5-oneapi2022.1.0-v63ckpi libiconv/1.16-oneapi2022.1.0-caghp63 opari2/2.0.6-intel2021.4.0-34c744c
berkeley-db/18.1.40-gcc8.4.1-egliouh libidn2/2.3.0-gcc8.4.1-rggatlp openmpi/4.1.3-oneapi2022.1.0-44wu2xf
berkeley-db/18.1.40-oneapi2022.1.0-emyiyb2 libidn2/2.3.0-oneapi2022.1.0-tjr7ymg otf2/2.3-gcc8.4.1-rjoiusx
bzip2/1.0.8-gcc8.4.1-ahvvlrw libmd/1.0.3-gcc8.4.1-kqgrzgj otf2/2.3-intel2021.4.0-inao6hn
bzip2/1.0.8-oneapi2022.1.0-md3kfxz libmd/1.0.4-oneapi2022.1.0-zeltuf3 papi/6.0.0.1-gcc8.4.1-pqalrnb
cmake/3.23.1-oneapi2022.1.0-afaxwof libpciaccess/0.16-oneapi2022.1.0-iyi6tbt papi/6.0.0.1-intel2021.4.0-zvpbzqb
[...]
To remove them from the environment, just unload the module
$ module unload netcdf-fortran
What about spack load, spack unload and spack env
These subcommands of Spack are part of a builtin module system. It is currently not usable at the HPC systems of NHR@FAU.
Dr. Thomas Zeiser
Zentrum für Nationales Hochleistungsrechnen Erlangen (NHR@FAU)
c/o Regionales Rechenzentrum Erlangen (RRZE)
- Email: thomas.zeiser@fau.de
Thomas Gruber
Erlangen National High Performance Computing Center
Software & Tools Division
- Phone number: +49 9131 85-28911
- Email: thomas.gruber@fau.de
Continuous Integration / One-way syncing of GitHub to Gitlab repositories
Introduction
In software development, it is crucial to use a version control system (VCS) to manage the code base. The most common VCS nowadays is Git with the well-known providers GitHub and Gitlab. While GitHub has more publicity, Gitlab can be self-hosted. The RRZE provides two Gitlab instances for the university. The NHR@FAU group provides Cx services for these two instances. Some users at the university might have the use case that their main repository is at GitHub while they still want to use the Cx services attached to the Gitlab instances. The NHR@FAU group has this use-case with their software tools like LIKWID (GitHub repository) which requires physical access to the hardware and therefore cannot be tested properly in containerized/virtualized environments.
Why this page?
Although Gitlab can be self-hosted and is open-source, some features are only available with distinct licenses and none of the Gitlab instances at RRZE has such a distinct license (anymore). One of these features was “running Cx for a remote repository” which involved “pull mirroring”. With “pull mirroring”, the Gitlab server integrates with the GitHub repository to pull changes and run Cx locally. The open-source license contains only “push mirroring”. The following page contains an introduction how to do the one-side synchronization of the repositories with only freely usable features.
Situation
What we have
- Original repository at GitHub (like LIKWID)
- A local Gitlab instance with open-source license (like the two Gitlab servers operated by the RRZE [1], [2])
What we need
- One-way synchronization of the original GitHub repository with a repository at a local Gitlab instance
- Run the local CI/CD services
- Return CI/CD results back to original GitHub repository
Naming
In the following we use distinct names for the repositories to make clear where things should be changed:
- GitHub repository: the original GitHub repository and the source for the one-way synchronization.
- Gitlab repository: the duplicate repository of the GitHub repository and the destination of the one-way synchronization.
- Sync repository: The auxiliary repository used for synchronization.
How it is done
1. Import remote GitHub repository to Gitlab, the “Gitlab repository”
Gitlab with all licenses provides a feature called “Import project” which mirrors a remote repository. In order to import projects from GitHub using the GitHub specific importer, you need an GitHub API token. Go to https://github.com/settings/tokens (or Profile → Settings → Developer settings → Personal access tokens) and create a new token with the repo scope. This token is used just for importing, so a short expiration period is enough. Copy the token to Gitlab’s importer and it retrieves the list of accessible repositories from GitHub. Import your repository, it will take some time. You can adjust the settings of the repository already, e.g., enable NHR@FAU Cx services. Moreover, unprotect your main branch in the Gitlab repository at Settings →Repository →Protected branches, if you want to get changes of this branch as well.
2. Set up a separate repository at Gitlab, the “Sync repository”
There are multiple ways to achieve this but the most simple solution is a separate repository at Gitlab which CI/CD pipeline updates the duplicated repository. So create an empty repository and enable CI/CD in the settings.
3. Create a pipeline trigger in the Sync repository
Go to Settings → CI/CD → Pipeline triggers and create a new trigger token. Note down the token. It will present some options how to trigger it. We will use the webhook: https://GIT_SERVER/api/v4/projects/PROJECT_ID/ref/REF_NAME/trigger/pipeline?token=TOKEN. The PROJECT_ID is already filled out commonly but if not Settings → General shows it. The REF_NAME is main by default at Gitlab.
4. Create an access token in the Gitlab repository
There are multiple ways to authenticate, here we use a Project Access Token. You can also use a SSH keypair.
Go to Settings → Access Tokens and create a new token with the write_repository scope. Note down the token.
5. Register the Gitlab repository write token in the Sync repository
Add a CI/CD variable GIT_PUSH_TOKEN with the Project Access Token of the Gitlab repository at Settings → CI/CD → Variables with the masked flag enabled.
6. Create sync CI pipeline in Sync repository
Create a file .gitlab-ci.yml or use the Gitlab pipeline editor:
update-repo:
  script:
    - git clone --mirror https://github.com/GITHUB_ORG/GITHUB_REPO.git
    - cd GITHUB_REPO.git
    - git remote remove origin
    - git push --mirror "https://whatever:${GIT_PUSH_TOKEN}@GITLAB_SERVER/GITLAB_ORG/GITLAB_REPO.git"
First, the source repository is cloned with the --mirror flag and we change into the newly created folder. Afterwards we remove the remote origin because the --mirror option contains: “Newly created local refs will be pushed to the remote end, locally updated refs will be force updated on the remote end, and deleted refs will be removed from the remote end.” (see git push man page) We don’t want to push anything to our origin, the repository at GitHub (https://github.com/GITHUB_ORG/GITHUB_REPO.git). Finally, we push everything to the duplicated Gitlab repository also using the --mirror option and the Gitlab repository write token.
7. Create a webhook in the Github repository
Now we set up everything for the one-way synchronization and as soon as we trigger the pipeline in the Sync repository, all changes should be mirrored from the GitHub repository to the Gitlab repository. Now we use the pipeline trigger created in 3. Go to the GitHub repository’s Settings → Webhooks and create a new one using the pipeline trigger URL. GitHub will trigger the webhook as soon as you press OK. You can check whether it was transmitted successfully by editing it and checking the Recent deliveries tab.
8. Create a status update token in the GitHub repository
In order to send the status of the CI/CD pipeline execution, we need some authentication with GitHub. In the first step, we already created a similar token. Go to the page again but create one with scope repo:status and long expiration period. Note down the token.
Add a CI/CD variable in the Gitlab repository which contains the token like GITHUB_API_TOKEN and enable the masked switch.
9. Send status updates about the CI/CD status of the Gitlab repository
As a last step we want the status of the CI/CD pipeline execution visible in GitHub. GitHub shows a yellow dot when the pipeline is running, so we need something in the beginning of our pipeline. The final status should be transmitted as well. How your pipeline is structured is up to you but here is how I did it. Add two new pipeline stages .prenotify and .postnotify surrounding your current stages:
stages:
  - .prenotify
  - ...
  - .postnotify
Add a single job to the .prenotify stage:
notify-github-pending:
  stage: .prenotify
  when: always
  script:
    - .ci/notify_github.sh pending
For the .postnotify stage we need two separate jobs to the the when: on_success and when: on_failure feature of Gitlab CI/CD:
notify-github-success:
  stage: .postnotify
  when: on_success
  script:
    - .ci/notify_github.sh success
notify-github-failure:
stage: .postnotify
when: on_success
script:
- .ci/notify_github.sh failureThe notify_github.sh script is basically:
- Create JSON file
status.jsonwith fields:statewith one ofpending,success,failureorerrortarget_urlwith an URL to the pipeline, commonly${CI_PIPELINE_URL}(optional)descriptionwith some descriptive string likeCI runs at NHR@FAU systems <status>(optional)contextcan be used to differentiate later if you have multiple CI/CD systems integrated. I usedci/${CI_SERVER_HOST}(optional)
- Send it to GitHub using the token created in 8. Use
${CI_COMMIT_SHA}to update the right commit at GitHub.curl -s -X POST -H "Accept: application/vnd.github+json" \ -H "Authorization: token ${GITHUB_API_TOKEN}" \ https://api.github.com/repos/${GITHUB_ORG}/${GITHUB_REPO}/statuses/${CI_COMMIT_SHA}" \ -d @status.json
#!/bin/bash
GITHUB_ORG="<YOUR_GITHUB_ORG>"
GITHUB_REPO="<YOUR_GITHUB_REPO>"
GITHUB_SHA="${CI_COMMIT_SHA}"
cat << EOF > headers.curl
Accept: application/vnd.github+json
Authorization: token ${GITHUB_API_TOKEN}
EOF
cat << EOF > success.json
{
  "state" : "success",
  "target_url" : "${CI_PIPELINE_URL}",
  "description" : "CI runs at NHR@FAU systems successful"
}
EOF
cat << EOF > failure.json
{
  "state" : "failure",
  "target_url" : "${CI_PIPELINE_URL}",
  "description" : "CI runs at NHR@FAU systems failed"
}
EOF
cat << EOF > pending.json
{
  "state" : "pending",
  "target_url" : "${CI_PIPELINE_URL}",
  "description" : "CI runs at NHR@FAU systems pending"
}
EOF
GITHUB_API_URL="https://api.github.com/repos/${GITHUB_ORG}/${GITHUB_REPO}/statuses/${GITHUB_SHA}"
if [ "$1" == "success" ]; then
curl -s -X POST -H @headers.curl "${GITHUB_API_URL}" -d @success.json
elif [ "$1" == "failure" ]; then
curl -s -X POST -H @headers.curl "${GITHUB_API_URL}" -d @failure.json
elif [ "$1" == "pending" ]; then
  curl -s -X POST -H @headers.curl "${GITHUB_API_URL}" -d @pending.json
fi
Now every time the CI/CD pipeline of the Gitlab repository runs, the status is visible at GitHub. Unfortunately, I didn’t find a way to catch pipeline errors (bad YAML, …) at Gitlab to notify GitHub of the error but you could use the error state if the synchronization fails.
GitHub docs related to commit status updates
What if there are changes pushed to the Gitlab repository directly?
This is one-way synchronization from GitHub to Gitlab. Don’t change anything on the Gitlab side because this probably causes the synchronization to fail! If it happens, delete the duplicated repository at Gitlab, create a new duplication, create the push token and enable CI/CD. Finally, update the token in the Sync repository.
What about syncing multiple repositories?
Often GitHub organizations host multiple repositories, each might require syncing to Gitlab. You can use the Sync repository to sync all of them. Create a branch for each project. Afterwards create a webhook for each branch using the branch name as REF_NAME in the webhook URL. Create a Gitlab repository write token (5.) in each destination register and add them to the CI/CD variables in the Sync repository with distinct names. Update the .gitlab-ci.yml files in the branches with the different source & destination URLs and the variable names.
You could also add all sync jobs to the .gitlab-ci.yml in the main branch and use a single webhook but it is a waste of resources.
In case you want to know
I tried using GitHub Actions that push to a remote repository at Gitlab but independent of the authentication used (token or SSH keypair), the GitHub Action or the Gitlab server did not allow connections (Connection refused).
I cannot use a local GitHub Actions runner because the system where the runner could be executed is located in a private network, so we need some globally accessible server where we can execute the git repository sync.
Thomas Gruber
Erlangen National High Performance Computing Center
Software & Tools Division
- Phone number: +49 9131 85-28911
- Email: thomas.gruber@fau.de
Working with NVIDIA GPUs
NVIDIA compiler and libraries
The CUDA compilers are part of the cuda modules. Loading the appropriate module (e.g. cuda/11.2) will not only sets the path to the Nvidia CUDA compilers but also e.g. CUDA_HOME or CUDA_INSTALL_PATH which might be used in Makefiles, etc.
The Nvidia (formerly PGI) compilers are part of the nvhpc modules.
GPU statistics in job output
Slurm saves the standard output stream by default into a file in the working directory and the filename is automatically compiled from the job name and the job ID. Statistics on GPU utilization are added at the very end of this file. Each CUDA binary call prints a line with information on GPU name, bus ID, process ID, GPU and memory utilization, maximum memory usage and overall execution time.
The output will look like this:
=== GPU utilization ===
gpu_name, gpu_bus_id, pid, gpu_utilization [%], mem_utilization [%], max_memory_usage [MiB], time [ms]
NVIDIA GeForce RTX 3080, 00000000:1A:00.0, 134883, 92 %, 11 %, 395 MiB, 244633 ms
NVIDIA GeForce RTX 3080, 00000000:1A:00.0, 135412, 92 %, 11 %, 395 MiB, 243797 ms
In this example, two CUDA binary calls happened; both were running on the same GPU (00000000:1A:00.0). The average GPU utilization was 92%, 11% of the GPU memory or 395 MiB have been used and each binary run for about 244 seconds.
NVIDIA System Management Interface
The System Management Interface (nvidia-smi) is a command line utility, based on top of the NVIDIA Management Library (NVML), intended to aid in the management and monitoring of NVIDIA GPU devices. nvidia-smi provides monitoring and management capabilities for each of NVIDIA’s Tesla, Quadro, GRID and GeForce devices from Fermi and higher architecture families.
Using nvidia-smi on our clusters
sshto the node where the job runs; if you have multiple jobs running on the same node: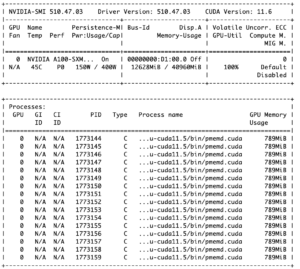
- On Alex: use
srun --jobid=<jobid> --overlap --pty /bin/bashinstead ofsshon the frontend to attach to a specific job - On TinyGPU: you will be placed in the allocation of the job which has most recently started a new jobstep (either by starting the job or by calling srun)
- On Alex: use
- type
nvidia-smito see GPU utilization

The output of nvidia-smi will look similar to the picture on the right. The upper part contains information about the GPU and provides the percentage of GPU utilization in the bottom right cell of the table; the lower part lists the processes that are running on the GPU and shows how much GPU memory is used. The device numbers for GPU jobs always starts with 0 as can be seen in the bottom left cell of the table because each job is treated on its own. Thus, in case you contact us for bug reports or need general help, please include the jobID and the GPU busID from the middle cell of the table to your message.
nvtop: GPU status viewer
Nvtop stands for Neat Videocard TOP, a (h)top like task monitor for AMD and NVIDIA GPUs. It can handle multiple GPUs and print information about them in a htop familiar way. It provides information on the GPU states (GPU and memory utilization, temperature, etc) as well as information about the processes executing on the GPUs. nvtop is available as a module on Alex and TinyGPU.
NVIDIA Multi-Process Service
The Multi-Process Service (MPS) is an alternative, binary-compatible implementation of the CUDA Application Programming Interface (API). The MPS runtime architecture is designed to transparently enable co-operative multi-process CUDA applications, typically MPI jobs. This can benefit performance when the GPU compute capacity is underutilized by a single application process.
Using MPS with single-GPU jobs
# set necessary environment variables and start the MPS daemon
export CUDA_MPS_PIPE_DIRECTORY=$TMPDIR/nvidia-mps.$SLURM_JOB_ID
export CUDA_MPS_LOG_DIRECTORY=$TMPDIR/nvidia-log.$SLURM_JOB_ID
nvidia-cuda-mps-control -d

# do your work (a.out is just a placeholder)
./a.out -param 1 &
./a.out -param 2 &
./a.out -param 3 &
./a.out -param 4 &
wait

# stop the MPS daemon
echo quit | nvidia-cuda-mps-control
Using MPS with multi-GPU jobs
# set necessary environment variables and start the MPS daemon
for GPU in `nvidia-smi --format=csv,noheader --query-gpu=uuid`; do
    echo "starting mps server for $GPU"
    export CUDA_VISIBLE_DEVICES=$GPU
    export CUDA_MPS_PIPE_DIRECTORY=$TMPDIR/nvidia-mps-${GPU}.$SLURM_JOB_ID
    export CUDA_MPS_LOG_DIRECTORY=$TMPDIR/nvidia-log-${GPU}.$SLURM_JOB_ID
    nvidia-cuda-mps-control -d
done
# do your work - you may need to set CUDA_MPS_PIPE_DIRECTORY correctly per process!!
...
# cleanup MPS
for GPU in `nvidia-smi --format=csv,noheader --query-gpu=uuid`; do
    echo "stopping mps server for $GPU"
    export CUDA_MPS_PIPE_DIRECTORY=$TMPDIR/nvidia-mps-${GPU}.$SLURM_JOB_ID
    echo 'quit' | nvidia-cuda-mps-control
done
See also http://cudamusing.blogspot.com/2013/07/enabling-cuda-multi-process-service-mps.html and https://stackoverflow.com/questions/36015005/cuda-mps-servers-fail-to-start-on-workstation-with-multiple-gpus.
GPU-Profiling with NVIDIA tools
NVIDIA offers two prominent profiling tools: Nsight Systems which targets profiling whole applications and Nsight Compute which allows zeroing in on specific performance characteristics of single kernels.
An overview of application behavior can be obtained by running
nsys profile ./a.out
transferring the resulting report file to your local machine and opening it with a local installation of Nsight Systems. More command line options are available, as specified in the documentation. Some of the most relevant ones are
--stats=true --force-overwrite=true -o my-profile
Stats summarizes obtained performance data after the application has finished and prints this summary to the command line. -o specifies the target output file name for the generated report file (my-profile in this example). Force overwrite advises the profiler to overwrite the report file should it already exist.
A full example could be
nsys profile --stats=true --force-overwrite=true -o my-profile ./a.out
Important: The resulting report files can grow quite large, depending on the application examined. Please make sure to use the appropriate file systems.
After getting an execution time overview, more in-depth analysis can be carried out by using Nsight Compute via
ncu ./a.out
which by default profiles all kernels in the application. This can be finetuned by providing options such as
--launch-skip 2 --launch-count 1
to skip the first two kernel launches and limit the number of profiled kernels to 1. Profiling can also be limited to specific kernels using
--kernel-name my_kernel
with an assumed kernel name of my_kernel. In most cases, specifying metrics to be measured is recommended as well, e.g. with
--metrics dram__bytes_read.sum,dram__bytes_write.sum
for the data volumes read and written from and to the GPU’s main memory. Further information on available metrics can be found here and some key metrics are listed here.
Other command line options can be reviewed in the documentation.
A full profiling call could be
ncu --kernel-name my_kernel --launch-skip 2 --launch-count 1 --metrics dram__bytes_read.sum,dram__bytes_write.sum ./a.out
LIKWID
LIKWID is a powerful performance tools and library suite for performance-oriented programmers and administrators using the GNU Linux operating system. For example, likwid-topology can be used to display the thread and cache topology on multicore/multisocket computers, likwid-perfctr is a tool to measure hardware performance counters on recent Intel and AMD processors, and likwid-pin allows you to pin your threaded application without changing your code.
LIKWID 5.0 also supports NVIDIA GPUs. In order to simplify the transition from CPUs to GPUs for the users, the LIKWID API for GPUs is basically a copy of the LIKWID API for CPUs with a few differences. For the command line applications, new CLI options are introduced. A tutorial on how to use LIKWID with NVIDIA GPUs can be found on the LIKWID GitHub page.
Continuous Integration / Gitlab Cx
HPC4FAU and NHR@FAU are happy to provide continuous integration for HPC-related software projects developed on one of the Gitlab instances at RRZE (gitlab.rrze.fau.de or gitos.rrze.fau.de). Access to the Gitlab Runner is restricted. Moreover, every job on the HPC systems has to be associated with an HPC user account.
The Cx jobs run on the Testcluster provided by HPC4FAU and NHR@FAU.
A Hands-On talk on Cx was given at the HPC-Café (October 19, 2021): Slides & Additional Slides
(Note: With the license downgrade of gitlab.rrze.fau.de at June 22, 2022, the pull mirroring feature is disabled. If you need synchronization between external repositories (e.g. GitHub) for CI, see here)
Prerequisites:
- Valid HPC account at HPC4FAU and NHR@FAU (Getting started guide)
- SSH key pair for authentication of the Gitlab Runner. Main information about SSH access is provided here. We recommend creating a separate SSH key pair without passphrase for Gitlab CI only, e.g. by running
ssh-keygen -t ed25519 -f id_ssh_ed25519_gitlab, which generatesid_ssh_ed25519_gitlabandid_ssh_ed25519_gitlab.pub. - Request Cx usage by mail at the HPC user support hpc-support@fau.de with
- your HPC account name
- the URL to the repository
- the public key (like
id_ssh_ed25519_gitlab.pub)
Preparing Gitlab repositories:
- Configure SSH authentification for the HPC Cx service. In the repository go to
Settings -> CI/CD -> Variablesand add two variables:AUTH_USER: The name of your HPC account.AUTH_KEY: The content of the private SSH key file (likeid_ssh_ed25519_gitlab). The key is not shown in the logs but is visible for all maintainers of the project!
- Enable the HPC runner for the repository at
Settings -> CI/CD -> Runnerand flip the switch atEnable shared runners for this project. The HPC Runner has thetestclustertag.
Define jobs using the HPC Cx service
Jobs for CI/CD in Gitlab are defined in the file .gitlab-ci.yml in the top level of the repository. In order to run on the HPC system, the jobs need the tag testcluster. The tag tells the system on which runner the job can be executed.
job:
  tags:
    - testcluster
  [...]
To define where and how the job is run, the following variables are available:
| Variable | Value | Changeable | Description |
SLURM_PARTITION |
work |
NO | Specify the set of nodes which should be used for the job. We currently allow Cx jobs only in the work partition |
SLURM_NODES |
1 |
NO | Only single-node jobs are allowed at the moment. |
SLURM_TIMELIMIT |
120 |
YES (values 1 – 120 allowed) |
Specify the maximal runtime of a job |
SLURM_NODELIST |
phinally |
YES to any hostname in the system, see here | Specify the host for the the job. |
You only need to specify a host in SLURM_NODELIST if you want to test different architecture-specific build options or optimizations.
In order to change one of the settings globally, you can overwrite them globally for all jobs:
SLURM options can be set globally in the variables section to apply to all jobs:
variables:
  SLURM_TIMELIMIT: 60
  SLURM_NODELIST: rome1

job1:
  [...]
  tags:
    - testcluster

job2:
  [...]
  tags:
    - testcluster
The options can also be specified for each job individually. This will overwrite the global settings.
job:
  [...]
  variables:
    SLURM_NODELIST: rome1
  tags:
    - testcluster
The Cx system uses the salloc command to submit the jobs to the batch system. All available environment variables for salloc can be applied here. An example would be SLURM_MAIL_USER to get notified by the system.
If you want to run on the frontend node testfront instead of a compute node, you can specify the variable NO_SLURM_SUBMIT: 1. This is commonly not what you want!
It may happen that your CI job fails if the node is occupied with other jobs for more than 24 hours. In that case, simply restart the CI job.
Examples:
stages:
	- build
	- test

build:
	stage: build
	script:
		- export NUM_CORES=$(nproc --all)
		- mkdir $CI_PROJECT_DIR/build
		- cd $CI_PROJECT_DIR/build
		- cmake ..
		- make -j $NUM_CORES
	tags:
		- testcluster
	artifacts:
		paths:
			- build

test:
	stage: test
	variables:
		SLURM_TIMELIMIT: 30
	script:
		- cd $CI_PROJECT_DIR/build
		- ./test
	tags:
		- testcluster
variables:
	SLURM_CONSTRAINT: "hwperf"

stages:
	- prepare
	- build
	- test

prepare:
	stage: prepare
	script:
		- echo "Preparing on frontend node..."
	variables:
		NO_SLURM_SUBMIT: 1
	tags:
		- testcluster

build:
	stage: build
	script:
		- export NUM_CORES=$(nproc --all)
		- mkdir $CI_PROJECT_DIR/build
		- cd $CI_PROJECT_DIR/build
		- cmake ..
		- make -j $NUM_CORES
	tags:
		- testcluster
	artifacts:
		paths:
			- build

test:
	stage: test
	variables:
		SLURM_TIMELIMIT: 30
	script:
		- cd $CI_PROJECT_DIR/build
		- ./test
	tags:
		- testcluster
variables:
	SLURM_NODELIST: broadep2
	SLURM_TIMELIMIT: 10

stages:
	- build
	- test

build:
	stage: build
	script:
		- export NUM_CORES=$(nproc --all)
		- mkdir $CI_PROJECT_DIR/build
		- cd $CI_PROJECT_DIR/build
		- cmake ..
		- make -j $NUM_CORES
	tags:
		- testcluster
	artifacts:
		paths:
			- build

test:
	stage: test
	variables:
		SLURM_TIMELIMIT: 30
	script:
		- cd $CI_PROJECT_DIR/build
		- ./test
	tags:
		- testcluster
stages:
	- build
	- benchmark

.build:
	stage: build
	script:
		- export NUM_CORES=$(nproc --all)
		- mkdir $CI_PROJECT_DIR/build
		- cd $CI_PROJECT_DIR/build
		- cmake ..
		- make -j $NUM_CORES
	tags:
		- testcluster
	variables:
		SLURM_TIMELIMIT: 10
	artifacts:
		paths:
			- build

.benchmark:
	stage: benchmark
	variables:
		SLURM_TIMELIMIT: 20
	script:
		- cd $CI_PROJECT_DIR/build
		- ./benchmark
	tags:
		- testcluster

# broadep2

build-broadep2:
   extends: .build
   variables:
      SLURM_NODELIST: broadep2

benchmark-broadep2:
   extends: .benchmark
   dependencies:
      - build-broadep2
   variables:
      SLURM_NODELIST: broadep2

# naples1

build-naples1:
   extends: .build
   variables:
      SLURM_NODELIST: naples1

benchmark-naples1:
   extends: .benchmark
   dependencies:
      - build-naples1
   variables:
      SLURM_NODELIST: naples1
In order to create a child pipeline we have to dynamically create a YAML file that is compatible for the Gitlab-CI system. The dynamically created file is only valid for the current Cx execution. The YAML file can be either created by a script that is part of the repository like the .ci/generate_jobs.sh script in the example below. There are different methods to create the YAML file for the child pipeline (multi-line script entry, templated job with variable overrides, …).
$ cat .ci/generate_jobs.sh
#!/bin/bash -l
# Get list of modules
MODLIST=$(module avail -t intel 2>&1 | grep -E "^intel" | awk '{print $1}')
# Alternative: Get list of idle hosts in the testcluster (requires NO_SLURM_SUBMIT=1)
#HOSTLIST=$(sinfo -t idle -h --partition=work -o "%n %t" | grep "idle" | cut -d ' ' -f 1)
for MOD in ${MODLIST}; do
  MODVER=${MOD/\//-}   # replace '/' in module name with '-' for job name
  cat << EOF
build-$MODVER:
  stage: build
  variables:
    CUDA_MODULE: $MOD
  script:
    - module load "\$CUDA_MODULE"
    - make
    - ./run_tests
  tags:
    - testcluster
  EOF
done
With this script, we can generate and execute the child pipeline in the parent configuration. We use NO_SLURM_SUBMIT=1 to generate the pipeline on the frontend node. In some cases, you have to use a specific system (e.g. CUDA modules only usable on the host medusa), then just use the SLURM_NODELIST variable. We store the generated YAML file as artifact in the generator job and include it as trigger in the executor. If you want to use artifacts in the child pipeline that are created in the parent pipeline (like differently configured builds), you have to specify the variable PARENT_PIPELINE_ID=$CI_PIPELINE_ID and specify the pipeline in the child job (job -> needs -> pipeline: $PARENT_PIPELINE_ID).
generate_child_pipeline:
  stage: build
  tags:
    - testcluster
  variables:
    - NO_SLURM_SUBMIT: 1
  script:
   - .ci/generate_jobs.sh > child-pipeline.yml
  artifacts:
    paths:
      - child-pipeline.yml

execute_child_pipeline:
  stage: test
  trigger:
    include:
      - artifact: child-pipeline.yml
        job: generate_child_pipeline
    strategy: depend
  variables:
    PARENT_PIPELINE_ID: $CI_PIPELINE_ID
Disclaimer
Be aware that
- the private SSH key is visible by all maintainers of your project. Best is to have only a single maintainer and all others are developers.
- the CI jobs can access data (
$HOME,$WORK, …) of the CI user. - BIOS and OS settings of Testcluster nodes can change without notification.
Mentors
- T. Gruber, RRZE/NHR@FAU, hpc-support@fau.de
- L. Werner, Chair of Computer Science 10, Chair of System Simulation
- Prof. Dr. Harald Köstler (NHR@FAU and Chair of System Simulation)
Python and Jupyter
Jupyterhub was the topic of the HPC Cafe in October 2020.
You can find our new jupyterhub at https://hub.hpc.fau.de/jupyter/. This new instance also has more GPU resources available.
If you have an HPC account without password, i.e. managed through the new “HPC portal”, use the link provided in the HPC portal in the “External Tools” section on the User tab to access our new Jupyterhub instance.
This page will address some common pitfalls when working with python and related tools on a shared system like a cluster.
The following topics will be discussed in detail on this page:
- Available python versions
- Installing packages
- Conda environment
- Jupyter notebook security
- Installation and usage of mpi4py under Conda
Available python versions
All Unix systems come with a system-wide python installation, however for the cluster it is highly recommended to use one of the anaconda installations provided as a modules.
# reminder
module avail python
module load python/XY
These modules come with a wide range of preinstalled packages.
Installing packages
There are different ways of managing python packages on the cluster. This list is not complete, whoever it highlights methods which are known to work well with the local software stack.
As a general note. It is necessary to build packages using an interactive job on the target cluster to make sure all hardware can be used properly.
As a general note. It is recommended to build packages using an interactive job on the target cluster to make sure all hardware can be used properly.
Make sure to load modules that might be needed by your python code (e.g. CUDA for gpu support)
set if external repositories are needed
export http_proxy=http://proxy:80
export https_proxy=http://proxy:80
Using pip
Pip is a package manager for python. It can be used to easily install packages and manage their versions.
By default pip will try to install packages system wide, which will not be possible due to missing permissions.
The behavior can be changed by adding --user to the call.
pip install --user package-name
or %pip install --user --proxy http://proxy:80 package-name from within Jupiter-notebooks
By defining the variable PYTHONUSERBASE (best done in your bashrc/bash_profile) we change the installation location from ~/.local to a different path. Doing so will prevent your home folder from cluttering with stuff that does not need a backup and hitting the quota.
export PYTHONUSERBASE=$WORK/software/privat
If you intend to share the packages/envs with your coworkers consider wrapping the python package inside a module.
For information on the module system see your HPC-Cafe from March 2020.
Setup and define the target folder with PYTHONUSERBASE.
Install the package as above.
Your module file needs to add to PYTHONPATH the site-packages folder
and to PATH the bin folder, if the package comes with binaries.
For an example see the module quantumtools on woody.
Conda environment
In order to use Conda environments on the HPC cluster some preparation has to be done.
Remember a python module needs to be loaded all the time – see module avail python.
run
conda init bash if you use a different shell replace bash by the shell of your choice
source ~/.bashrc if you use a different shell replace .bashrc.
The process was successful if your prompt starts with (base).
Create a ~/.profile with the content
if [ -n "$BASH_VERSION" ]; then
# include .bashrc if it exists
if [ -f "$HOME/.bashrc" ]; then
. "$HOME/.bashrc"
fi
fi
For batch jobs it might be needed to use source activate <myenv> instead of conda activate <myenv>
Some scientific software comes in the form of a Conda environment (e.g. https://docs.gammapy.org/0.17/install/index.html).
By default such an environment will be installed to ~/.conda. However the size can be several GB, therefore you should configure Conda to a different path. This will prevent your home folder from hitting the quota. It can be done by following these steps:
conda config # create ~/.condarc
Add the following lines to the file (replace the path if you prefer a different location)
pkgs_dirs:
- ${WORK}/software/privat/conda/pkgs
envs_dirs:
- ${WORK}/software/privat/conda/envs
You can check that this configuration file is properly read by inspecting the output of conda info
For more options see https://conda.io/projects/conda/en/latest/user-guide/configuration/use-condarc.html
Conda environments can also be used for package management (and more)
You can share conda environments with co-workers by having them add your environment path to their envs_dir as well.
Create your own environment with
conda create --name myenv (python=3.9)
conda activate myenv
conda/pip install package-name packages will end up within the conda environment therefore no --user option is needed.
Conda environments come with the extra benefit of ease of use; with jupyterhub.rrze.uni-erlangen.de they show up as a kernel option when starting a notebook.
Jupyter notebook security
When using Jupyter notebooks with their default configuration, they are protected by a random hashed password, which in some circumstances can cause security issues on a multi-user system like cshpc or the cluster frontends. We can change this with a few configuration steps by adding a password protection.
First generate a configuration file by executing
jupyter notebook --generate-config
Open a python terminal and generate a password:
from notebook.auth import passwd; passwd()
Add the password hash to your notebook config file
# The string should be of the form type:salt:hashed-password.

c.NotebookApp.password = u''
c.NotebookApp.password_required = True
From now on your notebook will be password protected. This comes with the benefit that you can use bash functions for a more convenient use.
Quick reminder how to use the remote notebook:
#start notebook on a frontend (e.g. woody)
jupyter notebook --no-browser --port=XXXX
On your client, use:
ssh -f user_name@remote_server -L YYYY:localhost:XXXX -N
Open the notebook in your local browser at https://localhost:YYYY
With XXXX and YYYY being 4 digit numbers.
Don’t forget to stop the notebook once you are done. Otherwise you will block resources that could be used by others!
Some useful functions/aliases for lazy people 😉
alias remote_notebook_stop='ssh username@remote_server_ip "pkill -u username jupyter"'
Be aware this will kill all jupyter processes that you own!
start_jp_woody(){

nohup ssh -J username@cshpc.rrze.fau.de -L $1:localhost:$1 username@woody.nhr.fau.de "
. /etc/bash.bashrc.local; module load python/3.7-anaconda ; jupyter notebook --port=$1 --no-browser" ;
echo ""; echo " the notebook can be started in your browser at: https://localhost:$1/ " ; echo ""
}
start_jp_meggie(){

nohup ssh -J username@cshpc.rrze.fau.de -L $1:localhost:$1 username@meggie.rrze.fau.de "
. /etc/profile; module load python/3.7-anaconda ; jupyter notebook --port=$1 --no-browser" ;
echo ""; echo " the notebook can be started in your browser at: https://localhost:$1/ " ; echo ""
}
If you are using a cshell remove . /etc/bash.bashrc.local and . /etc/profile from the functions.
Installation and usage of mpi4py under Conda
Installing mpi4py via pip will install a generic MPI that will not work on our clusters. We recommend separately installing mpi4py for each cluster through the following steps:
- If conda is not already configured and initialized follow the steps documented under Conda environment.
- For more details regarding the installation refer to the official documentation of
mpi4py.
Note: Running MPI parallel Python scripts is only supported on the compute nodes and not on frontend nodes.
Installation
Installation must be performed on the cluster frontend node:
- Load Anaconda module.
- Load MPI module.
- Install
mpi4pyand specify the path to the MPI compiler wrapper:MPICC=$(which mpicc) pip install --no-cache-dir mpi4py
Testing the installation must be performed inside an interactive job:
- Load the Anaconda and MPI module versions
mpi4pywas build with. - Activate environment.
- Run MPI parallel Python script:
srun python -m mpi4py.bench helloworld
This should print for each process a line in the form of:
Hello, World! I am process <rank> of <size> on <hostname>
The number of processes to start is configured through the respective options of
salloc.
Usage
MPI parallel python scripts with mpi4py only work inside a job on a compute node.
In an interactive job or inside a job script run the following steps:
- Load the Anaconda and MPI module versions
mpi4pywas build with. - Initialize/activate environment.
- Run MPI parallel Python script
srun python <script>
The number of processes to start is configured through the respective options in the job script or of
salloc.
For how to request an interactive job via salloc and how to write a job script see batch processing.
SSH – Secure Shell access to HPC systems
To use the HPC systems at NHR@FAU, you have to log into a cluster frontend via an SSH (SecureShell) client. For all HPC accounts created via the new HPC portal, thus, in particular all NHR project accounts, the use of SSH public key authentication is mandatory and the only way to access the HPC systems as the HPC portal does not store password hashes. Only legacy FAU-HPC accounts can still use password authentication for some transition period.
SSH is a common command-line tool for remotely logging into and executing commands on a different computer over the network. The following topics will be discussed in detail on this page:
- Basic usage
- Graphical applications
- SSH public-key authentication
- SSH agent
- Configure host settings in ~/.ssh/config
- Security recommendations
- Advanced usage
Basic usage
Access to the HPC systems is possible via an SSH (SecureShell) client. Under Linux, Mac and recent Windows 10 versions, a command-line SSH client is pre-installed and available via Terminal/Console/PowerShell. If you want to have a graphical user interface, you can use third-party clients like MobaXterm (Windows). We do not recommend using PuTTY due to limitations in the available SSH configuration.
Connect to a remote host
Direct access to the cluster frontends is restricted to networks within the university. So if you are connected via such a network, or if you are using VPN, you can connect using the following command:
ssh USERNAME@CLUSTERNAME.nhr.fau.de
In this case, USERNAME is your HPC user name and CLUSTERNAME is the name of the cluster you want to log into, e.g. woody, meggie, fritz or alex. If you want to access TinyFat or TinyGPU, you have to connect to tinyx. You will be prompted for your HPC password or your SSH key passphrase if you are using SSH keys. After successful authentication, you have a login shell on the target system.
Accounts created via the new HPC portal (in particular NHR project accounts) do not have passwords, they can only use SSH keys.
If you are outside of the university network and are not using VPN, you have to connect to the dialogserver first :
ssh USERNAME@cshpc.rrze.fau.de
You can then use the above SSH command to connect to the cluster front ends from there.
It is also possible to use the proxy jump functionality of OpenSSH within your SSH config to “jump” over the dialogserver when connecting to the cluster frontends.
Copy data to a remote host
A secure mechanism for copying data to a remote host is also available in all OpenSSH distributions on Linux, Mac, and current Windows 10 versions. When running Windows, you can also use WinSCP or MobaXterm, which has a graphical user interface.
For all command-line based options, the secure copy mechanism is invoked by the following command:
scp <filename> USERNAME@CLUSTERNAME.nhr.fau.de:<remote_directory>
This will copy the local file <filename> to the directory $HOME/<remote_directory> on the remote system. This directory must exist prior to the copy attempt. Keep in mind that nearly all available file systems are mounted on all frontends (see File Systems documentation). It is therefore sufficient to copy data to only one frontend, e.g. cshpc.
For WinSCP, it is possible to choose from different file transfer protocols, mainly scp and sftp. A comparison can be found on the WinSCP website. Especially for large files, scp is usually much faster, however, the transfer cannot be resumed.
For more complex file transfers or a larger amount of files, we recommend using rsync. It provides more extensive functionality than scp, e.g. resuming file transfers, excluding specific files, or checking if files already exist in the destination. It is, however, only available for Linux and Mac.
Graphical applications
We generally do not recommend running graphical applications on the cluster frontends, since they normally consume much more resources and can, therefore, interfere with the work of other users on these shared systems. However, there are some cases where the use of graphical applications is necessary.
For applications that do not need many resources, it should be sufficient to enable X11 forwarding/X11 tunneling by your SSH client via the -X option:
ssh -X USERNAME@CLUSTERNAME.rrze.fau.de
However, this requires an X11-Server running on your local machine, which is generally not available by default on Mac and Windows. In this case, you need to activate X11 tunneling in your client configuration, as well as have an X Window server (e.g. Xming or MobaXTerm for Windows, XQuartz for Mac) running locally.
As an alternative, we recommend using remote desktop software to run graphical applications, e.g. NoMachine NX. A description of how to set up and use NoMachine NX on cshpc is available in the dialogserver description.
SSH public-key authentication
The use of SSH public key authentication is mandatory for all accounts created via the HPC portal (in particular all NHR project accounts).
As an alternative to logging in with your HPC password when you connect to a server via SSH, you can also use public key authentication. It requires a so-called SSH key pair comprised of two matching parts – a public and a private key. The key pair is generated on your local machine. The public key is uploaded to the remote system, whereas the private key remains on your local machine. We recommend generating a separate SSH key pair for every system (workstation, laptop, …) you use for logging into the HPC clusters.
Generating key pairs is possible over the Terminal/Console/PowerShell when your client has OpenSSH capabilities (Linux, Mac, Windows 10). We do not recommend using PuTTY or puttykeygen.exe, since it uses a special key format.
When generating a key pair, you have to choose between different algorithms and key sizes. The recommendations of which one to use are changing over time since also the capabilities to break encryptions increase. Currently, it is advised to use either rsa with a length of 4096 bits, ecdsa with 521 bits or ed25519. Use one of the following commands to generate a key pair:
ssh-keygen -t rsa -b 4096
ssh-keygen -t ecdsa -b 521
ssh-keygen -t ed25519
During the generation process, you will be prompted for a passphrase to encrypt your private key. We don’t recommend leaving this empty since in this case, your private key sitting on your computer as a plain text file. If this unencrypted private key is copied/stolen by someone, they can access the corresponding server directly. In case it is encrypted by a passphrase, the attacker must first find out the passphrase in order to gain access to the server with the key.
By default, the key pair is generated into the folder .ssh in your home directory, with the files id_<algorithm> being your private and id_<algorithm>.pub being your public key. If you want to change the location and name of your key pair, use the following option:
ssh-keygen -f <path_to_keys>/<keyname> -t <algorithm>
The public key must then be copied to the server and added to the authorized_keys file to be used for authentication. How this has to be done depends on the type of account you have:
ssh-copy-id tool:
ssh-copy-id -i ~/.ssh/id_<algorithm>.pub USERNAME@cshpc.rrze.fau.de
If this doesn’t work, you can also manually copy the public key and add it to ~/.ssh/authorized_keys:
cat id_rsa.pub | ssh USERNAME@cshpc.rrze.fau.de 'cat >> ~/.ssh/authorized_keys'
Once the public key has been configured on the server (for HPC portal-based accounts this process can take 2 hours for all HPC systems to get the uploaded SSH public key), the server will allow any connecting user that owns the private key to log in. Since your home directory is shared on all HPC systems at RRZE, it is sufficient to copy the key to only one system, e.g. cshpc. It will be automatically available on all others.
If you have changed the default name of your key pair, you have to explicitly specify that this key should be used for connecting to a specific host. This is possible by using the -i parameter:
ssh -i ~/<path_to_keys>/<keyname> USERNAME@CLUSTERNAME.rrze.fau.de
For frequent usage, this is quite cumbersome. Therefore, it is possible to specify these parameters (and many more) in the ~/.ssh/config file. A detailed description of how to do this is given below.
If you have problems using your key, e.g. when you are asked for your password despite the key, or in case authentication is not working for some other reason, try using the option ssh -v. This will cause SSH to print debugging messages about its progress, which can help locate the issue much easier.
Also check our FAQ entries on SSH.
SSH agent
If you have set a passphrase for your private SSH key, you will be prompted to enter the passphrase every time you use the key to connect to a remote host. To avoid this, you can use an SSH agent. After you have entered your passphrase for the first time, this small tool will store your private key for the duration of your session. This will allow you to connect to a remote host without re-entering your passphrase every time.
If you are using a current Linux distribution with a graphical desktop session (Unity, GNOME,…), an SSH agent will be started automatically in the background. Your private keys will be stored automatically and used when connecting to a remote host.
In case you are not using a graphical desktop session or your SSH agent does not start automatically, you will have to start it manually by typing the following into your local terminal session:
eval "$(ssh-agent -s)"
This will start the agent in the background. To add your private key to the agent, type the following:
ssh-add ~/.ssh/<keyname>
After you have successfully entered your passphrase, you will get a confirmation message that your identity file was successfully added to the agent. This will allow you to use your key to sign in without having to enter the passphrase again in the current terminal session.
You can also list the keys which are currently managed by the SSH agent via:
ssh-add -l
For more information about the SSH agent, type man ssh-add on your terminal.
Configure host settings in ~/.ssh/config
If you are regularly connecting to multiple remote systems over SSH, you’ll find that typing all the remote hostnames, different usernames, identity files, and various other options is quite cumbersome. However, there is a much simpler solution to define shortcuts for different hosts and store SSH settings for each remote machine you connect to.
The client-side configuration file is named config and is located in the .ssh folder in your home directory. If it does not exist, you can create it manually.
The configuration file is organized into different sections for each host. You can use wildcards to match more than one host, and you can also use multiple patterns on the same line. The SSH client reads the configuration file line by line, so later matches can override earlier ones. Because of this, you should put your most general matches at the top of the file.
One simple example to create a shortcut for connection to cshpc is given below. The following is added to ~/.ssh/config:
Host cshpc cshpc.rrze.fau.de
  HostName cshpc.rrze.fau.de
  User USERNAME
  IdentityFile ~/.ssh/private_ssh_key_name
With this configuration, you can now connect via
ssh cshpc
instead of typing
ssh -i ~/.ssh/private_ssh_key_nameUSERNAME@cshpc.rrze.fau.de
A large number of different SSH options are available. Some options which are used more frequently or are especially useful are listed below. You can find a full list by typing man ssh_config in your terminal.
Template for HPC portal and NHR users
HPC portal users, in particular NHR users, can add the following template to their local .ssh/config. It specifies the usage of an SSH (private) key for ssh connections to the Alex and Fritz clusters as well as the dialog server cshpc. Connections to Alex and Fritz are performed by proxy jump through the dialog server cshpc first. This is necessary for external users, who cannot access the cluster frontends directly.
Whenever a connection with ssh or any other application utilizing ssh is made to cshpc.rrze.fau.de, alex.nhr.fau.de, fritz.nhr.fau.de the settings will be applied.
Before usage, the template has to be adjusted for
- your HPC account (
<HPC account>) , as listed in the HPC portal under Your accounts -> Active accounts, not your SSO identity!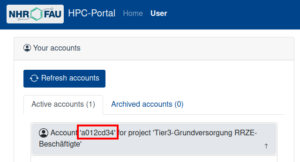
Example of where to find the HPC account in the HPC portal. - path to the private key of the corresponding public key that was added to the HPC portal (
<path to HPC portal SSH private key>)
It can be adjusted further for increased comfort. For example, if you would like to not have to type out fritz.nhr.fau.de every time you connect, you can introduce an shorter alias for that, for example just “fritz”. To do that, replace the line that reads Host fritz.nhr.fau.de with Host fritz.nhr.fau.de fritz.
Template:
Host cshpc.rrze.fau.de
  HostName cshpc.rrze.fau.de
  User <HPC account>
  IdentityFile <path to HPC portal SSH private key>
  IdentitiesOnly yes
  PasswordAuthentication no
  PreferredAuthentications publickey

Host csnhr.nhr.fau.de
  HostName csnhr.nhr.fau.de
  User <HPC account>
  IdentityFile <path to HPC portal SSH private key>
  IdentitiesOnly yes
  PasswordAuthentication no
  PreferredAuthentications publickey

Host fritz.nhr.fau.de
  HostName fritz.nhr.fau.de
  User <HPC account>
  ProxyJump cshpc.rrze.fau.de
  IdentityFile <path to HPC portal SSH private key>
  IdentitiesOnly yes
  PasswordAuthentication no
  PreferredAuthentications publickey

Host alex.nhr.fau.de
  HostName alex.nhr.fau.de
  User <HPC account>
  ProxyJump cshpc.rrze.fau.de
  IdentityFile <path to HPC portal SSH private key>
  IdentitiesOnly yes
  PasswordAuthentication no
  PreferredAuthentications publickey

# Following is not needed for NHR projects, only for "Tier3-Grundversorgung" accounts
Host tinyx.nhr.fau.de
  HostName tinyx.nhr.fau.de
  User <HPC account>
  ProxyJump cshpc.rrze.fau.de
  IdentityFile <path to HPC portal SSH private key>
  IdentitiesOnly yes
  PasswordAuthentication no
  PreferredAuthentications publickey

# Following is not needed for NHR projects, only for "Tier3-Grundversorgung" accounts
Host woody.nhr.fau.de
  HostName woody.nhr.fau.de
  User <HPC account>
  ProxyJump cshpc.rrze.fau.de
  IdentityFile <path to HPC portal SSH private key>
  IdentitiesOnly yes
  PasswordAuthentication no
  PreferredAuthentications publickey

# Following is not needed for NHR projects, only for "Tier3-Grundversorgung" accounts
Host meggie.rrze.fau.de
  HostName meggie.rrze.fau.de
  User <HPC account>
  ProxyJump cshpc.rrze.fau.de
  IdentityFile <path to HPC portal SSH private key>
  IdentitiesOnly yes
  PasswordAuthentication no
  PreferredAuthentications publickey
Description:
Host cshpc.rrze.fau.de |
The hostname to match for. See here. |
HostName cshpc.rrze.fau.de |
The hostname to use for this connection. See here. |
User <HPC account> |
The HPC account to use. Specify the account name as provided by the HPC portal. |
PreferredAuthentication publickey |
For authentication prefer public key. |
PasswordAuthentication no |
Do not use password authentication. |
IdentityFile <path to HPC portal SSH private key> |
Use the specified SSH private key. |
IdentitiesOnly yes |
Use only the specified SSH key, even if, e.g. ssh-agent, could provide more SSH keys. |
ProxyJump cshpc.rrze.fau.de |
For alex.nhr.fau.de, fritz.nhr.fau.de, tinyx.nhr.fau.de, and woody.nhr.fau.de: use proxy jump to connect to cshpc.rrze.fau.de first and from there connect to cluster frontend. |
Security recommendations
In general, it is recommended not to trust systems that are accessible to multiple users or that someone else has root access to, which is true for all HPC systems. Even with best efforts by the administrators to keep the systems safe, it is always possible that attackers are able to gain root rights on the system, which makes them very powerful. An attacker may for example install keyloggers or hijack your running SSH-agent, just to name a few possibilities.
Thus it is often recommended
- not to log in via interactive passwords on untrusted hosts,
- not to use SSH agents on untrusted hosts,
- and not to use SSH agent forwarding to untrusted hosts.
It is generally more secure to use SSH public-private key pairs for authentication when accessing remote systems, as long as these rules are followed:
- Store no private keys on untrusted hosts. Private keys should only be placed on single-user systems (e.g. your laptop).
- Always use SSH private keys with strong passphrases.
- Use only one SSH key pair per system with shared homes.
- Use a separate key pair for every client (laptop, desktop,..).
To make it easier to jump between different systems at RRZE, we recommend generating a separate key for internal use only. This key may also be used for access to external systems (e.g. LRZ).
SSH agent forwarding
SSH agent forwarding is mostly used as a Single-Sign-On solution to connect from one remote host to another (e.g. from cshpc to other cluster frontend or between different cluster frontends). When you enable SSH agent forwarding, the query of the remote server for the private key is redirected to your local client where the SSH-agent is running. This eliminates the need for using password logins and for having private keys on remote machines. However, it is not recommended to use SSH agent forwarding to an untrusted host. Attackers with the ability to bypass file permissions on the remote machine can gain access to the agent on your local machine through the forwarded connection. An attacker cannot obtain key material from the agent, however, they can use the loaded keys to gain access to remote machines with your identity. An alternative to using SSH-agent forwarding is the ProxyJump functionality provided by SSH, which is described below.
X11 forwarding
Similar to SSH agent forwarding, X11 forwarding can be a security risk. If your SSH client is configured to generally allow applications on a remote server to render GUI windows on your screen, this can be exploited by an attacker. It is therefore recommended to specify ForwardX11 no for all hosts in ~/.ssh/config and only use -X on the command line when necessary.
Host keys
SSH host keys are used to verify a server’s identity before you sent any sensitive information like passwords to it. Each server has a unique host key, which is the server’s public key. It can be used by the client to decrypt an authentication message sent from the server when connecting. This makes sure that the remote host you connect to is really the one you intended to connect to, and that your connection is not secretly redirected to another server.
SSH clients automatically store host keys for all hosts they have connected to. These keys are normally stored in ~/.ssh/known_hosts. If the host key of a server you are trying to connect to has changed, you will get a warning message.
When you connect to a server for the first time, you cannot know if the key offered by the server is correct. Therefore, we provide the public system keys for the cluster frontends below, which can be directly added into the ~/.ssh/known_hosts file (you may need to generate the .ssh directory and/or the file if it does not exist yet) on your local machine.
cshpc.rrze.fau.de ssh-rsa AAAAB3NzaC1yc2EAAAABIwAAAIEAs0wFVn1PN3DGcUtd/JHsa6s1DFOAu+Djc1ARQklFSYmxdx5GNQMvS2+SZFFa5Rcw+foAP9Ks46hWLo9mOjTV9AwJdOcSu/YWAhh+TUOLMNowpAEKj1i7L1Iz9M1yrUQsXcqDscwepB9TSSO0pSJAyrbuGMY7cK8m6//2mf7WSxc=
cshpc.rrze.fau.de ssh-ed25519 AAAAC3NzaC1lZDI1NTE5AAAAIPSIFF3lv2wTa2IQqmLZs+5Onz1DEug8krSrWM3aCDRU
cshpc.rrze.fau.de ecdsa-sha2-nistp256 AAAAE2VjZHNhLXNoYTItbmlzdHAyNTYAAAAIbmlzdHAyNTYAAABBBNVzp97t3CxlHtUiJ5ULqc/KLLH+Zw85RhmyZqCGXwxBroT+iK1Quo1jmG6kCgjeIMit9xQAHWjS/rxrlI10GIw=
csnhr.nhr.fau.de ssh-rsa AAAAB3NzaC1yc2EAAAADAQABAAABgQDT11h5EoZ6ai2un4RRxIPDURa6J5KGX79FMNA5RJf82KmHj9rDA70FVIToAVBGcMLS3mHr9226eMFnkiUvD1yk2DsV5iGI0xKMKTclAfBR1DJWrvvVEg9DyZDOhYmc9QgeL+0iALeXEqe2n8zZPsFz+L5vvyVI8O371oXsTQbWY9KEvzc1NsmLECVe1TuER+wcRlVDsL512qmrPzM2UF0gMfTbYkYaKdl6X7saAXjdyPerI9X+YDoPO52haG13h+MbHM8a24+2ewvSSadKK2xxL/+voVEHUHNc+INEYbxgSB83EUyGSd6Zt/T+zJNfbr2NRSkP9kZAy7dt+MPX8xgYKfbFAvAuuXuF/AemCtFIDWoFLIUEiOjvdXp68c6FSODoNYgmBePtWVvu3XaXpPef0PuXlkbG9nw8zCNgDZCB2xIMBfxRN3Euqw1xgJYxxzPOKI1BeWAUuj+iwm784tIxYn0JR3m5BLOTynwShAOS+8mWvIlEO2wim6Tz/D2hoys=
csnhr.nhr.fau.de ssh-ed25519 AAAAC3NzaC1lZDI1NTE5AAAAIC94rFtCF7Ka6Q1glwWRSi8OOMx4mtCEOweNR4D7t5fi
csnhr.nhr.fau.de ecdsa-sha2-nistp256 AAAAE2VjZHNhLXNoYTItbmlzdHAyNTYAAAAIbmlzdHAyNTYAAABBBHJ036qY9DD5kAW62T3pFOGqmRMZF1W5d/YO/sxoxIHpCzHI94y+cSSi+XoZyhnwG74H0IOPtrgxFQwmBxs2y2I=
tinyx.nhr.fau.de ssh-rsa AAAAB3NzaC1yc2EAAAADAQABAAAEAQDeiwzMm9JQ3fnc7AqLkXrlmUOHh5CXh11XF0gQe0wqZx2sER+oumfi+T0M2lWMTBoeMOL74fMal/Bgpq66ETqnodDyVasyD6LwaJwEVIxlss9gcrN1SPa1XaXxgAhpEaR7mTwrNLjM6W5d3+6CMiLvp32lsL4RrQHShjhkXAYrhr3RbApMLwFdb6QZzHa7teN47aMy9s6oubRr4haoeTbfFGRaQjIyguG18nrOcnTlhyPafiHyivL5AE0wLiLCZyqux5Q0GZhIr1uK8smyT1QIIf55A8bRHVvE/QGkcT8lz2w9OnKJKNHUS/UA4MerJIM5V2/IOOdSeDgLnMuJ0usEwawgqNXoqx76X1wuhXA8IqaP4J0vo2OkK7QdyZP7qKP2YMZoDwFmyl73C8xaCw28ovIYGzPmCVLpwtIAQf0uX5xe2yWo9hLPhfP3rTKEKksOVnLKcLNpMLMqxxJHsHbLnmbFn7RdDWQ92JH0nZDAjmUZ2NaHzoPbcz5y1/CCvdURUrNLSosaMqcclq5yZif8uWtUQ8wvIacrMQUFetPTz86dg9ryIrZhxOaYgWzNQVV2ZeED4k5P+QQLkjbvw26htYWxHP7BpTOxIYryQJO/gRMTOnDPP/js49nECn1bW07HDYznhhztGVcjZAgNND8hELHxAmG3WYAsR0/sOMM1ddddM3GbYaCzX++3EE26dvEWpy3J6rHRq9mvGhRG7p8Y2LozlyDXo8wodNNci2/kXTArgeZnU5W15awjl9G5haPcoeNxg467T7bIKGq9JdLkHhqBrqGesrM0ADcDLufgrcT0SIukrc9rSOgVWtYfnXeRWfj7FrjaT15FpWeFSxBXqkQeOrScrPpmbkE7fR5xJYPFDugXQs2FvIjfvW8TsSWaxyt7eLbiFdfa1czGO1S5SOIASIn4/6CuECasvMalSX0JKKLV3Yhs7zXMk3t3wiAHXJ8m+PZB7sY0jhU1UDJIymbvwSzEtrRpbXLkQDhf9XHuG0yNS8dd9u25X6jqoWogPGKoEpQX/2xicebMfJRA3TLWuOM4RtqwAYNVrjsmAfXVmAewvlAtPNFrD0JeKJANVGfa6JFvLfhGHI2UVmdt5vzQzneI/31/+2jNbglcheAfsUO5gPbq3BdToM1bDxJ8hWw3sS2gZ2DZybVz/95rdh9zcj+ciCDMjYypVzgmDROskoAcoVRdKyOE1ZJ3jCOPvJphEPwDSNUBGiYu6LCZdTcwMsepGOvNYbk/c9LIIyczNFh/H46cgekYgVx0i8LwmhJkxCnaK7N15NkMHsK7yInjLqfzKvZQ0z7mfmeXKVgDQVEDxjsdUYq3UUCcbA8muWyuSUtTu3+wSG/v2xhl
tinyx.nhr.fau.de ssh-ed25519 AAAAC3NzaC1lZDI1NTE5AAAAIPC9x4/BNwKQro3+95Gwh4DZpHBT2tVHPjKouwIBOk6g
tinyx.nhr.fau.de ecdsa-sha2-nistp256 AAAAE2VjZHNhLXNoYTItbmlzdHAyNTYAAAAIbmlzdHAyNTYAAABBBL7lrwFFhlZZ7mGBJ3f5gSxDEKcxvebrXLXd/bz0fH6A9Qk2GrJN2tL+sleVPRJHTboOFbdeaJy0igSwivqI2vc
meggie.rrze.fau.de ssh-rsa AAAAB3NzaC1yc2EAAAADAQABAAABgQDWRrk/BTdc6FruAf4cNXEMSaDicyqL5ZU0a8jTPotdZVHOnijItKfo55HYJAAVdF05jiUnaqGx9lxfHnjoVPthxL5R5k0b1UGmrbM9OE2Hzk1ChGLFt0LSKW/piVe3WNNbxK29MqAgAYfxCZNoP5yQnAjed8LyH+i1NB4SebQYMNgjiXkdM/e6MuuckYq5RsjPRVEbw0Ma4G2pY6fp0R3AXZvfGH14ur4K7ZxacXFp9xuH1h24d853A61QMdHT1Ja2znNdSS6HmO3WntG6y7kC8d4p1yyT5cgoljTZY+lA5bSwCCcCegkx7oSUhGR/L5DF6mIb/gPv2/uOvfnGXiv+7ugevd1OZ/fgy+Bh2NM/vmE9jumEVmhLeVymX6dYHwrttClwTPc4QozO0uGsT4Rkvkz81k2KFZo1TsYBtpDaWtpRr6C6u8rP8qMEVH54zCtu7hcPc9uXLjyxq8bJGEUCosk/qwVNKEI3RZ+Dk8OXiuZWhy8tqV40EzzeUn8PcH0=
meggie.rrze.fau.de ecdsa-sha2-nistp256 AAAAE2VjZHNhLXNoYTItbmlzdHAyNTYAAAAIbmlzdHAyNTYAAABBBArwyF9D0l6NX9hU+HmIrzff1gv5+qg4J5UEU+xlrAfBFR4ti/olCRSiK4Tbj/M3f4u7gX/KmNxlJclZxGT95b4=
meggie.rrze.fau.de ssh-ed25519 AAAAC3NzaC1lZDI1NTE5AAAAIMtlqrVtV+m35FSmIbu2ALrPexprRkPR0+sADB6BfwCY
SHA256 Fingerprint as displayed when connecting with SSH for the first time:
| ECDSA | OidKJlJ3KNbXlJpRUiZNoKp8vephfTbhQepA7Zmn8p4 |
| ED25519 | XJS5y5JvFSkKRHWyMz8p6KPaGTuggNIgD/xTr8QZTlI |
| RSA | nyqTfKAAACVUe5hs6RAkpUl963/Hnco4VLmS8kjp1dI |
Note: This key changed on 2022-09-06 due to the OS update/reinstallation of meggie.
Please keep in mind that these keys should not usually change, but they can change every few years, e.g. when we switch to a new major version of the operating system. So if you get a warning while connecting, first check the above keys if they have changed!
Advanced Usage
Proxy Jump
If you want to connect from one host to another without the risks involved by using SSH agent forwarding and without having to type your password each time, the ProxyJump functionality of SSH can be a good alternative. When using ProxyJump, the connection is forwarded through one or more jump hosts to the target destination host via SSH. This is the most secure method because encryption is end-to-end. You can use ProxyJump for example to connect to the meggie cluster frontend by using cshpc as the jump host. This can be achieved via the following additions to ~/.ssh/config:
Host meggie meggie.rrze.fau.de
  HostName meggie.rrze.fau.de
  ProxyJump cshpc.rrze.fau.de
SSH config
There are some options to use in ~/.ssh/config that can simplify your workflow. To see all available options, type man ssh_config in your terminal.
- Instead of defining the same identity file explicitly for every host, you can also define to always use the same key for a specific user:
Match User JohnDoe
  IdentityFile ~/.ssh/private_ssh_key_name
- Specify that only the SSH keys listed in ~/.ssh/config should be tried for authentication. This can avoid a “Too many authentication failures” error, if the SSH agent offers many different keys.
IdentitiesOnly yes - It is possible to use wildcards (*,?,..) in hostnames to reduce the number of explicit entries. For example, it is possible to deny SSH agent and X11 forwarding for all hosts via:
Host *
  ForwardAgent no
  ForwardX11 no
SSHFS
In order to access your data on a remote system, you can mount the remote directory to your local machine and use all your local tools to work on the data. If not installed, you have to install sshfs locally. It uses the FUSE subsystem to mount file systems with user privileges.
A basic mount looks like this:
$ sshfs <user>@<remote_host>:<remote_directory> <local_directory>
In order to unmount it, you call:
$ fusermount -u <local_directory>
It is recommended to use some mount options that help with shaky connections and adaption to the local system:
$ sshfs -o reconnect,ServerAliveInterval=15,ServerAliveCountMax=3,idmap=user,cache=yes <user>@<remote_host>:<remote_directory> <local_directory>
$ sshfs -o noappledouble,noapplexattr,reconnect,ServerAliveInterval=15,ServerAliveCountMax=3,kernel_cache,cache=yes,idmap=user <user>@<remote_host>:<remote_directory> <local_directory>
You can add an alias to your ~/.bashrc for convenience:
alias sshfs="sshfs -o <opts>"
OpenFOAM
OpenFOAM (for “Open-source Field Operation And Manipulation”) is a C++ toolbox for the development of customized numerical solvers, and pre-/post-processing utilities for the solution of continuum mechanics problems, most prominently including computational fluid dynamics (CFD). It contains solvers for a wide range of problems, from simple laminar regimes to DNS or LES including reactive turbulent flows. It provides a framework for manipulating fields and solving general partial differential equations on unstructured grids based on finite volume methods. Therefore, it is suitable for complex geometries and a wide range of configurations and applications.
There are three main variants of OpenFOAM that are released as free and open-source software under a GPLv3 license: ESI OpenFOAM, The OpenFOAM Foundation, Foam Extend.
Availability / Target HPC systems
We provide modules for some major OpenFOAM versions, which were mostly requested by specific groups or users. If you have a request for a new version, please contact hpc-support@fau.de. Please note that we will only provide modules for fully released versions, which will be used by more than one user. If you need some specific custom configuration or version, please consider building it yourself. Installation guides are available from the respective OpenFOAM distributors.
The installed versions of OpenFOAM may differ between the different HPC clusters. You can check the available versions via module avail openfoam.
Production jobs should be run on the parallel HPC systems in batch mode. It is NOT permitted to run computationally intensive OpenFOAM simulation runs or serial/parallel post-processing sessions with large memory consumption on login nodes.
Notes
- OpenFOAM produces per default lots of small files – for each processor, every step, and for each field. The parallel file system ($FASTTMP) is not made for such a finely grained file/folder structure. For more recent versions of OpenFOAM, you can use collated I/O, which produces somewhat less problematic output.
- Paraview is used for post-processing and is also available via the modules system on the HPC cluster. However, keep an eye on the main memory requirements for this visualization, especially on the frontends!
Sample job scripts
All job scripts have to contain the following information:
- Resource definition for the queuing system (more details here)
- Load OpenFOAM environment module
- Start command for parallel execution of solver of choice
For meggie/Slurm batch system: mpirun takes the parameters (nodes, tasks-per-node) that you specified in the header of your batch file. You don’t have to specify this again in your mpirun call (see also MPI on meggie). In order that this works correctly, the total number of MPI tasks (nodes times tasks-per-node) must be equal to numberOfSubdomains inside system/decomposeParDict!
[/collapse]
#!/bin/bash -l #SBATCH --job-name=my-job-name #SBATCH --nodes=4 #SBATCH --tasks-per-node=20 # for 20 physical cores on meggie #SBATCH --time=24:00:00 #SBATCH --export=NONE# load environment module module load openfoam/XXXX
unset SLURM_EXPORT_ENV
# Please insert here your preferred solver executable! mpirun icoFoam -parallel -fileHandler collated > logfile
Further information
- Tutorials and guides can be found in the official OpenFOAM.com documentation or the OpenFOAM.org User Guide.
Mentors
- please volunteer!
ANSYS CFX
ANSYS CFX is a general purpose Computational Fluid Dynamics (CFD) code. It provides a wide variety of physical models for turbulent flows, acoustics, Eulerian and Lagrangian multiphase flow modeling, radiation, combustion and chemical reactions, heat and mass transfer including CHT (conjugate heat transfer in solid domains). It is mostly used for simulating turbomachinery, such as pumps, fans, compressors and gas and hydraulic turbines.
Please note that the clusters do not come with any license. If you want to use ANSYS products on the HPC clusters, you have to have access to suitable licenses. These can be purchased directly from RRZE. To efficiently use the HPC resources, ANSYS HPC licenses are necessary.
Availability / Target HPC systems
Different versions of all ANSYS products are available via the modules system, which can be listed by module avail ansys. A special version can be loaded, e.g. by module load ansys/2020R1.
We mostly install the current versions automatically, but if something is missing, please contact hpc-support@fau.de.
Production jobs should be run on the parallel HPC systems in batch mode.
ANSYS CFX can also be used in interactive GUI mode for serial pre- and/or post-processing on the login nodes (Linux: SSH Option “-X”; Windows: using PuTTY and XMing for X11-forwarding). This should only be used to make quick simulation setup changes. It is NOT permitted to run computationally intensive ANSYS CFX simulation runs or serial/parallel post-processing sessions with large memory consumption on login nodes.
Alternatively, ANSYS CFX can be run interactively with GUI on TinyFat (for large main memory requirements) or on a compute node.
Getting started
The (graphical) CFX launcher is started by typing
cfx5launch
on the command line. If you want to use the separate pre- or postprocessing capabilities, you can also launch cfx5pre or cfx5post, respectively.
For running simulations in batch mode on the HPC systems, use the
cfx5solve
command. You can find out the available parameters via cfx5solve -help. One example call to use in your batch script would be
cfx5solve -batch -par-dist $NODELIST -double -def <solver input file>
The number of processes and the hostnames of the compute nodes to be used are defined in $NODELIST. For how to compile this list, refer to the example script below. Using SMT threads is not recommended.
Notes
- We recommend writing automatic backup files (every 6 to 12 hours) for longer runs to be able to restart the simulation in case of a job or machine failure. This can be specified in Output Control → User Interface → Backup Tab
- Furthermore, it is recommended to use the “Elapsed Wall Clock Time Control” in the job definition in ANSYS CFX Pre (Solver Control → Elapsed Wall Clock Time Control → Maximum Run Time → <24h). Also plan enough buffer time for writing the final output, depending on your application, this can take quite a long time!
- Please note that the default (Intel) MPI startup mechanism is not working for versions below 2023R2. This will lead to the solver hanging without producing any output. Use the option
-start-method "Open MPI Distributed Parallel"to prevent this.
Sample job scripts
All job scripts have to contain the following information:
- Resource definition for the queuing system (more details here)
- Load ANSYS environment module
- Generate a file with names of hosts of the current simulation run to tell CFX on which nodes it should run (see example below)
- Execute
cfx5solvewith appropriate command line parameters (available options viacfx5solve -help)
#!/bin/bash -l
#SBATCH --job-name=mycfx
#SBATCH --nodes=4
#SBATCH --time=24:00:00
#SBATCH --export=NONE

unset SLURM_EXPORT_ENV
# specify the name of your input-def file
DEFFILE="example.def"
# number of cores to use per node
PPN=20
# load environment module
module load ansys/XXXX
# generate node list
NODELIST=$(for node in $( scontrol show hostnames $SLURM_JOB_NODELIST | uniq ); do echo -n "${node}*$PPN,"; done | sed 's/,$//')
# execute cfx with command line parameters (see cfx5solve -help for all available parameters)
 cfx5solve -batch -double -par-dist "$NODELIST" -def "$DEFFILE" -start-method "Open MPI Distributed Parallel"
#!/bin/bash -l
#SBATCH --job-name=mycfx
#SBATCH --nodes=4
#SBATCH --time=24:00:00
#SBATCH --export=NONE

unset SLURM_EXPORT_ENV
# specify the name of your input-def file
DEFFILE="example.def"
# number of cores to use per node
PPN=72
# load environment module
module load ansys/2023R2
# generate node list
NODELIST=$(for node in $( scontrol show hostnames $SLURM_JOB_NODELIST | uniq ); do echo -n "${node}*$PPN,"; done | sed 's/,$//')
# execute cfx with command line parameters (see cfx5solve -help for all available parameters)
 cfx5solve -batch -double -par-dist "$NODELIST" -def "$DEFFILE"
Further information
- Documentation is available within the application help manual. Further information is provided through the ANSYS Customer Portal for registered users.
- More in-depth documentation is available at LRZ. Please note: not everything is directly applicable to HPC systems at RRZE!
Mentors
- Dr.-Ing. Katrin Nusser, RRZE, hpc-support@fau.de
- please volunteer!
Tensorflow and PyTorch
TensorFlow is an Open Source Machine Learning Framework.
Security issue of TensorBoard on multi-user systems
It is not recommended for security reasons to run TensorBoard on a multi-user system. ThensorBoard does not come with any means of access control and anyone with access to the multi-user system can attach to your TensorBoard port and act as you! (It might only need some effort to find the port if you do not use the default port.) There is nothing NHR@FAU can do to mitigate these security issues. Even the hint --host localhost in https://github.com/tensorflow/tensorboard/issues/260#issuecomment-471737166 does not help on a multi-user system. The suggestion from https://github.com/tensorflow/tensorboard/issues/267#issuecomment-671820015 does not help either on a multi-user system.
We patched the preinstalled TensorBoard version on Alex according to https://github.com/tensorflow/tensorboard/pull/5570 using a hash will be enforced.
However, we recommend using TensorBoard on your local machine with the HPC-filesystem mounted (e.g. sshfs).
Availability / Target HPC systems
TensorFlow and PyTorch currently are not installed on any of RRZE’s HPC systems as new versions are very frequently released and all groups have their own special needs.
The following HPC systems are best suited:
- TinyGPU or Alex
- Woody for CPU-only runs
As a general note. It is necessary to build packages using an interactive job on the target cluster to make sure all hardware can be used properly.
Notes
Different routes can be taken to get your private installation of TensorFlow or PyTorch. Don’t waste valuable storage in $HOME and use $WORK instead for storing your installation.
#reminder make sure your dependancies are loaded and you are running the installation in an interactive job
module avail python
module load python/XY
module load cuda
module load cudnn
Official Docker images are regularly published on https://hub.docker.com/r/tensorflow/tensorflow and https://hub.docker.com/r/pytorch/pytorch/. These images can be used with Singularity on our HPC systems. Run the following steps on the woody frontend to pull your image:
cd $WORK
export SINGULARITY_CACHEDIR=$(mktemp -d)
singularity pull tensorflow-2.1.0-gpu-py3.sif docker://tensorflow/tensorflow:2.1.0-gpu-py3
rm -rf $SINGULARITY_CACHEDIR
Within your job script, you use the container as follows. /home/* and /apps/ are automatically bind-mounted into the container. On TinyGPU, GPU device libraries are also automatically bind-mounted into the container.
./tensorflow-2.1.0-gpu-py3.sif ./script.py
cd $WORK
export SINGULARITY_CACHEDIR=$(mktemp -d)
singularity pull tensorflow-ngc-20.03-tf2-py3.sif docker://nvcr.io/nvidia/tensorflow:20.03-tf2-py3
rm -rf $SINGULARITY_CACHEDIR
Within your job script, you use the container as follows. /home/* and /apps/ are automatically bind-mounted into the container. On TinyGPU, GPU device libraries are also automatically bind-mounted into the container.
./tensorflow-ngc-20.03-tf2-py3.sif script.py
When manually installing TensorFlow or PyTorch (into a Python VirtualEnv) using pip, remember to load a python module first! The system python will not be sufficient.
A simple pip install tensorflow will not work! You need to install cudatoolkit cudnn first to get GPU support.
PyTorch provides some help for the pip install command see https://pytorch.org/get-started/locally/. Select stable linux pip python cuda-$version, where $version is the CUDA module version you previously loaded from modules.
Anaconda also comes with TensorFlow packages in conda-forge. Either load one of the python modules and install the additional packages into one of your directories or start with your private (mini)conda installation from scratch! The system python will not be sufficient.
To convince the login node (which does not have a GPU) to install the GPU version of TensorFlow using conda, temporarily setting the environment variable CONDA_OVERRIDE_CUDA may be necessary, cf. https://conda-forge.org/blog/posts/2021-11-03-tensorflow-gpu/
PyTorch provides some help for the conda install command see https://pytorch.org/get-started/locally/. Select stable linux pip python cuda-$version, where $version is the CUDA module version you previously loaded from modules.
To check that your TensorFlow is functional and detects the hardware, you can use the following simple python sequence:
python -c "import tensorflow as tf; print(tf.config.list_physical_devices('GPU'))"To check that your PyTorch is functional and detects the hardware, you can use the following simple lines on your bash:
python -c 'import torch; print(torch.rand(2,3).cuda())'Further information
- https://www.tensorflow.org/
- https://github.com/tensorflow/tensorflow
- https://ngc.nvidia.com/catalog/containers/nvidia:tensorflow
Mentors
- please volunteer!
- Prof. Harald Köstler (NHR/LSS)